編輯:關於Android編程
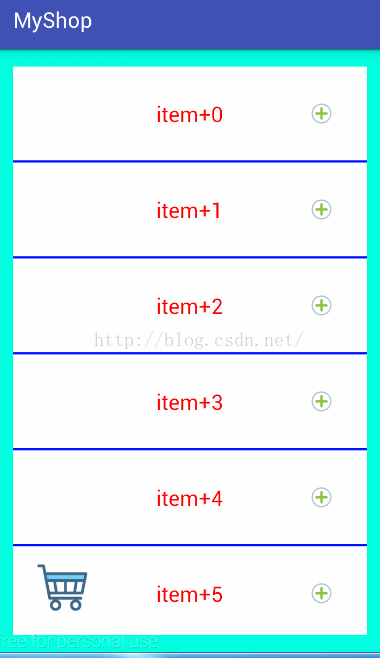
當我們寫商城類的項目的時候,一般都會有加入購物車的功能,加入購物車的時候會有一些拋物線動畫,具體代碼如下:
實現效果如圖:
思路:
難點:
PathMeasure的使用
- getLength()
- boolean getPosTan(float distance, float[] pos, float[] tan) 的理解
涉及到的知識點:
如何獲取控件在屏幕中的絕對坐標
//得到父布局的起始點坐標(用於輔助計算動畫開始/結束時的點的坐標)
  int[] parentLocation = new int[2];
  rl.getLocationInWindow(parentLocation);
如何使用貝塞爾曲線以及屬性動畫插值器ValueAnimator
 //    四、計算中間動畫的插值坐標(貝塞爾曲線)(其實就是用貝塞爾曲線來完成起終點的過程)
    //開始繪制貝塞爾曲線
    Path path = new Path();
    //移動到起始點(貝塞爾曲線的起點)
    path.moveTo(startX, startY);
    //使用二次薩貝爾曲線:注意第一個起始坐標越大,貝塞爾曲線的橫向距離就會越大,一般按照下面的式子取即可
    path.quadTo((startX + toX) / 2, startY, toX, toY);
    //mPathMeasure用來計算貝塞爾曲線的曲線長度和貝塞爾曲線中間插值的坐標,
    // 如果是true,path會形成一個閉環
    mPathMeasure = new PathMeasure(path, false);

    //★★★屬性動畫實現(從0到貝塞爾曲線的長度之間進行插值計算,獲取中間過程的距離值)
    ValueAnimator valueAnimator = ValueAnimator.ofFloat(0, mPathMeasure.getLength());
    valueAnimator.setDuration(1000);
    // 勻速線性插值器
    valueAnimator.setInterpolator(new LinearInterpolator());
    valueAnimator.addUpdateListener(new ValueAnimator.AnimatorUpdateListener() {
      @Override
      public void onAnimationUpdate(ValueAnimator animation) {
        // 當插值計算進行時,獲取中間的每個值,
        // 這裡這個值是中間過程中的曲線長度(下面根據這個值來得出中間點的坐標值)
        float value = (Float) animation.getAnimatedValue();
        // ★★★★★獲取當前點坐標封裝到mCurrentPosition
        // boolean getPosTan(float distance, float[] pos, float[] tan) :
        // 傳入一個距離distance(0<=distance<=getLength()),然後會計算當前距
        // 離的坐標點和切線,pos會自動填充上坐標,這個方法很重要。
        mPathMeasure.getPosTan(value, mCurrentPosition, null);//mCurrentPosition此時就是中間距離點的坐標值
        // 移動的商品圖片(動畫圖片)的坐標設置為該中間點的坐標
        goods.setTranslationX(mCurrentPosition[0]);
        goods.setTranslationY(mCurrentPosition[1]);
      }
    });
//   五、 開始執行動畫
    valueAnimator.start();
所有代碼:
package cn.c.com.beziercurveanimater;

import android.animation.Animator;
import android.animation.ValueAnimator;
import android.graphics.Bitmap;
import android.graphics.BitmapFactory;
import android.graphics.Path;
import android.graphics.PathMeasure;
import android.os.Bundle;
import android.support.v7.app.AppCompatActivity;
import android.support.v7.widget.LinearLayoutManager;
import android.support.v7.widget.RecyclerView;
import android.view.LayoutInflater;
import android.view.View;
import android.view.ViewGroup;
import android.view.animation.LinearInterpolator;
import android.widget.ImageView;
import android.widget.RelativeLayout;
import android.widget.TextView;

import java.util.ArrayList;

public class MainActivity extends AppCompatActivity {

  private RecyclerView mRecyclerView;
  private ImageView cart;
  private ArrayList<Bitmap> bitmapList = new ArrayList<>();
  private RelativeLayout rl;
  private PathMeasure mPathMeasure;
  /**
   * 貝塞爾曲線中間過程的點的坐標
   */
  private float[] mCurrentPosition = new float[2];
  private TextView count;
  private int i = 0;

  @Override
  protected void onCreate(Bundle savedInstanceState) {
    super.onCreate(savedInstanceState);
    setContentView(R.layout.activity_main);
    initView();
    initImg();
    MyAdapter myAdapter = new MyAdapter(bitmapList);
    mRecyclerView.setAdapter(myAdapter);
    mRecyclerView.setLayoutManager(new LinearLayoutManager(MainActivity.this));
  }

  private void initImg() {
    bitmapList.add(BitmapFactory.decodeResource(getResources(), R.drawable.coin));
    bitmapList.add(BitmapFactory.decodeResource(getResources(), R.drawable.coin1));
    bitmapList.add(BitmapFactory.decodeResource(getResources(), R.drawable.coin91));
  }

  private void initView() {
    mRecyclerView = (RecyclerView) findViewById(R.id.recyclerView);
    cart = (ImageView) findViewById(R.id.cart);
    rl = (RelativeLayout) findViewById(R.id.rl);
    count = (TextView) findViewById(R.id.count);
  }

  class MyAdapter extends RecyclerView.Adapter<MyVH> {
    private ArrayList<Bitmap> bitmapList;

    public MyAdapter(ArrayList<Bitmap> bitmapList) {
      this.bitmapList = bitmapList;
    }

    @Override
    public MyVH onCreateViewHolder(ViewGroup parent, int viewType) {
      LayoutInflater inflater = LayoutInflater.from(MainActivity.this);
      View itemView = inflater.inflate(R.layout.item, parent, false);
      MyVH myVH = new MyVH(itemView);
      return myVH;
    }

    @Override
    public void onBindViewHolder(final MyVH holder, final int position) {
      holder.iv.setImageBitmap(bitmapList.get(position));
      holder.buy.setOnClickListener(new View.OnClickListener() {
        @Override
        public void onClick(View v) {
          addCart(holder.iv);
        }
      });
    }

    @Override
    public int getItemCount() {
      return bitmapList.size();
    }
  }

  /**
   * ★★★★★把商品添加到購物車的動畫效果★★★★★
   * @param iv
   */
  private void addCart( ImageView iv) {
//   一、創造出執行動畫的主題---imageview
    //代碼new一個imageview,圖片資源是上面的imageview的圖片
    // (這個圖片就是執行動畫的圖片,從開始位置出發,經過一個拋物線(貝塞爾曲線),移動到購物車裡)
    final ImageView goods = new ImageView(MainActivity.this);
    goods.setImageDrawable(iv.getDrawable());
    RelativeLayout.LayoutParams params = new RelativeLayout.LayoutParams(100, 100);
    rl.addView(goods, params);

//    二、計算動畫開始/結束點的坐標的准備工作
    //得到父布局的起始點坐標(用於輔助計算動畫開始/結束時的點的坐標)
    int[] parentLocation = new int[2];
    rl.getLocationInWindow(parentLocation);

    //得到商品圖片的坐標(用於計算動畫開始的坐標)
    int startLoc[] = new int[2];
    iv.getLocationInWindow(startLoc);

    //得到購物車圖片的坐標(用於計算動畫結束後的坐標)
    int endLoc[] = new int[2];
    cart.getLocationInWindow(endLoc);


//    三、正式開始計算動畫開始/結束的坐標
    //開始掉落的商品的起始點:商品起始點-父布局起始點+該商品圖片的一半
    float startX = startLoc[0] - parentLocation[0] + iv.getWidth() / 2;
    float startY = startLoc[1] - parentLocation[1] + iv.getHeight() / 2;

    //商品掉落後的終點坐標:購物車起始點-父布局起始點+購物車圖片的1/5
    float toX = endLoc[0] - parentLocation[0] + cart.getWidth() / 5;
    float toY = endLoc[1] - parentLocation[1];

//    四、計算中間動畫的插值坐標(貝塞爾曲線)(其實就是用貝塞爾曲線來完成起終點的過程)
    //開始繪制貝塞爾曲線
    Path path = new Path();
    //移動到起始點(貝塞爾曲線的起點)
    path.moveTo(startX, startY);
    //使用二次薩貝爾曲線:注意第一個起始坐標越大,貝塞爾曲線的橫向距離就會越大,一般按照下面的式子取即可
    path.quadTo((startX + toX) / 2, startY, toX, toY);
    //mPathMeasure用來計算貝塞爾曲線的曲線長度和貝塞爾曲線中間插值的坐標,
    // 如果是true,path會形成一個閉環
    mPathMeasure = new PathMeasure(path, false);

    //★★★屬性動畫實現(從0到貝塞爾曲線的長度之間進行插值計算,獲取中間過程的距離值)
    ValueAnimator valueAnimator = ValueAnimator.ofFloat(0, mPathMeasure.getLength());
    valueAnimator.setDuration(1000);
    // 勻速線性插值器
    valueAnimator.setInterpolator(new LinearInterpolator());
    valueAnimator.addUpdateListener(new ValueAnimator.AnimatorUpdateListener() {
      @Override
      public void onAnimationUpdate(ValueAnimator animation) {
        // 當插值計算進行時,獲取中間的每個值,
        // 這裡這個值是中間過程中的曲線長度(下面根據這個值來得出中間點的坐標值)
        float value = (Float) animation.getAnimatedValue();
        // ★★★★★獲取當前點坐標封裝到mCurrentPosition
        // boolean getPosTan(float distance, float[] pos, float[] tan) :
        // 傳入一個距離distance(0<=distance<=getLength()),然後會計算當前距
        // 離的坐標點和切線,pos會自動填充上坐標,這個方法很重要。
        mPathMeasure.getPosTan(value, mCurrentPosition, null);//mCurrentPosition此時就是中間距離點的坐標值
        // 移動的商品圖片(動畫圖片)的坐標設置為該中間點的坐標
        goods.setTranslationX(mCurrentPosition[0]);
        goods.setTranslationY(mCurrentPosition[1]);
      }
    });
//   五、 開始執行動畫
    valueAnimator.start();

//   六、動畫結束後的處理
    valueAnimator.addListener(new Animator.AnimatorListener() {
      @Override
      public void onAnimationStart(Animator animation) {

      }

      //當動畫結束後:
      @Override
      public void onAnimationEnd(Animator animation) {
        // 購物車的數量加1
        i++;
        count.setText(String.valueOf(i));
        // 把移動的圖片imageview從父布局裡移除
        rl.removeView(goods);
      }

      @Override
      public void onAnimationCancel(Animator animation) {

      }

      @Override
      public void onAnimationRepeat(Animator animation) {

      }
    });
  }


  class MyVH extends RecyclerView.ViewHolder {

    private ImageView iv;
    private TextView buy;

    public MyVH(View itemView) {
      super(itemView);
      iv = (ImageView) itemView.findViewById(R.id.iv);
      buy = (TextView) itemView.findViewById(R.id.buy);
    }
  }


}
以上就是本文的全部內容,希望對大家的學習有所幫助,也希望大家多多支持本站。
 紅米3指紋高配版和標准版有什麼區別 紅米3高配版配置升級
紅米3指紋高配版和標准版有什麼區別?小米手機旗下的紅米系列:紅米3升級版已發布,這款紅米3高配版配置升級的同時,配備了指紋識別,當然價錢也稍微比標准版提升了
 Android基礎學習—下載並在Eclipse中關聯Android源碼
1.下載源碼 這部分網上有大量的資料,我就不重新寫了,這是我參考的文章:《Windows平台下Android源碼的下載》 一般來說,跟著上面文章的講解操作
 android自定義View原理分析
自定義view一.View的MeasureSpec1.MeasureSpec包SpecMode和SpecSize。其中SpecMode包括UNSPECIFIED:父容器不
 Android對話框(二)ProgressDialog
main.xml custom_dialog.xml package com.example.p
 Universal-Image-Loader,android-Volley,Picasso、Fresco和Glide圖片緩存庫的聯系與區別
前言Universal-Image-Loader,android-Vol