編輯:關於Android編程
Android Widget開發案例實現是本文要介紹的內容,主要是來了解並學習Android Widget開發應用,今天我們要寫一下Android Widget的開發,由於快點凌晨,我就不說的太具體了,同志們就模仿吧!
首先繼續了解下App Widget框架的主要的類:
AppWidgetProvider:繼承自BroadcastReceiver,在App Widget應用update,enable,disable和deleted時接受通知。其中onUpdate,onReceive是最常用到的方法。
AppWidgetProviderInfo:描述AppWidget的大小,更新頻率和初始界面等信息,以xml文件的形式存在於應用中的res/xml目錄下。
AppWidgetManager:負責管理AppWidget,向AppWidgetProvider發送通知。
RemoteViews:一個可以在其他應用進程中運行的類,是構造AppWidget的核心。
下面開始代碼的編寫,首先在res/xml下建立myappwidetprovider.xml
<?xml version="1.0" encoding="utf-8"?>
<appwidget-provider xmlns:android="http://schemas.android.com/apk/res/android"
  android:minWidth="100dp"
  android:minHeight="72dp"
  android:updatePeriodMillis="86400000"
  android:initialLayout="@layout/myappwidget"
  >
</appwidget-provider>
上面分別是 定義widget的寬度,高度,更新周期,以及layout的widget布局。
下面是我們的布局文件:
 <?xml version="1.0" encoding="utf-8"?>
<LinearLayout xmlns:android="http://schemas.android.com/apk/res/android"
  android:layout_width="match_parent"
  android:layout_height="match_parent"
  android:background="@drawable/widget_bg1"
  android:gravity="center"
  android:id="@+id/layout"
  android:orientation="vertical" >

  <TextView
    android:id="@+id/txtMonth"
    android:layout_width="wrap_content"
    android:layout_height="wrap_content"
    android:textColor="#000000"
    android:layout_margin="2dp"
    android:text="" />
<TextView
    android:id="@+id/txtDay"
    android:layout_width="wrap_content"
    android:layout_height="wrap_content"
    android:textColor="#990033"
    android:textSize="25dp"
    android:text="" />
<TextView
    android:id="@+id/txtWeekDay"
    android:layout_width="wrap_content"
    android:layout_height="wrap_content"
    android:layout_margin="2dp"
    android:textColor="#000000"
    android:text="" />
</LinearLayout>
對應布局widget要求比較高,大家自行設計,更加美觀的界面。
接下來是我們的核心代碼ExampleAppWidgetProvider類了:
 import android.app.PendingIntent;
import android.appwidget.AppWidgetManager;
import android.appwidget.AppWidgetProvider;
import android.content.Context;
import android.content.Intent;
import android.text.format.Time;
import android.widget.RemoteViews;
import android.widget.Toast;

public class ExampleAppWidgetProvider extends AppWidgetProvider{
  private String[] months={"一月","二月","三月","四月","五月","六月","七月","八月","九月","十月","十一月","十二月"};
  private String[] days={"星期日","星期一","星期二","星期三","星期四","星期五","星期六"};
  @Override
  public void onUpdate(Context context, AppWidgetManager appWidgetManager,
      int[] appWidgetIds) {
    // TODO Auto-generated method stub

    RemoteViews remoteViews=new RemoteViews(context.getPackageName(), R.layout.myappwidget);
    Time time=new Time();
    time.setToNow();
    String month=time.year+" "+months[time.month];
    remoteViews.setTextViewText(R.id.txtDay, new Integer(time.monthDay).toString());
    remoteViews.setTextViewText(R.id.txtMonth, month);
    remoteViews.setTextViewText(R.id.txtWeekDay, days[time.weekDay]);
    Intent intent=new Intent("cn.com.karl.widget.click");
    PendingIntent pendingIntent=PendingIntent.getBroadcast(context, 0, intent, 0);
    remoteViews.setOnClickPendingIntent(R.id.layout, pendingIntent);
    appWidgetManager.updateAppWidget(appWidgetIds, remoteViews);

    super.onUpdate(context, appWidgetManager, appWidgetIds);
  }

  @Override
  public void onReceive(Context context, Intent intent) {
    // TODO Auto-generated method stub
    super.onReceive(context, intent);
    if(intent.getAction().equals("cn.com.karl.widget.click")){
      Toast.makeText(context, "點擊了widget日歷", 1).show();
    }
  }
}
上面代碼忘記做注釋了,在這類分別解釋下,使用remoteViews類分別加載上來布局文件的相應ID設置好值,然PendingIntent 這就沒什麼好解釋的了。
最後在manifest中加入:
 <receiver android:name="ExampleAppWidgetProvider" >
      <intent-filter >
        <action android:name="android.appwidget.action.APPWIDGET_UPDATE" />
        <action android:name="cn.com.karl.widget.click" >
        </action>
      </intent-filter>

      <meta-data
        android:name="android.appwidget.provider"
        android:resource="@xml/myappwidetprovider" />
    </receiver>
這樣就完成了,運行項目看一下載手機上運行的效果吧:

上面就是我們自己定義的AppWidget顯示效果,點擊它:
這裡為了表示點擊了它,使用了Toast打印信息,當然我們也可以點擊它之後啟動相應的Activity。
以上就是本文的全部內容,希望對大家的學習有所幫助,也希望大家多多支持本站。
 Android 自定義雙向滑動SeekBar
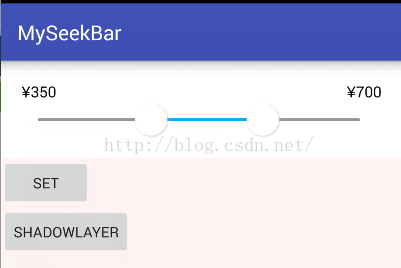
Android 自定義雙向滑動SeekBar ,一些需要價格區間選擇的App可能需要用到1. 自定義MySeekBar 繼承 View,先給一張效果圖。2.原理:自定義a
 Android項目開發之UI設計器
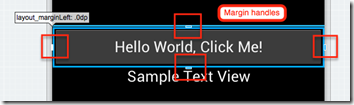
開發人員可以用以下兩種方式聲明UI:一是通過.xml文件(不帶預覽界面)或者.axml文件(帶預覽界面)來描述;二是用C#代碼實現。 用.axml文件描述用戶界
 Android 動畫系列之屬性(Property)動畫詳解
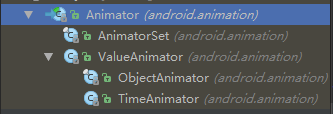
前言今天有時間來繼續寫寫屬性動畫。簡介眾所周知,屬性動畫是Android3.0版本開始的,一個東西的推出肯定是有它的道理的,那為什麼前面已經有逐幀和補間動畫了還要推出屬性
 Android開發筆記之:AsyncTask的應用詳解
AsyncTask的介紹及基本使用方法關於AsyncTask的介紹和基本使用方法可以參考官方文檔和《Android開發筆記之:深入理解多線程AsyncTask》這裡就不重