編輯:關於Android編程
網上介紹Android上http通信的文章很多,不過大部分只給出了實現代碼的片段,一些注意事項和如何設計一個合理的類用來處理所有的http請求以及返回結果,一般都不會提及。因此,自己對此做了些總結,給出了我的一個解決方案。
首先,需要明確一下http通信流程,Android目前提供兩種http通信方式,HttpURLConnection和HttpClient,HttpURLConnection多用於發送或接收流式數據,因此比較適合上傳/下載文件,HttpClient相對來講更大更全能,但是速度相對也要慢一點。在此只介紹HttpClient的通信流程:
1.創建HttpClient對象,改對象可以用來多次發送不同的http請求
2.創建HttpPost或HttpGet對象,設置參數,每發送一次http請求,都需要這樣一個對象
3.利用HttpClient的execute方法發送請求並等待結果,該方法會一直阻塞當前線程,直到返回結果或拋出異常。
4.針對結果和異常做相應處理
根據上述流程,發現在設計類的時候,有幾點需要考慮到:
1.HttpClient對象可以重復使用,因此可以作為類的靜態變量
2.HttpPost/HttpGet對象一般無法重復使用(如果你每次請求的參數都差不多,也可以重復使用),因此可以創建一個方法用來初始化,同時設置一些需要上傳到服務器的資源
3.目前Android不再支持在UI線程中發起Http請求,實際上也不該這麼做,因為這樣會阻塞UI線程。因此還需要一個子線程,用來發起Http請求,即執行execute方法
4.不同的請求對應不同的返回結果,對於如何處理返回結果(一般來說都是解析json&更新UI),需要有一定的自由度。
5.最簡單的方法是,每次需要發送http請求時,開一個子線程用於發送請求,子線程中接收到結果或拋出異常時,根據情況給UI線程發送message,最後在UI線程的handler的handleMessage方法中做結果解析和UI更新。這麼寫雖然簡單,但是UI線程和Http請求的耦合度很高,而且代碼比較散亂、丑陋。
基於上述幾點原因,我設計了一個PostRequest類,用於滿足我的http通信需求。我只用到了Post請求,如果你需要Get請求,也可以改寫成GetRequest
package com.handspeaker.network;

import java.io.IOException;
import java.io.UnsupportedEncodingException;
import java.net.URI;
import java.net.URISyntaxException;
import java.util.concurrent.ExecutorService;
import java.util.concurrent.Executors;

import org.apache.http.HttpResponse;
import org.apache.http.client.ClientProtocolException;
import org.apache.http.client.HttpClient;
import org.apache.http.client.methods.HttpPost;
import org.apache.http.entity.StringEntity;
import org.apache.http.impl.client.DefaultHttpClient;
import org.apache.http.params.HttpConnectionParams;
import org.apache.http.params.HttpParams;
import org.apache.http.protocol.HTTP;
import org.apache.http.util.EntityUtils;
import org.json.JSONObject;

import android.app.Activity;
import android.content.Context;
import android.net.ConnectivityManager;
import android.os.Handler;
import android.util.Log;

/**
 *
 * 用於封裝&簡化http通信
 *
 */
public class PostRequest implements Runnable {

  private static final int NO_SERVER_ERROR=1000;
  //服務器地址
  public static final String URL = "fill your own url";
  //一些請求類型
  public final static String ADD = "/add";
  public final static String UPDATE = "/update";
  public final static String PING = "/ping";
  //一些參數
  private static int connectionTimeout = 60000;
  private static int socketTimeout = 60000;
  //類靜態變量
  private static HttpClient httpClient=new DefaultHttpClient();
  private static ExecutorService executorService=Executors.newCachedThreadPool();
  private static Handler handler = new Handler();
  //變量
  private String strResult;
  private HttpPost httpPost;
  private HttpResponse httpResponse;
  private OnReceiveDataListener onReceiveDataListener;
  private int statusCode;

  /**
   * 構造函數,初始化一些可以重復使用的變量
   */
  public PostRequest() {
    strResult = null;
    httpResponse = null;
    httpPost = new HttpPost();
  }

  /**
   * 注冊接收數據監聽器
   * @param listener
   */
  public void setOnReceiveDataListener(OnReceiveDataListener listener) {
    onReceiveDataListener = listener;
  }

  /**
   * 根據不同的請求類型來初始化httppost
   *
   * @param requestType
   *      請求類型
   * @param nameValuePairs
   *      需要傳遞的參數
   */
  public void iniRequest(String requestType, JSONObject jsonObject) {
    httpPost.addHeader("Content-Type", "text/json");
    httpPost.addHeader("charset", "UTF-8");

    httpPost.addHeader("Cache-Control", "no-cache");
    HttpParams httpParameters = httpPost.getParams();
    HttpConnectionParams.setConnectionTimeout(httpParameters,
        connectionTimeout);
    HttpConnectionParams.setSoTimeout(httpParameters, socketTimeout);
    httpPost.setParams(httpParameters);
    try {
      httpPost.setURI(new URI(URL + requestType));
      httpPost.setEntity(new StringEntity(jsonObject.toString(),
          HTTP.UTF_8));
    } catch (URISyntaxException e1) {
      e1.printStackTrace();
    } catch (UnsupportedEncodingException e) {
      e.printStackTrace();
    }
  }

  /**
   * 新開一個線程發送http請求
   */
  public void execute() {
    executorService.execute(this);
  }

  /**
   * 檢測網絡狀況
   *
   * @return true is available else false
   */
  public static boolean checkNetState(Activity activity) {
    ConnectivityManager connManager = (ConnectivityManager) activity
        .getSystemService(Context.CONNECTIVITY_SERVICE);
    if (connManager.getActiveNetworkInfo() != null) {
      return connManager.getActiveNetworkInfo().isAvailable();
    }
    return false;
  }

  /**
   * 發送http請求的具體執行代碼
   */
  @Override
  public void run() {
    httpResponse = null;
    try {
      httpResponse = httpClient.execute(httpPost);
      strResult = EntityUtils.toString(httpResponse.getEntity());
    } catch (ClientProtocolException e1) {
      strResult = null;
      e1.printStackTrace();
    } catch (IOException e1) {
      strResult = null;
      e1.printStackTrace();
    } finally {
      if (httpResponse != null) {
        statusCode = httpResponse.getStatusLine().getStatusCode();
      }
      else
      {
        statusCode=NO_SERVER_ERROR;
      }
      if(onReceiveDataListener!=null)
      {
        //將注冊的監聽器的onReceiveData方法加入到消息隊列中去執行
        handler.post(new Runnable() {
          @Override
          public void run() {
            onReceiveDataListener.onReceiveData(strResult, statusCode);
          }
        });
      }
    }
  }

  /**
   * 用於接收並處理http請求結果的監聽器
   *
   */
  public interface OnReceiveDataListener {
    /**
     * the callback function for receiving the result data
     * from post request, and further processing will be done here
     * @param strResult the result in string style.
     * @param StatusCode the status of the post
     */
    public abstract void onReceiveData(String strResult,int StatusCode);
  }

}
代碼使用了觀察者模式,任何需要接收http請求結果的類,都要實現OnReceiveDataListener接口的抽象方法,同時PostRequest實例調用setOnReceiveDataListener方法,注冊該監聽器。完整調用步驟如下:
1.創建PostRequest對象,實現onReceiveData接口,編寫自己的onReceiveData方法
2.注冊監聽器
3.調用PostRequest的iniRequest方法,初始化本次request
4.調用PostRequest的execute方法
可能的改進:
1.如果需要多個觀察者,可以把只能注冊單個監聽器改為可以注冊多個監聽器,維護一個監聽器List。
2.如果需求比較簡單,並希望調用流程更簡潔,iniRequest和execute可以合並
以上就是本文的全部內容,希望對大家的學習有所幫助,也希望大家多多支持本站。
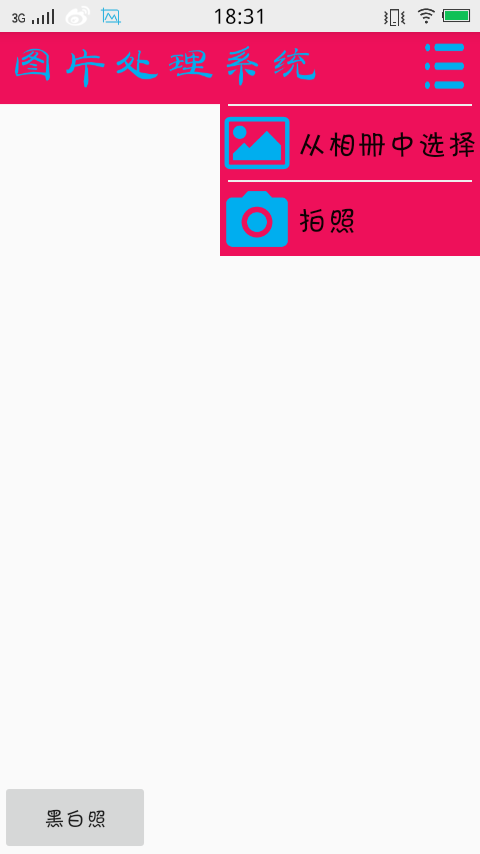 Android調用系統相冊和相機選擇圖片並顯示在imageview中
Android調用系統相冊和相機選擇圖片並顯示在imageview中,在系統調用相機拍攝中,直接返回的是經過壓縮處理後的圖像,當你直接把返還後的圖片放在imageview
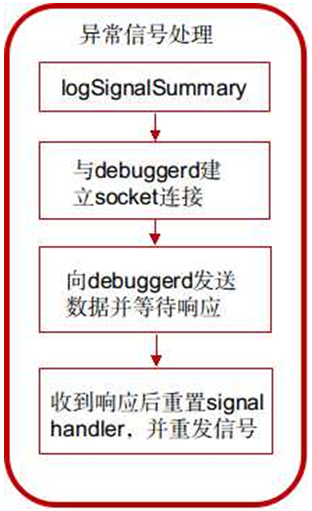 Android debuggerd 源碼分析
debuggerd 簡介 Android系統自帶一個實用的程序異常退出的診斷daemon debuggerd。此進程可以偵測到程序崩潰,並將崩潰時的進程狀態信息輸出到文件
 詳解Android的兩種事件處理機制
UI編程通常都會伴隨事件處理,Android也不例外,它提供了兩種方式的事件處理:基於回調的事件處理和基於監聽器的事件處理。對於基於監聽器的事件處理而言,主要就是為And
 View的事件分發機制
View的事件分發機制,也稱為View的事件攔截機制,在說事件分發機制之前,需要對MotionEvent對象就行分析,也就是點擊事件,MotionEvent是手指接觸屏幕