編輯:關於Android編程
我在此基礎上優化了部分代碼, 添加了滑動回調, 可自定義性更強. 並且添加了點擊按鈕左右滑動的功能.
據說無圖都不敢發文章了.
看圖:
1:這種功能, 首先需要自己管理布局
繼承 RecyclerView.LayoutManager , 顯示自己管理布局, 比如最多顯示4個view, 並且都是居中顯示.
底部的View還需要進行縮放,平移操作.
public class OverLayCardLayoutManager extends RecyclerView.LayoutManager {
 private static final String TAG = "swipecard";
 public static int MAX_SHOW_COUNT = 4;
 public static float SCALE_GAP = 0.05f;
 public static int TRANS_Y_GAP;
 public OverLayCardLayoutManager(Context context) {
  //平移時, 需要用到的參考值
  TRANS_Y_GAP = (int) (20 * context.getResources().getDisplayMetrics().density);
 }
 @Override
 public RecyclerView.LayoutParams generateDefaultLayoutParams() {
  //必須要實現的方法
  return new RecyclerView.LayoutParams(ViewGroup.LayoutParams.WRAP_CONTENT, ViewGroup.LayoutParams.WRAP_CONTENT);
 }
 @Override
 public void onLayoutChildren(RecyclerView.Recycler recycler, RecyclerView.State state) {
  //在這個方法中進行View的布局操作.此方法會被調用多次.
  detachAndScrapAttachedViews(recycler);
  int itemCount = getItemCount();
  if (itemCount < 1) {
   return;
  }
  //top-3View的position
  int bottomPosition;
  //邊界處理
  if (itemCount < MAX_SHOW_COUNT) {
   bottomPosition = 0;
  } else {
   bottomPosition = itemCount - MAX_SHOW_COUNT;
  }
  //從可見的最底層View開始layout,依次層疊上去
  for (int position = bottomPosition; position < itemCount; position++) {
   //1:重recycler的緩存機制中拿到一個View
   View view = recycler.getViewForPosition(position);
   //2:和自定義ViewGroup一樣, 需要先addView
   addView(view);
   //3:和自定義ViewGroup一樣, 也需要測量View的大小
   measureChildWithMargins(view, 0, 0);
   int widthSpace = getWidth() - getDecoratedMeasuredWidth(view);
   int heightSpace = getHeight() - getDecoratedMeasuredHeight(view);
   //4:和自定義ViewGroup的onLayout一樣, 需要layout View.對View進行布局
   //我們在布局時,將childView居中處理,這裡也可以改為只水平居中
   layoutDecoratedWithMargins(view, widthSpace / 2, heightSpace / 2,
     widthSpace / 2 + getDecoratedMeasuredWidth(view),
     heightSpace / 2 + getDecoratedMeasuredHeight(view));
   /**
    * TopView的Scale 為1,translationY 0
    * 每一級Scale相差0.05f,translationY相差7dp左右
    *
    * 觀察人人影視的UI,拖動時,topView被拖動,Scale不變,一直為1.
    * top-1View 的Scale慢慢變化至1,translation也慢慢恢復0
    * top-2View的Scale慢慢變化至 top-1View的Scale,translation 也慢慢變化只top-1View的translation
    * top-3View的Scale要變化,translation巋然不動
    */
   //第幾層,舉例子,count =7, 最後一個TopView(6)是第0層,
   int level = itemCount - position - 1;
   //如果不需要縮放平移, 那麼下面的代碼可以注釋掉...
   //除了頂層不需要縮小和位移
   if (level > 0 /*&& level < mShowCount - 1*/) {
    //每一層都需要X方向的縮小
    view.setScaleX(1 - SCALE_GAP * level);
    //前N層,依次向下位移和Y方向的縮小
    if (level < MAX_SHOW_COUNT - 1) {
     view.setTranslationY(TRANS_Y_GAP * level);
     view.setScaleY(1 - SCALE_GAP * level);
    } else {//第N層在 向下位移和Y方向的縮小的成都與 N-1層保持一致
     view.setTranslationY(TRANS_Y_GAP * (level - 1));
     view.setScaleY(1 - SCALE_GAP * (level - 1));
    }
   }
  }
 }
}
2:布局好了之後, 就需要監聽鼠標事件了
谷歌官方提供了一個ItemTouchHelper工具類, 對滑動進行了慘無人道的優越封裝, 傻x都能用…
使用方法: new ItemTouchHelper(callback).attachToRecyclerView(recyclerView);就這麼簡單,
接下來的操作, 都在回調callback裡面進行.
public class RenRenCallback extends ItemTouchHelper.SimpleCallback {
private static final String TAG = "RenRen";
private static final int MAX_ROTATION = 15;
OnSwipeListener mSwipeListener;
boolean isSwipeAnim = false;
public RenRenCallback() {
//第一個參數決定可以拖動排序的方向, 這裡由於不需要拖動排序,所以傳0
//第二個參數決定可以支持滑動的方向,這裡設置了上下左右都可以滑動.
super(0, ItemTouchHelper.DOWN | ItemTouchHelper.UP | ItemTouchHelper.LEFT | ItemTouchHelper.RIGHT);
}
public void setSwipeListener(OnSwipeListener swipeListener) {
mSwipeListener = swipeListener;
}
//水平方向是否可以被回收掉的阈值
public float getThreshold(RecyclerView recyclerView, RecyclerView.ViewHolder viewHolder) {
//2016 12 26 考慮 探探垂直上下方向滑動,不刪除卡片,這裡參照源碼寫死0.5f
return recyclerView.getWidth() * /*getSwipeThreshold(viewHolder)*/ 0.5f;
}
@Override
public boolean onMove(RecyclerView recyclerView, RecyclerView.ViewHolder viewHolder, RecyclerView.ViewHolder target) {
//由於不支持滑動排序, 所以不需要處理此方法
return false;
}
@Override
public void onSwiped(RecyclerView.ViewHolder viewHolder, int direction) {
//當view需要滑動的時候,會回調此方法
//但是這個方法只是告訴你View需要滑動, 並不是對View和Adapter進行額外的操作,
//所以, 如果你需要實現滑動刪除, 那麼需要在此方法中remove item等.
//我們這裡需要對滑動過後的View,進行恢復操作.
viewHolder.itemView.setRotation(0);//恢復最後一次的旋轉狀態
if (mSwipeListener != null) {
mSwipeListener.onSwipeTo(viewHolder, 0);
}
notifyListener(viewHolder.getAdapterPosition(), direction);
}
private void notifyListener(int position, int direction) {
Log.w(TAG, "onSwiped: " + position + " " + direction);
if (mSwipeListener != null) {
mSwipeListener.onSwiped(position, direction);
}
}
@Override
public float getSwipeThreshold(RecyclerView.ViewHolder viewHolder) {
//滑動的比例達到多少之後, 視為滑動
return 0.3f;
}
@Override
public void onChildDraw(Canvas c, RecyclerView recyclerView, RecyclerView.ViewHolder viewHolder, float dX, float dY, int actionState, boolean isCurrentlyActive) {
super.onChildDraw(c, recyclerView, viewHolder, dX, dY, actionState, isCurrentlyActive);
//當你在滑動的過程中, 此方法一直會被回調, 就跟onTouch事件一樣...
//先根據滑動的dx dy 算出現在動畫的比例系數fraction
float swipeValue = (float) Math.sqrt(dX * dX + dY * dY);
final float threshold = getThreshold(recyclerView, viewHolder);
float fraction = swipeValue / threshold;
//邊界修正 最大為1
if (fraction > 1) {
fraction = 1;
} else if (fraction < -1) {
fraction = -1;
}
//對每個ChildView進行縮放 位移
int childCount = recyclerView.getChildCount();
for (int i = 0; i < childCount; i++) {
View child = recyclerView.getChildAt(i);
//第幾層,舉例子,count =7, 最後一個TopView(6)是第0層,
int level = childCount - i - 1;
if (level > 0) {
child.setScaleX(1 - SCALE_GAP * level + fraction * SCALE_GAP);
if (level < MAX_SHOW_COUNT - 1) {
child.setScaleY(1 - SCALE_GAP * level + fraction * SCALE_GAP);
child.setTranslationY(TRANS_Y_GAP * level - fraction * TRANS_Y_GAP);
} else {
//child.setTranslationY((float) (mTranslationYGap * (level - 1) - fraction * mTranslationYGap));
}
} else {
//最上層
//rotate
if (dX < -50) {
child.setRotation(-fraction * MAX_ROTATION);
} else if (dX > 50) {
child.setRotation(fraction * MAX_ROTATION);
} else {
child.setRotation(0);
}
if (mSwipeListener != null) {
RecyclerView.LayoutParams params = (RecyclerView.LayoutParams) child.getLayoutParams();
final int adapterPosition = params.getViewAdapterPosition();
mSwipeListener.onSwipeTo(recyclerView.findViewHolderForAdapterPosition(adapterPosition), dX);
}
}
}
}
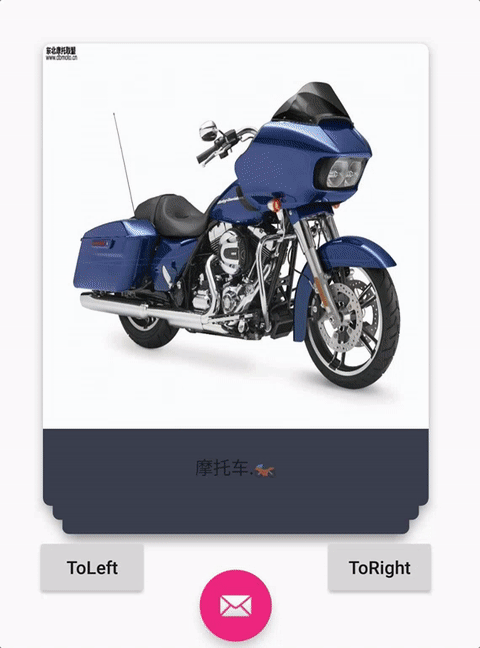
//擴展實現:點擊按鈕實現左滑效果
public void toLeft(RecyclerView recyclerView) {
if (check(recyclerView)) {
animTo(recyclerView, false);
}
}
//擴展實現:點擊按鈕實現右滑效果
public void toRight(RecyclerView recyclerView) {
if (check(recyclerView)) {
animTo(recyclerView, true);
}
}
private void animTo(final RecyclerView recyclerView, boolean right) {
final int position = recyclerView.getAdapter().getItemCount() - 1;
final View view = recyclerView.findViewHolderForAdapterPosition(position).itemView;
TranslateAnimation translateAnimation = new TranslateAnimation(Animation.RELATIVE_TO_SELF, 0,
Animation.RELATIVE_TO_SELF, right ? 1f : -1f,
Animation.RELATIVE_TO_SELF, 0f, Animation.RELATIVE_TO_SELF, 1.3f);
translateAnimation.setFillAfter(true);
translateAnimation.setDuration(300);
translateAnimation.setInterpolator(new DecelerateInterpolator());
translateAnimation.setAnimationListener(new Animation.AnimationListener() {
@Override
public void onAnimationStart(Animation animation) {
}
@Override
public void onAnimationEnd(Animation animation) {
isSwipeAnim = false;
recyclerView.removeView(view);
notifyListener(position,
x > view.getMeasuredWidth() / 2
?
ItemTouchHelper.RIGHT : ItemTouchHelper.LEFT);
}
@Override
public void onAnimationRepeat(Animation animation) {
}
});
view.startAnimation(translateAnimation);
}
private boolean check(RecyclerView recyclerView) {
if (isSwipeAnim) {
return false;
}
if (recyclerView == null || recyclerView.getAdapter() == null) {
return false;
}
if (recyclerView.getAdapter().getItemCount() == 0) {
return false;
}
isSwipeAnim = true;
return true;
}
public interface OnSwipeListener {
/**
* @param direction {@link ItemTouchHelper#LEFT} / {@link ItemTouchHelper#RIGHT}
* {@link ItemTouchHelper#UP} or {@link ItemTouchHelper#DOWN}).
*/
void onSwiped(int adapterPosition, int direction);
/**
* 最上層View滑動時回調.
*
* @param viewHolder 最上層的ViewHolder
* @param offset 距離原始位置的偏移量
*/
void onSwipeTo(RecyclerView.ViewHolder viewHolder, float offset);
}
public static class SimpleSwipeCallback implements OnSwipeListener {
/**
* {@inheritDoc}
*/
@Override
public void onSwiped(int adapterPosition, int direction) {
}
/**
* {@inheritDoc}
*/
@Override
public void onSwipeTo(RecyclerView.ViewHolder viewHolder, float offset) {
}
}
}
看起來不難, 但是真正做的時候, 要處理的地方很多,
並且有些地方要思考很久, 才能實現效果.
總之,做了你才會發現1+1=2的魅力, just do it.
開源地址: https://github.com/angcyo/RecyclerLayoutManager
好了,以上所示是小編給大家分享的Android開發中RecyclerView模仿探探左右滑動布局功能,希望對大家有所幫助,如果大家有任何疑問歡迎給我留言。
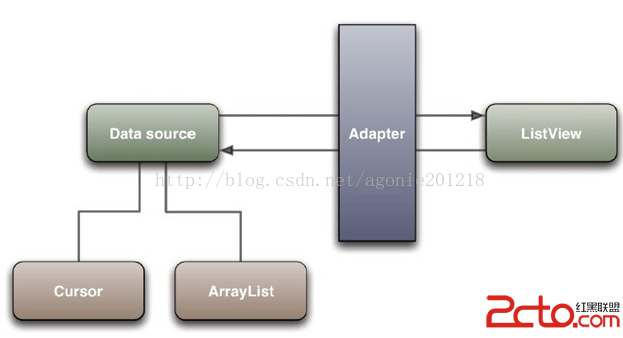
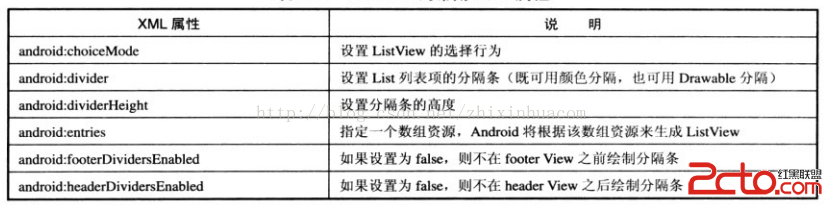 android學習--視圖列表(ListView和ListActivity)
說明: 視圖列表(ListView和ListActivity)與AutoComplete、Spinner類似,它們都需要一個供顯示的列表項,可以需
 Android Studio--NDK編譯C代碼為.so文件,JNI調用
前言:從Android Studio開始,就支持jni和.so庫調用了。環境:Windows 7+Android Studio2.1.2+NDK版本:android-nd
 Android 設置透明背景
1.style.xml @color/transparent true true 2.color.xml #00000000 3.AndroidManifest.x
 Android中Activity四種加載模式
Activity四種加載模式 我們知道在配置Activity的時候可以指定android:lauchMode屬性,該屬性用於配置該Activity的加載模
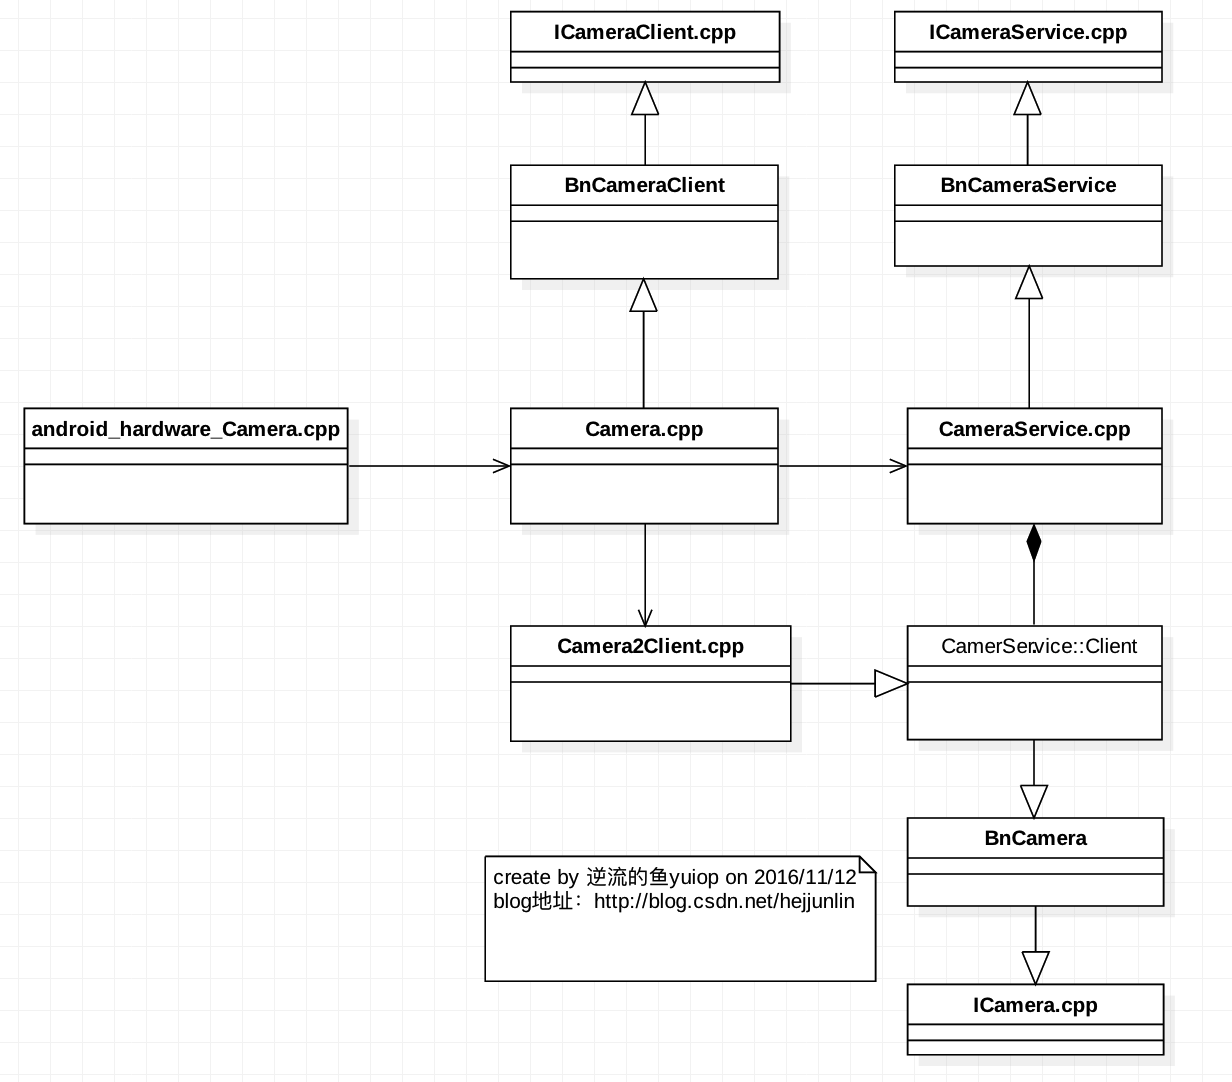 Android Multimedia框架總結(十九)Camera2框架C/S模型之CameraService啟動及與Client連接過程
Agenda:一張圖看Camera2框架類圖 CameraService