編輯:關於Android編程
OKHttp3是如今非常流行的Android網絡請求框架,那麼如何利用Android實現斷點續傳呢,今天寫了個Demo嘗試了一下,感覺還是有點意思
准備階段
我們會用到OKHttp3來做網絡請求,使用RxJava來實現線程的切換,並且開啟Java8來啟用Lambda表達式,畢竟RxJava實現線程切換非常方便,而且數據流的形式也非常舒服,同時Lambda和RxJava配合食用味道更佳
打開我們的app Module下的build.gradle,代碼如下
apply plugin: 'com.android.application'

android {
  compileSdkVersion 24
  buildToolsVersion "24.0.3"

  defaultConfig {
    applicationId "com.lanou3g.downdemo"
    minSdkVersion 15
    targetSdkVersion 24
    versionCode 1
    versionName "1.0"
    testInstrumentationRunner "android.support.test.runner.AndroidJUnitRunner"
    //為了開啟Java8
    jackOptions{
      enabled true;
    }
  }
  buildTypes {
    release {
      minifyEnabled false
      proguardFiles getDefaultProguardFile('proguard-android.txt'), 'proguard-rules.pro'
    }
  }

  //開啟Java1.8 能夠使用lambda表達式
  compileOptions{
    sourceCompatibility JavaVersion.VERSION_1_8
    targetCompatibility JavaVersion.VERSION_1_8
  }
}

dependencies {
  compile fileTree(dir: 'libs', include: ['*.jar'])
  androidTestCompile('com.android.support.test.espresso:espresso-core:2.2.2', {
    exclude group: 'com.android.support', module: 'support-annotations'
  })
  compile 'com.android.support:appcompat-v7:24.1.1'
  testCompile 'junit:junit:4.12'

  //OKHttp
  compile 'com.squareup.okhttp3:okhttp:3.6.0'
  //RxJava和RxAndroid 用來做線程切換的
  compile 'io.reactivex.rxjava2:rxandroid:2.0.1'
  compile 'io.reactivex.rxjava2:rxjava:2.0.1'
}
OKHttp和RxJava,RxAndroid使用的都是最新的版本,並且配置開啟了Java8
布局文件
接著開始書寫布局文件
<?xml version="1.0" encoding="utf-8"?>
<LinearLayout xmlns:android="http://schemas.android.com/apk/res/android"
  xmlns:tools="http://schemas.android.com/tools"
  android:id="@+id/activity_main"
  android:layout_width="match_parent"
  android:layout_height="match_parent"
  android:paddingBottom="@dimen/activity_vertical_margin"
  android:paddingLeft="@dimen/activity_horizontal_margin"
  android:paddingRight="@dimen/activity_horizontal_margin"
  android:paddingTop="@dimen/activity_vertical_margin"
  android:orientation="vertical"
  tools:context="com.lanou3g.downdemo.MainActivity">

  <LinearLayout
    android:layout_width="match_parent"
    android:layout_height="wrap_content"
    android:orientation="horizontal">
    <ProgressBar
      android:id="@+id/main_progress1"
      android:layout_width="0dp"
      android:layout_weight="1"
      android:layout_height="match_parent"
       />
    <Button
      android:id="@+id/main_btn_down1"
      android:layout_width="wrap_content"
      android:layout_height="wrap_content"
      android:text="下載1"/>
    <Button
      android:id="@+id/main_btn_cancel1"
      android:layout_width="wrap_content"
      android:layout_height="wrap_content"
      android:text="取消1"/>
  </LinearLayout>
  <LinearLayout
    android:layout_width="match_parent"
    android:layout_height="wrap_content"
    android:orientation="horizontal">
    <ProgressBar
      android:id="@+id/main_progress2"
      android:layout_width="0dp"
      android:layout_weight="1"
      android:layout_height="match_parent"
       />
    <Button
      android:id="@+id/main_btn_down2"
      android:layout_width="wrap_content"
      android:layout_height="wrap_content"
      android:text="下載2"/>
    <Button
      android:id="@+id/main_btn_cancel2"
      android:layout_width="wrap_content"
      android:layout_height="wrap_content"
      android:text="取消2"/>
  </LinearLayout>
  <LinearLayout
    android:layout_width="match_parent"
    android:layout_height="wrap_content"
    android:orientation="horizontal">
    <ProgressBar
      android:id="@+id/main_progress3"
      android:layout_width="0dp"
      android:layout_weight="1"
      android:layout_height="match_parent"
       />
    <Button
      android:id="@+id/main_btn_down3"
      android:layout_width="wrap_content"
      android:layout_height="wrap_content"
      android:text="下載3"/>
    <Button
      android:id="@+id/main_btn_cancel3"
      android:layout_width="wrap_content"
      android:layout_height="wrap_content"
      android:text="取消3"/>
  </LinearLayout>
</LinearLayout>
大概是這個樣子的
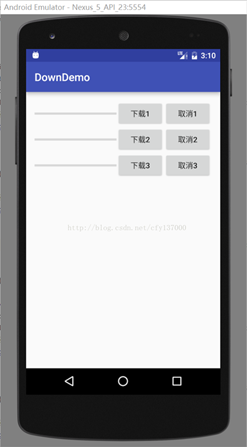
3個ProgressBar就是為了顯示進度的,每個ProgressBar對應2個Button,一個是開始下載,一個是暫停(取消)下載,這裡需要說明的是,對下載來說暫停和取消沒有什麼區別,除非當取消的時候,會順帶把臨時文件都刪除了,在本例裡是不區分他倆的.
Application
我們這裡需要用到一些文件路徑,有一個全局Context會比較方便, 而Application也是Context的子類,使用它的是最方便的,所以我們寫一個類來繼承Application
package com.lanou3g.downdemo;

import android.app.Application;
import android.content.Context;

/**
 * Created by 陳豐堯 on 2017/2/2.
 */

public class MyApp extends Application {
  public static Context sContext;//全局的Context對象

  @Override
  public void onCreate() {
    super.onCreate();
    sContext = this;
  }
}
可以看到,我們就是要獲得一個全局的Context對象的
我們在AndroidManifest中注冊一下我們的Application,同時再把我們所需要的權限給上
<?xml version="1.0" encoding="utf-8"?>
<manifest xmlns:android="http://schemas.android.com/apk/res/android"
  package="com.lanou3g.downdemo">

  <!--網絡權限-->
  <uses-permission android:name="android.permission.INTERNET"/>

  <application
    android:allowBackup="true"
    android:icon="@mipmap/ic_launcher"
    android:label="@string/app_name"
    android:supportsRtl="true"
    android:name=".MyApp"
    android:theme="@style/AppTheme">
    <activity android:name=".MainActivity">
      <intent-filter>
        <action android:name="android.intent.action.MAIN" />

        <category android:name="android.intent.category.LAUNCHER" />
      </intent-filter>
    </activity>
  </application>

</manifest>
我們只需要一個網絡權限,在application標簽下,添加name屬性,來指向我們的Application
DownloadManager
接下來是核心代碼了,就是我們的DownloadManager,先上代碼
package com.lanou3g.downdemo;

import java.io.File;
import java.io.FileOutputStream;
import java.io.IOException;
import java.io.InputStream;
import java.util.HashMap;
import java.util.concurrent.atomic.AtomicReference;

import io.reactivex.Observable;
import io.reactivex.ObservableEmitter;
import io.reactivex.ObservableOnSubscribe;
import io.reactivex.android.schedulers.AndroidSchedulers;
import io.reactivex.schedulers.Schedulers;
import okhttp3.Call;
import okhttp3.OkHttpClient;
import okhttp3.Request;
import okhttp3.Response;

/**
 * Created by 陳豐堯 on 2017/2/2.
 */

public class DownloadManager {

  private static final AtomicReference<DownloadManager> INSTANCE = new AtomicReference<>();
  private HashMap<String, Call> downCalls;//用來存放各個下載的請求
  private OkHttpClient mClient;//OKHttpClient;

  //獲得一個單例類
  public static DownloadManager getInstance() {
    for (; ; ) {
      DownloadManager current = INSTANCE.get();
      if (current != null) {
        return current;
      }
      current = new DownloadManager();
      if (INSTANCE.compareAndSet(null, current)) {
        return current;
      }
    }
  }

  private DownloadManager() {
    downCalls = new HashMap<>();
    mClient = new OkHttpClient.Builder().build();
  }

  /**
   * 開始下載
   *
   * @param url       下載請求的網址
   * @param downLoadObserver 用來回調的接口
   */
  public void download(String url, DownLoadObserver downLoadObserver) {
    Observable.just(url)
        .filter(s -> !downCalls.containsKey(s))//call的map已經有了,就證明正在下載,則這次不下載
        .flatMap(s -> Observable.just(createDownInfo(s)))
        .map(this::getRealFileName)//檢測本地文件夾,生成新的文件名
        .flatMap(downloadInfo -> Observable.create(new DownloadSubscribe(downloadInfo)))//下載
        .observeOn(AndroidSchedulers.mainThread())//在主線程回調
        .subscribeOn(Schedulers.io())//在子線程執行
        .subscribe(downLoadObserver);//添加觀察者

  }

  public void cancel(String url) {
    Call call = downCalls.get(url);
    if (call != null) {
      call.cancel();//取消
    }
    downCalls.remove(url);
  }

  /**
   * 創建DownInfo
   *
   * @param url 請求網址
   * @return DownInfo
   */
  private DownloadInfo createDownInfo(String url) {
    DownloadInfo downloadInfo = new DownloadInfo(url);
    long contentLength = getContentLength(url);//獲得文件大小
    downloadInfo.setTotal(contentLength);
    String fileName = url.substring(url.lastIndexOf("/"));
    downloadInfo.setFileName(fileName);
    return downloadInfo;
  }

  private DownloadInfo getRealFileName(DownloadInfo downloadInfo) {
    String fileName = downloadInfo.getFileName();
    long downloadLength = 0, contentLength = downloadInfo.getTotal();
    File file = new File(MyApp.sContext.getFilesDir(), fileName);
    if (file.exists()) {
      //找到了文件,代表已經下載過,則獲取其長度
      downloadLength = file.length();
    }
    //之前下載過,需要重新來一個文件
    int i = 1;
    while (downloadLength >= contentLength) {
      int dotIndex = fileName.lastIndexOf(".");
      String fileNameOther;
      if (dotIndex == -1) {
        fileNameOther = fileName + "(" + i + ")";
      } else {
        fileNameOther = fileName.substring(0, dotIndex)
            + "(" + i + ")" + fileName.substring(dotIndex);
      }
      File newFile = new File(MyApp.sContext.getFilesDir(), fileNameOther);
      file = newFile;
      downloadLength = newFile.length();
      i++;
    }
    //設置改變過的文件名/大小
    downloadInfo.setProgress(downloadLength);
    downloadInfo.setFileName(file.getName());
    return downloadInfo;
  }

  private class DownloadSubscribe implements ObservableOnSubscribe<DownloadInfo> {
    private DownloadInfo downloadInfo;

    public DownloadSubscribe(DownloadInfo downloadInfo) {
      this.downloadInfo = downloadInfo;
    }

    @Override
    public void subscribe(ObservableEmitter<DownloadInfo> e) throws Exception {
      String url = downloadInfo.getUrl();
      long downloadLength = downloadInfo.getProgress();//已經下載好的長度
      long contentLength = downloadInfo.getTotal();//文件的總長度
      //初始進度信息
      e.onNext(downloadInfo);

      Request request = new Request.Builder()
          //確定下載的范圍,添加此頭,則服務器就可以跳過已經下載好的部分
          .addHeader("RANGE", "bytes=" + downloadLength + "-" + contentLength)
          .url(url)
          .build();
      Call call = mClient.newCall(request);
      downCalls.put(url, call);//把這個添加到call裡,方便取消
      Response response = call.execute();

      File file = new File(MyApp.sContext.getFilesDir(), downloadInfo.getFileName());
      InputStream is = null;
      FileOutputStream fileOutputStream = null;
      try {
        is = response.body().byteStream();
        fileOutputStream = new FileOutputStream(file, true);
        byte[] buffer = new byte[2048];//緩沖數組2kB
        int len;
        while ((len = is.read(buffer)) != -1) {
          fileOutputStream.write(buffer, 0, len);
          downloadLength += len;
          downloadInfo.setProgress(downloadLength);
          e.onNext(downloadInfo);
        }
        fileOutputStream.flush();
        downCalls.remove(url);
      } finally {
        //關閉IO流
        IOUtil.closeAll(is, fileOutputStream);

      }
      e.onComplete();//完成
    }
  }

  /**
   * 獲取下載長度
   *
   * @param downloadUrl
   * @return
   */
  private long getContentLength(String downloadUrl) {
    Request request = new Request.Builder()
        .url(downloadUrl)
        .build();
    try {
      Response response = mClient.newCall(request).execute();
      if (response != null && response.isSuccessful()) {
        long contentLength = response.body().contentLength();
        response.close();
        return contentLength == 0 ? DownloadInfo.TOTAL_ERROR : contentLength;
      }
    } catch (IOException e) {
      e.printStackTrace();
    }
    return DownloadInfo.TOTAL_ERROR;
  }


}
代碼稍微有點長,關鍵部位我都加了注釋了,我們挑關鍵地方看看
首先我們這個類是單例類,我們下載只需要一個OKHttpClient就足夠了,所以我們讓構造方法私有,而單例類的獲取實例方法就是這個getInstance();當然大家用別的方式實現單例也可以的,然後我們在構造方法裡初始化我們的HttpClient,並且初始化一個HashMap,用來放所有的網絡請求的,這樣當我們取消下載的時候,就可以找到url對應的網絡請求然後把它取消掉就可以了
接下來就是核心的download方法了,首先是參數,第一個參數url不用多說,就是請求的網址,第二個參數是一個Observer對象,因為我們使用的是RxJava,並且沒有特別多復雜的方法,所以就沒單獨寫接口,而是謝了一個Observer對象來作為回調,接下來是DownLoadObserver的代碼
package com.lanou3g.downdemo;

import io.reactivex.Observer;
import io.reactivex.disposables.Disposable;

/**
 * Created by 陳豐堯 on 2017/2/2.
 */

public abstract class DownLoadObserver implements Observer<DownloadInfo> {
  protected Disposable d;//可以用於取消注冊的監聽者
  protected DownloadInfo downloadInfo;
  @Override
  public void onSubscribe(Disposable d) {
    this.d = d;
  }

  @Override
  public void onNext(DownloadInfo downloadInfo) {
    this.downloadInfo = downloadInfo;
  }

  @Override
  public void onError(Throwable e) {
    e.printStackTrace();
  }


}
在RxJava2中 這個Observer有點變化,當注冊觀察者的時候,會調用onSubscribe方法,而該方法參數就是用來取消注冊的,這樣的改動可以更靈活的有監聽者來取消監聽了,我們的進度信息會一直的傳送的onNext方法裡,這裡將下載所需要的內容封了一個類叫DownloadInfo
package com.lanou3g.downdemo;

/**
 * Created by 陳豐堯 on 2017/2/2.
 * 下載信息
 */

public class DownloadInfo {
  public static final long TOTAL_ERROR = -1;//獲取進度失敗
  private String url;
  private long total;
  private long progress;
  private String fileName;

  public DownloadInfo(String url) {
    this.url = url;
  }

  public String getUrl() {
    return url;
  }

  public String getFileName() {
    return fileName;
  }

  public void setFileName(String fileName) {
    this.fileName = fileName;
  }

  public long getTotal() {
    return total;
  }

  public void setTotal(long total) {
    this.total = total;
  }

  public long getProgress() {
    return progress;
  }

  public void setProgress(long progress) {
    this.progress = progress;
  }
}
這個類就是一些基本信息,total就是需要下載的文件的總大小,而progress就是當前下載的進度了,這樣就可以計算出下載的進度信息了
接著看DownloadManager的download方法,首先通過url生成一個Observable對象,然後通過filter操作符過濾一下,如果當前正在下載這個url對應的內容,那麼就不下載它,
接下來調用createDownInfo重新生成Observable對象,這裡應該用map也是可以的,createDownInfo這個方法裡會調用getContentLength來獲取服務器上的文件大小,可以看一下這個方法的代碼,
/**
  * 獲取下載長度
  *
  * @param downloadUrl
  * @return
  */
  private long getContentLength(String downloadUrl) {
    Request request = new Request.Builder()
        .url(downloadUrl)
        .build();
    try {
      Response response = mClient.newCall(request).execute();
      if (response != null && response.isSuccessful()) {
        long contentLength = response.body().contentLength();
        response.close();
        return contentLength == 0 ? DownloadInfo.TOTAL_ERROR : contentLength;
      }
    } catch (IOException e) {
      e.printStackTrace();
    }
    return DownloadInfo.TOTAL_ERROR;
  }
可以看到,其實就是在通過OK進行了一次網絡請求,並且從返回的頭信息裡拿到文件的大小信息,一般這個信息都是可以拿到的,除非下載網址不是直接指向資源文件的,而是自己手寫的Servlet,那就得跟後台人員溝通好了.注意,這次網絡請求並沒有真正的去下載文件,而是請求個大小就結束了,具體原因會在後面真正請求數據的時候解釋
接著download方法
獲取完文件大小後,就可以去硬盤裡找文件了,這裡調用了getRealFileName方法
private DownloadInfo getRealFileName(DownloadInfo downloadInfo) {
    String fileName = downloadInfo.getFileName();
    long downloadLength = 0, contentLength = downloadInfo.getTotal();
    File file = new File(MyApp.sContext.getFilesDir(), fileName);
    if (file.exists()) {
      //找到了文件,代表已經下載過,則獲取其長度
      downloadLength = file.length();
    }
    //之前下載過,需要重新來一個文件
    int i = 1;
    while (downloadLength >= contentLength) {
      int dotIndex = fileName.lastIndexOf(".");
      String fileNameOther;
      if (dotIndex == -1) {
        fileNameOther = fileName + "(" + i + ")";
      } else {
        fileNameOther = fileName.substring(0, dotIndex)
            + "(" + i + ")" + fileName.substring(dotIndex);
      }
      File newFile = new File(MyApp.sContext.getFilesDir(), fileNameOther);
      file = newFile;
      downloadLength = newFile.length();
      i++;
    }
    //設置改變過的文件名/大小
    downloadInfo.setProgress(downloadLength);
    downloadInfo.setFileName(file.getName());
    return downloadInfo;
  }
這個方法就是看本地是否有已經下載過的文件,如果有,再判斷一次本地文件的大小和服務器上數據的大小,如果是一樣的,證明之前下載全了,就再成一個帶(1)這樣的文件,而如果本地文件大小比服務器上的小的話,那麼證明之前下載了一半斷掉了,那麼就把進度信息保存上,並把文件名也存上,看完了再回到download方法
之後就開始真正的網絡請求了,這裡寫了一個內部類來實現ObservableOnSubscribe接口,這個接口也是RxJava2的,東西和之前一樣,好像只改了名字,看一下代碼
private class DownloadSubscribe implements ObservableOnSubscribe<DownloadInfo> {
    private DownloadInfo downloadInfo;

    public DownloadSubscribe(DownloadInfo downloadInfo) {
      this.downloadInfo = downloadInfo;
    }

    @Override
    public void subscribe(ObservableEmitter<DownloadInfo> e) throws Exception {
      String url = downloadInfo.getUrl();
      long downloadLength = downloadInfo.getProgress();//已經下載好的長度
      long contentLength = downloadInfo.getTotal();//文件的總長度
      //初始進度信息
      e.onNext(downloadInfo);

      Request request = new Request.Builder()
          //確定下載的范圍,添加此頭,則服務器就可以跳過已經下載好的部分
          .addHeader("RANGE", "bytes=" + downloadLength + "-" + contentLength)
          .url(url)
          .build();
      Call call = mClient.newCall(request);
      downCalls.put(url, call);//把這個添加到call裡,方便取消
      Response response = call.execute();

      File file = new File(MyApp.sContext.getFilesDir(), downloadInfo.getFileName());
      InputStream is = null;
      FileOutputStream fileOutputStream = null;
      try {
        is = response.body().byteStream();
        fileOutputStream = new FileOutputStream(file, true);
        byte[] buffer = new byte[2048];//緩沖數組2kB
        int len;
        while ((len = is.read(buffer)) != -1) {
          fileOutputStream.write(buffer, 0, len);
          downloadLength += len;
          downloadInfo.setProgress(downloadLength);
          e.onNext(downloadInfo);
        }
        fileOutputStream.flush();
        downCalls.remove(url);
      } finally {
        //關閉IO流
        IOUtil.closeAll(is, fileOutputStream);

      }
      e.onComplete();//完成
    }
  }
主要看subscribe方法
首先拿到url,當前進度信息和文件的總大小,然後開始網絡請求,注意這次網絡請求的時候需要添加一條頭信息
.addHeader("RANGE", "bytes=" + downloadLength + "-" + contentLength)
這條頭信息的意思是下載的范圍是多少,downloadLength是從哪開始下載,contentLength是下載到哪,當要斷點續傳的話必須添加這個頭,讓輸入流跳過多少字節的形式是不行的,所以我們要想能成功的添加這條信息那麼就必須對這個url請求2次,一次拿到總長度,來方便判斷本地是否有下載一半的數據,第二次才開始真正的讀流進行網絡請求,我還想了一種思路,當文件沒有下載完成的時候添加一個自定義的後綴,當下載完成再把這個後綴取消了,應該就不需要請求兩次了.
接下來就是正常的網絡請求,向本地寫文件了,而寫文件到本地這,網上大多用的是RandomAccessFile這個類,但是如果不涉及到多個部分拼接的話是沒必要的,直接使用輸出流就好了,在輸出流的構造方法上添加一個true的參數,代表是在原文件的後面添加數據即可,而在循環裡,不斷的調用onNext方法發送進度信息,當寫完了之後別忘了關流,同時把call對象從hashMap中移除了.這裡寫了一個IOUtil來關流
package com.lanou3g.downdemo;

import java.io.Closeable;
import java.io.IOException;

/**
 * Created by 陳豐堯 on 2017/2/2.
 */

public class IOUtil {
  public static void closeAll(Closeable... closeables){
    if(closeables == null){
      return;
    }
    for (Closeable closeable : closeables) {
      if(closeable!=null){
        try {
          closeable.close();
        } catch (IOException e) {
          e.printStackTrace();
        }
      }
    }
  }
}
其實就是挨一個判斷是否為空,並關閉罷了
這樣download方法就完成了,剩下的就是切換線程,注冊觀察者了
MainActivity
最後是aty的代碼
package com.lanou3g.downdemo;

import android.net.Uri;
import android.support.annotation.IdRes;
import android.support.v7.app.AppCompatActivity;
import android.os.Bundle;
import android.view.View;
import android.widget.Button;
import android.widget.ProgressBar;
import android.widget.Toast;

public class MainActivity extends AppCompatActivity implements View.OnClickListener {
  private Button downloadBtn1, downloadBtn2, downloadBtn3;
  private Button cancelBtn1, cancelBtn2, cancelBtn3;
  private ProgressBar progress1, progress2, progress3;
  private String url1 = "http://192.168.31.169:8080/out/dream.flac";
  private String url2 = "http://192.168.31.169:8080/out/music.mp3";
  private String url3 = "http://192.168.31.169:8080/out/code.zip";
  @Override
  protected void onCreate(Bundle savedInstanceState) {
    super.onCreate(savedInstanceState);
    setContentView(R.layout.activity_main);

    downloadBtn1 = bindView(R.id.main_btn_down1);
    downloadBtn2 = bindView(R.id.main_btn_down2);
    downloadBtn3 = bindView(R.id.main_btn_down3);

    cancelBtn1 = bindView(R.id.main_btn_cancel1);
    cancelBtn2 = bindView(R.id.main_btn_cancel2);
    cancelBtn3 = bindView(R.id.main_btn_cancel3);

    progress1 = bindView(R.id.main_progress1);
    progress2 = bindView(R.id.main_progress2);
    progress3 = bindView(R.id.main_progress3);

    downloadBtn1.setOnClickListener(this);
    downloadBtn2.setOnClickListener(this);
    downloadBtn3.setOnClickListener(this);

    cancelBtn1.setOnClickListener(this);
    cancelBtn2.setOnClickListener(this);
    cancelBtn3.setOnClickListener(this);
  }

  @Override
  public void onClick(View v) {
    switch (v.getId()) {
      case R.id.main_btn_down1:
        DownloadManager.getInstance().download(url1, new DownLoadObserver() {
          @Override
          public void onNext(DownloadInfo value) {
            super.onNext(value);
            progress1.setMax((int) value.getTotal());
            progress1.setProgress((int) value.getProgress());
          }

          @Override
          public void onComplete() {
            if(downloadInfo != null){
              Toast.makeText(MainActivity.this,
                  downloadInfo.getFileName() + "-DownloadComplete",
                  Toast.LENGTH_SHORT).show();
            }
          }
        });
        break;
      case R.id.main_btn_down2:
        DownloadManager.getInstance().download(url2, new DownLoadObserver() {
          @Override
          public void onNext(DownloadInfo value) {
            super.onNext(value);
            progress2.setMax((int) value.getTotal());
            progress2.setProgress((int) value.getProgress());
          }

          @Override
          public void onComplete() {
            if(downloadInfo != null){
              Toast.makeText(MainActivity.this,
                  downloadInfo.getFileName() + Uri.encode("下載完成"),
                  Toast.LENGTH_SHORT).show();
            }
          }
        });
        break;
      case R.id.main_btn_down3:
        DownloadManager.getInstance().download(url3, new DownLoadObserver() {
          @Override
          public void onNext(DownloadInfo value) {
            super.onNext(value);
            progress3.setMax((int) value.getTotal());
            progress3.setProgress((int) value.getProgress());
          }

          @Override
          public void onComplete() {
            if(downloadInfo != null){
              Toast.makeText(MainActivity.this,
                  downloadInfo.getFileName() + "下載完成",
                  Toast.LENGTH_SHORT).show();
            }
          }
        });
        break;
      case R.id.main_btn_cancel1:
        DownloadManager.getInstance().cancel(url1);
        break;
      case R.id.main_btn_cancel2:
        DownloadManager.getInstance().cancel(url2);
        break;
      case R.id.main_btn_cancel3:
        DownloadManager.getInstance().cancel(url3);
        break;
    }
  }

  private <T extends View> T bindView(@IdRes int id){
    View viewById = findViewById(id);
    return (T) viewById;
  }
}
Activity裡沒什麼了,就是注冊監聽,開始下載,取消下載這些了,下面我們來看看效果吧
運行效果
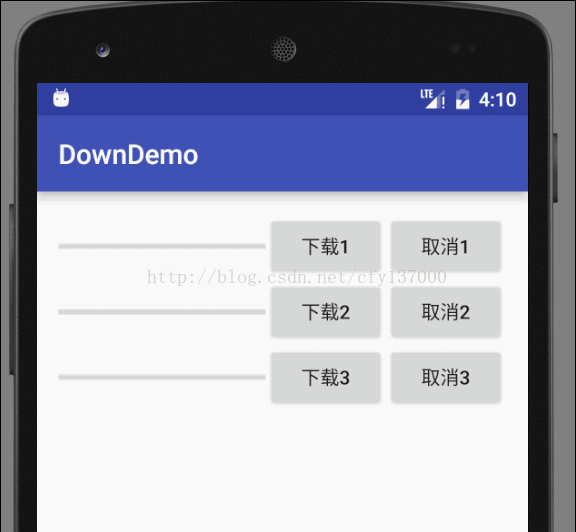
可以看到 多個下載,斷點續傳什麼的都已經成功了,最後我的文件網址是我自己的局域網,大家寫的時候別忘了換了..
代碼地址:demo
以上就是本文的全部內容,希望對大家的學習有所幫助,也希望大家多多支持本站。
 小米手機(MIUI系統)怎麼在撥號界面直接充值話費
如果你是小米手機或小米MIUI系統的用戶,充值話費可以很簡單,你知道嗎?還在打開電腦、登陸淘寶,搜索充值話費的店嗎?看看小米MIUI系統是怎麼在撥號界面輕松
 Android進程優先級基礎教程
線程與進程的最大區別就是是否共享父進程的地址空間,內核角度來看沒有線程與進程之分,都用task_struct結構體來表示,調度器操作的實體便是task_st
 Android 使用內置的Camera應用程序捕獲圖像
本Demo的實現效果是調用手機上已安裝的照相機來實現拍照的功能,拍好的照片以ImageView形式展示。 目的:學習手機調用安裝的相機照相,對大的圖片處理有所認識,這裡主
 Android圖像處理之霓虹濾鏡效果
霓虹是用來描繪圖像的輪廓,勾畫出顏色變化的邊緣,加強其過度效果,使圖像產生輪廓發光的效果。主要步驟為1、根據當前像素與其右方和下方像素的梯度運算;2、然後將結果值作為當前