編輯:關於Android編程
前言
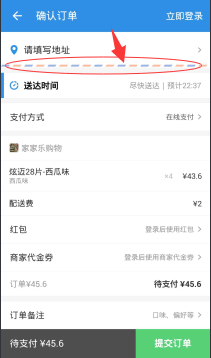
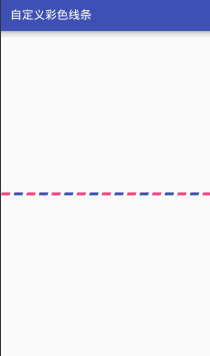
最近開發的一個產品需要涉及到訂單,訂單頁涉及到了一個UI元素,類似餓了麼的訂單頁以及支付寶口碑外賣訂單頁的彩帶(通俗點講就是一條兩種顏色相間而成的分割線):

可以看到,風格基本都是以兩種顏色為主相間拼接,至於長度則完全由屏幕寬度來決定,因此如果想要通過設計成圖片素材來作為ImageView的背景的方式實現的話,效果並不理想,因為圖片的寬度完全無法確定。所以本文通過自定義View的方式,繪制出這樣一個彩帶的效果。
實現
1.Android中如何繪制四邊形
public class ColourLineView extends View{

 public ColourLineView(Context context) {
 super(context, null);
 }

 public ColourLineView(Context context, AttributeSet attrs) {
 super(context, attrs, 0);
 }

 public ColourLineView(Context context, AttributeSet attrs, int defStyleAttr) {
 super(context, attrs, defStyleAttr);
 }

 @Override
 protected void onDraw(Canvas canvas) {
 super.onDraw(canvas);
 int width = getWidth();
 int height = getHeight();
 Path path = new Path();
 canvas.save();
 path.reset();//重置路徑
 path.moveTo(width/2, 0);//左上點
 path.lineTo(0, height);//左下點
 path.lineTo(width-width/2, height);//右下點
 path.lineTo(width, 0);//右上點
 canvas.clipPath(path);//截取路徑所繪制的圖形
 canvas.drawColor(Color.RED);
 path.reset();//重置路徑,准備繪制第三種顏色的平行四邊形
 canvas.restore();
 }
}
主要看onDraw方法,可以看到首先獲取View的寬和高,然後建立路徑對象path,接著先將path的起點移動到(控件寬的二分之一處,0)處:
接著由該點向(0, 控件高)處繪制一條直線:

接著由(0, 控件高)向(控件寬的二分之一處,高度)繪制一條直線:
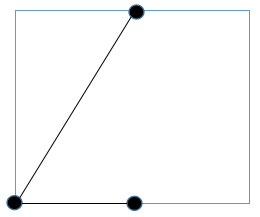
接著由(控件寬的二分之一處,高度)向(控件寬, 0)繪制一條直線:
路徑繪制完畢,調用clipPath將路徑的圖形剪出來,便成了一個平行四邊形,再給它填充個顏色。
在布局文件中使用一下:
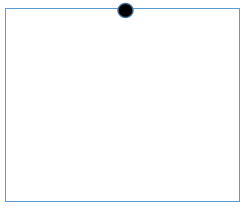
<com.example.yang.statubardemo.ColourLineView
 android:layout_width="80dp"
 android:layout_height="80dp"
 android:background="#000"/>
效果如圖:
平行四邊形的效果就出來了,了解了如何繪制平行四邊形,也就相當於寫好了磚塊,砌成牆自然就不是事了。
2.繪制彩色分割線
首先,我們這個View可以定義的東西應該有如下這幾點:
1.可以自定義每個顏色塊的大小
2.可以自定義兩種顏色
3.可以自定義顏色塊之間的間隔
4.平行四邊形顏色塊傾斜的程度
5.背景色
下面著手來實現這個效果
首先定義一下屬性,在attrs.xml中加入如下:
<declare-styleable name="ColourLineView">
 <!--線條高度-->
 <attr name="line_height" format="dimension"/>
 <!--第一種顏色塊的寬度-->
 <attr name="item_width" format="dimension"/>
 <!--第二種顏色塊的寬度-->
 <attr name="separation_width" format="dimension"/>
 <!--平行四邊形傾斜的程度-->
 <attr name="lean_degree" format="dimension"/>
 <!--第一種顏色-->
 <attr name="first_color" format="color"/>
 <!--第二種顏色-->
 <attr name="second_color" format="color"/>
 <!--線條底色-->
 <attr name="canvas_color" format="color"/>
</declare-styleable>
自定義View代碼:
**
 * Created by IT_ZJYANG on 2017/2/9.
 */
public class ColourLineView extends View{

 //線條高度
 private float line_height;
 //每個顏色塊的寬度
 private float item_width;
 //每兩個顏色快之間的間距
 private float separation_width;
 //平行四邊形傾斜的程度
 private float lean_degree;
 //第一種顏色塊的顏色
 private int first_color;
 //第二種顏色塊的顏色
 private int second_color;
 //線條底色
 private int canvas_color;

 public ColourLineView(Context context) {
 super(context, null);
 }

 public ColourLineView(Context context, AttributeSet attrs) {
 super(context, attrs);
 initAttr(context, attrs);
 }

 public ColourLineView(Context context, AttributeSet attrs, int defStyleAttr) {
 super(context, attrs, defStyleAttr);
 initAttr(context, attrs);
 }

 public void initAttr(Context context, AttributeSet attrs){
 TypedArray typedArray = context.obtainStyledAttributes(attrs, R.styleable.ColourLineView);
 line_height = typedArray.getDimension(R.styleable.ColourLineView_line_height, 20);
 item_width = typedArray.getDimension(R.styleable.ColourLineView_item_width, 20);
 separation_width = typedArray.getDimension(R.styleable.ColourLineView_separation_width, 20);
 lean_degree = typedArray.getDimension(R.styleable.ColourLineView_lean_degree, 5);
 first_color = typedArray.getColor(R.styleable.ColourLineView_first_color, Color.RED);
 second_color = typedArray.getColor(R.styleable.ColourLineView_second_color, Color.GREEN);
 canvas_color = typedArray.getColor(R.styleable.ColourLineView_canvas_color, Color.WHITE);
 typedArray.recycle();
 }

 @Override
 protected void onDraw(Canvas canvas) {
 super.onDraw(canvas);
 Path path = new Path();
 int lineWidth = getWidth();
 int lineHeight = getHeight();
 int count = (item_width + separation_width == 0) ? 0 : lineWidth / (int) (item_width + separation_width) + 1;
 for(int i=0; i < count; i++){
  canvas.save();
  path.reset();//重置路徑
  path.moveTo(lean_degree + (item_width + separation_width) * i, 0);//左上點
  path.lineTo((item_width + separation_width) * i, lineHeight);//左下點
  path.lineTo(item_width * (i + 1) + separation_width * i, lineHeight);//右下點
  path.lineTo(lean_degree + item_width * (i + 1) + separation_width * i, 0);//右上點
  canvas.clipPath(path);//截取路徑所繪制的圖形
  if(i % 2 == 0){
  canvas.drawColor(first_color);
  }else{
  canvas.drawColor(second_color);
  }
  canvas.restore();
 }
 }
}
其中,initAttr方法就不多說了,就是單純的獲取attr裡面的屬性值,關鍵看onDraw中的代碼,我們要實現多個平行四邊形間隔著繪制,那首先需要計算出有多少個平行四邊形,將每一個【顏色塊+間距】作為一個小部分,然後以整體的寬度/【顏色塊+間距】得出有多少個,然後通過for循環繪制出每一個Item,關鍵在於如何定位平行四邊形的四個端點,下面舉個例子說明一下思路:
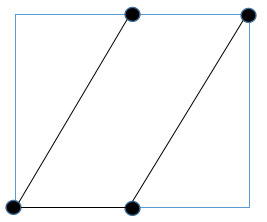
當i = 0,也就是第一個顏色塊,那麼其左上角一定是(lean_degree,0),左下角為(0,line_height),右上角肯定是左上角+顏色塊寬度,所以為(lean_degree+item_width, 0),同理右下角肯定是左下角+顏色塊寬度,所以為(item_width, line_height)。
當i = 1,也就是第二個顏色塊,此時需要注意,左上角需要在剛才第一個的基礎上加上第一個【顏色塊+間距】的值,也就是(lean_degree+ (item_width + separation_width) *1,0),左下角則為((item_width + separation_width) *1,line_height),右下和右上同理只是在左上左下的基礎上加上item_width。
.............
.............
.............
當i = i時,四個點也就成了:
(lean_degree + (item_width + separation_width) * i , 0)
((item_width + separation_width) * i , lineHeight)
(item_width * (i + 1) + separation_width * i , lineHeight)
(lean_degree + item_width * (i + 1) + separation_width * i , 0)
然後再根據奇偶性判斷,讓兩種顏色間隔繪制,完成。
使用
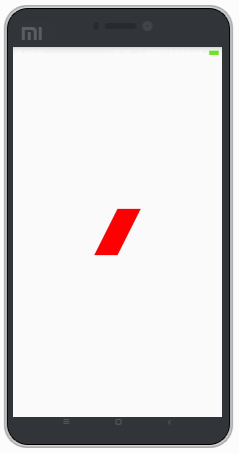
<LinearLayout xmlns:android="http://schemas.android.com/apk/res/android"
 xmlns:tools="http://schemas.android.com/tools"
 android:layout_width="match_parent"
 android:layout_height="match_parent"
 xmlns:app="http://schemas.android.com/apk/res-auto"
 android:orientation="vertical"
 android:gravity="center"
 tools:context="com.example.zjyang.statubardemo.MainActivity">

 <com.example.zjyang.statubardemo.ColourLineView
 android:layout_width="match_parent"
 android:layout_height="5dp"
 android:background="#fff"
 app:first_color="@color/colorAccent"
 app:second_color="@color/colorPrimary"
 app:item_width="15dp"
 />

</LinearLayout>
可以看到高度設置為5dp,每個顏色塊寬度為15dp,底色為白色,兩個顏色塊使用兩種不同的顏色,效果如下:
以上就是本文的全部內容,希望對大家的學習有所幫助,也希望大家多多支持本站。
 RemoteViews完全解析
一、概述什麼是RemoteViews?從字面意思可以理解為遠程View。需要注意的是,RemoteViews並不是View的子類,它是Object的子類。它的作用是可以跨
 移植u-boot2012.04.1 -》2440 (二)norflash 識別
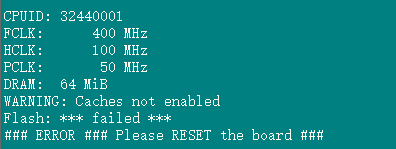
在上一篇文章中,我們實現了新建單板,時鐘 sdram 等一系列初始化工作,串口已經能正確輸出打印信息,但是有錯誤信息。現在,我們就來解決問題。搜索“Flash
 細說JVM系列:自動內存管理內存回收:垃圾收集理論-垃圾收集算法
這裡主要講解垃圾收集理論上的算法,下一篇會介紹一些實現了這些算法的垃圾收集器。一般我們談垃圾收集從三個問題來幫你理解jvm的垃圾收集策略:1.怎麼判斷哪些內存是垃圾?2.
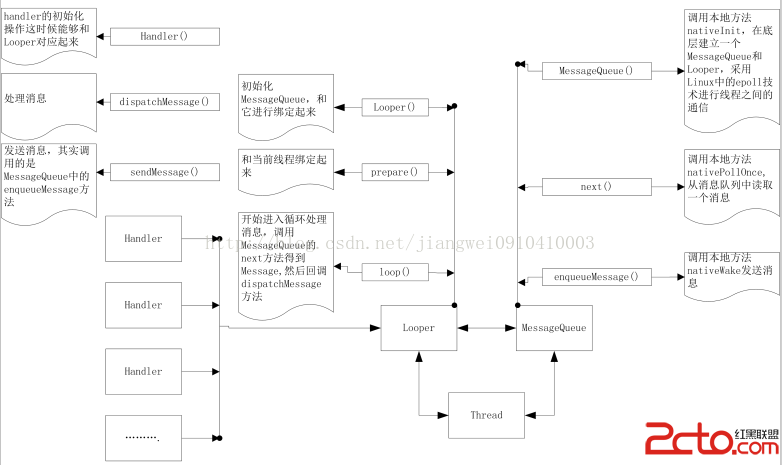 Android中對消息機制(Handler)的再次解讀
今天遇到一些關於在子線程中操作Handler的問題,感覺又要研究源代碼了,但是關於Handler的話,我之前研究過,可以參考這篇文章:http://blog.csdn.n