編輯:Android資訊
本篇文章小編為大家介紹,Android 軟件自動更新功能實現的方法。需要的朋友參考下。
相信所有的用戶都遇到過軟件提醒更新的情況,下面就將實現此功能
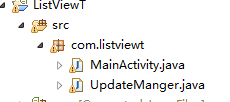
首先看一下程序目錄結構

步驟:
1、新建一個類UpdateManger,用於顯示提示更新
public class UpdateManger {
// 應用程序Context
private Context mContext;
// 提示消息
private String updateMsg = "有最新的軟件包,請下載!";
// 下載安裝包的網絡路徑
private String apkUrl = "http://softfile.3g.qq.com:8080/msoft/179/24659/43549/qq_hd_mini_1.4.apk";
private Dialog noticeDialog;// 提示有軟件更新的對話框
private Dialog downloadDialog;// 下載對話框
private static final String savePath = "/sdcard/updatedemo/";// 保存apk的文件夾
private static final String saveFileName = savePath + "UpdateDemoRelease.apk";
// 進度條與通知UI刷新的handler和msg常量
private ProgressBar mProgress;
private static final int DOWN_UPDATE = 1;
private static final int DOWN_OVER = 2;
private int progress;// 當前進度
private Thread downLoadThread; // 下載線程
private boolean interceptFlag = false;// 用戶取消下載
// 通知處理刷新界面的handler
private Handler mHandler = new Handler() {
@SuppressLint("HandlerLeak")
@Override
public void handleMessage(Message msg) {
switch (msg.what) {
case DOWN_UPDATE:
mProgress.setProgress(progress);
break;
case DOWN_OVER:
installApk();
break;
}
super.handleMessage(msg);
}
};
public UpdateManger(Context context) {
this.mContext = context;
}
// 顯示更新程序對話框,供主程序調用
public void checkUpdateInfo() {
showNoticeDialog();
}
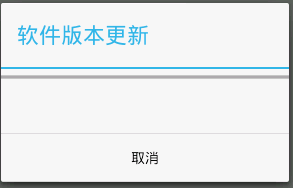
private void showNoticeDialog() {
android.app.AlertDialog.Builder builder = new android.app.AlertDialog.Builder(
mContext);// Builder,可以通過此builder設置改變AleartDialog的默認的主題樣式及屬性相關信息
builder.setTitle("軟件版本更新");
builder.setMessage(updateMsg);
builder.setPositiveButton("下載", new OnClickListener() {
@Override
public void onClick(DialogInterface dialog, int which) {
dialog.dismiss();// 當取消對話框後進行操作一定的代碼?取消對話框
showDownloadDialog();
}
});
builder.setNegativeButton("以後再說", new OnClickListener() {
@Override
public void onClick(DialogInterface dialog, int which) {
dialog.dismiss();
}
});
noticeDialog = builder.create();
noticeDialog.show();
}
protected void showDownloadDialog() {
android.app.AlertDialog.Builder builder = new android.app.AlertDialog.Builder(mContext);
builder.setTitle("軟件版本更新");
final LayoutInflater inflater = LayoutInflater.from(mContext);
View v = inflater.inflate(R.layout.progress, null);
mProgress = (ProgressBar) v.findViewById(R.id.progress);
builder.setView(v);// 設置對話框的內容為一個View
builder.setNegativeButton("取消", new OnClickListener() {
@Override
public void onClick(DialogInterface dialog, int which) {
dialog.dismiss();
interceptFlag = true;
}
});
downloadDialog = builder.create();
downloadDialog.show();
downloadApk();
}
private void downloadApk() {
downLoadThread = new Thread(mdownApkRunnable);
downLoadThread.start();
}
protected void installApk() {
File apkfile = new File(saveFileName);
if (!apkfile.exists()) {
return;
}
Intent i = new Intent(Intent.ACTION_VIEW);
i.setDataAndType(Uri.parse("file://" + apkfile.toString()),
"application/vnd.android.package-archive");// File.toString()會返回路徑信息
mContext.startActivity(i);
}
private Runnable mdownApkRunnable = new Runnable() {
@Override
public void run() {
URL url;
try {
url = new URL(apkUrl);
HttpURLConnection conn = (HttpURLConnection) url.openConnection();
conn.connect();
int length = conn.getContentLength();
InputStream ins = conn.getInputStream();
File file = new File(savePath);
if (!file.exists()) {
file.mkdir();
}
String apkFile = saveFileName;
File ApkFile = new File(apkFile);
FileOutputStream outStream = new FileOutputStream(ApkFile);
int count = 0;
byte buf[] = new byte[1024];
do {
int numread = ins.read(buf);
count += numread;
progress = (int) (((float) count / length) * 100);
// 下載進度
mHandler.sendEmptyMessage(DOWN_UPDATE);
if (numread <= 0) {
// 下載完成通知安裝
mHandler.sendEmptyMessage(DOWN_OVER);
break;
}
outStream.write(buf, 0, numread);
} while (!interceptFlag);// 點擊取消停止下載
outStream.close();
ins.close();
} catch (Exception e) {
e.printStackTrace();
}
}
};
}
2、新建一個xml文件,用於定義下載過程中的ProgressBar的進度顯示,名為progress.xml
<?xml version="1.0" encoding="utf-8"?>
<LinearLayout xmlns:android="http://schemas.android.com/apk/res/android"
android:layout_width="fill_parent"
android:layout_height="wrap_content" >
<ProgressBar
android:id="@+id/progress"

android:layout_width="fill_parent"
android:layout_height="wrap_content" />
</LinearLayout>
3、在MainActivity中onCreate()方法中,進行軟件更新的檢測
mUpdateManger = new UpdateManger(MainActivity.this);// 注意此處不能傳入getApplicationContext();會報錯,因為只有是一個Activity才可以添加窗體
mUpdateManger.checkUpdateInfo();
並且在配置清單文件中添加網絡權限 <uses-permission android:name=”android.permission.INTERNET” />
4、運行程序

–點擊下載–>
 4 行代碼實現 Android 快速文件下載
寫在前面的廢話 下載文件,幾乎是所有APP都會用到的功能!算了,還是不廢話了,直接開寫吧。。。 簡單使用 完成一個下載任務只需要4行代碼,什麼斷點續傳,大文件下載
 再次探究Android ListView緩存機制
概述 雖然現在5.0後Google推出了RecycleView,但在5.0 Lollipop普及前Listview仍會被廣泛使用,所以打算再次探究一下Listvi
 Android 的 Handler 機制實現原理分析
handler在安卓開發中是必須掌握的技術,但是很多人都是停留在使用階段。使用起來很簡單,就兩個步驟,在主線程重寫handler的handleMessage( )
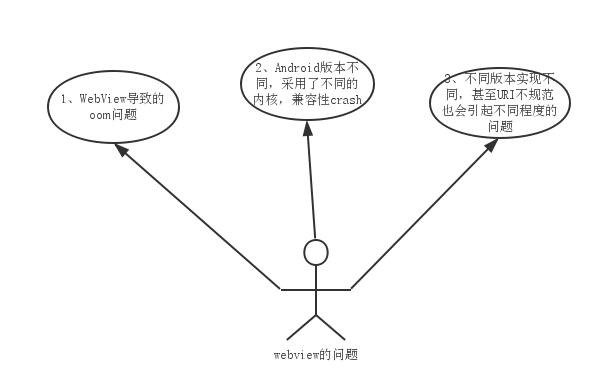 Android WebView 優化之路
前言 隨著app的迭代,嵌入的html5界面越來越多了,WebView這個強大組件引起的問題越發的多起來,例如: 1、WebView導致的oom問題 2、And