編輯:Android資訊
0和1是計算機的基礎,數理邏輯中0和1代表兩種狀態,真與假.0和1看似簡單,其實變化無窮. 今天我就來聊聊android控件中擁有著0和1這種特性的魔力控件checkbox.
先來講講Checkbox的基本使用.在XML中定義.
<?xml version="1.0" encoding="utf-8"?>
<CheckBox xmlns:android="http://schemas.android.com/apk/res/android"
    android:id="@+id/cbx"
    android:layout_width="wrap_content"
    android:layout_height="wrap_content"
    android:checked="false" />
在Activity中使用
CheckBox cbx = (CheckBox) findViewById(R.id.cbx);
cbx.setOnCheckedChangeListener(new CompoundButton.OnCheckedChangeListener() {
    @Override
    public void onCheckedChanged(CompoundButton buttonView, boolean isChecked) {
        //do something
    }
});
no big deal,很簡單.要注意的是,CheckBox本身是一個視圖,是展示給用戶看的,因此我們要用數據來控制它的展示.所以,我們的CheckBox在Activity中要這麼寫
boolean isChecked= false;
CheckBox cbx = (CheckBox) findViewById(R.id.cbx);
cbx.setOnCheckedChangeListener(new CompoundButton.OnCheckedChangeListener() {
    @Override
    public void onCheckedChanged(CompoundButton buttonView, boolean isChecked) {
        if(isChecked){
            //do something
        }else{
            //do something else
        }
    }
});
cbx.setChecked(isChecked);
這樣,我們改變數據的時候,視圖的狀態就會跟著數據來做改變了.注意,監聽器一定要這setChecked之前設置,這樣才能體現出來數據來控制視圖的展示.
單獨用CheckBox很easy,接下來,復雜的情況來啦,CheckBox如何跟ListView/RecyclerView(以下簡稱LV/RV)配合使用.這就不能簡單的考慮問題啦,要知道LV/RV中的視圖個數跟數據集的裡面的數據並不一致,真正的視圖個數遠小於數據集中數據項的個數.因為屏幕上在列表中的視圖是可以復用的.關於這點,初學者請看 The World Of ListView .由於LV/RV的復用機制,如果我們沒有用數據來控制CheckBox狀態的話,將會導致CheckBox的顯示在列表中錯亂.比方說你只對第一個Item中的CheckBox做了選中操作,當列表向上滾動的時候,你會發現,下面的Item中居然也會有被選中的.當然,我剛學Android時候也遇到過這種情況,問題的關鍵就在於要用數據來控制視圖的顯示.因此在getView/onBindViewHolder中,我們應該這麼寫.
holder.cbx.setTag(item);
holder.cbx.setOnCheckedChangeListener(new CompoundButton.OnCheckedChangeListener() {
    @Override
    public void onCheckedChanged(CompoundButton buttonView, boolean isChecked) {
        Item item =(Item) buttonView.getTag();
        if(isChecked){
            item.setCheckState(true);
            //do something
        }else{
            item.setCheckState(false);
            //do something else
        }
    }
});
cbx.setChecked(item.getCheckState());
這種方法基本正確,但是我們要額外的給每個數據項裡面添加一個字段來記錄狀態,這代價就有點大了.一是不必這麼做,二是這會導致本地數據結構跟服務端結構不一致.通常,列表中使用CheckBox的話,很明顯是把選中的item給記錄下來,可以這麼理解,選中的狀態是列表給的,而item本身應該是無狀態的.那麼,如果重構我們的代碼呢,Android為我們提供了一種完美的數據結構來解決這個問題.你可以用SparseArray,也可以用SparseBooleanArray,我現在習慣使用SparseBooleanArray,ok,請看代碼
private class Adapter extends RecyclerView.Adapter<RecyclerView.ViewHolder>{
    SparseBooleanArray mCheckStates=new SparseBooleanArray();
    @Override
    public RecyclerView.ViewHolder onCreateViewHolder(ViewGroup parent, int viewType) {
        //...
    }
    @Override
    public void onBindViewHolder(RecyclerView.ViewHolder holder, int position) {
        holder.cbx.setTag(position);
        holder.cbx.setOnCheckedChangeListener(new CompoundButton.OnCheckedChangeListener() {
            @Override
            public void onCheckedChanged(CompoundButton buttonView, boolean isChecked) {
                int pos =(int)buttonView.getTag();
                if(isChecked){
                    mCheckStates.put(pos,true);
                    //do something
                }else{
                    mCheckStates.delete(pos);
                    //do something else
                }
            }
        });
        cbx.setChecked(mCheckStates.get(position,false));
    }
    @Override
    public int getItemCount() {
        //...
    }
}
這樣列表就能正常顯示了,而且在你選中CheckBox的時候,會自動觸發onCheckedChanged來對mCheckStates來進行更新.此時,如果你想用程序來選中某個item的時候,那麼直接這樣就行了.
mCheckStates.put(pos,true);
adapter.notifyDatasetChanged();
如果我們想要取出列表列中所有的數據項,那麼有了SparseBooleanArray,這個就非常好辦啦.
ArrayList<Item> selItems=new ArrayList<>();
for(int i=0;i < mCheckStates.size();i++){
    if(mCheckStates.valueAt(i)){
        selItems.add(allItems.get(mCheckStates.keyAt(i)));
    }
}
竟然是如此的節省空間和時間,這樣的代碼誰不喜歡呢.但是,這還不完美. 由於CheckBox這個控件太容易變了,為什麼這麼說呢,因為就算你把它設成disabled的話,它依然是可以點選的,它的onCheckedChanged依然會觸發.那麼我們該怎麼辦呢.程序員考慮問題呢,一般都是先想最笨的方法啦,既然onCheckedChanged依然會觸發,那我就在裡面把buttonView再設置成!isCheck的不就行了嘛.
holder.cbx.setOnCheckedChangeListener(new CompoundButton.OnCheckedChangeListener() {
    @Override
    public void onCheckedChanged(CompoundButton buttonView, boolean isChecked) {
        buttonView.setChecked(!isChecked);
        //...
    }
});
但是這麼寫的話,就會調用buttonView的onCheckedChanged,其實buttonView就是外面的holder.cbx,這就會造成死循環.因此我們如果用cbx本身去改變狀態的話,那麼一定要加鎖.
boolean lockState=false;
holder.cbx.setOnCheckedChangeListener(new CompoundButton.OnCheckedChangeListener() {
    @Override
    public void onCheckedChanged(CompoundButton buttonView, boolean isChecked) {
        if(lockState)return;
        //不然cbx改變狀態.
        lockState=true;
        buttonView.setChecked(!isChecked);
        lockState=false;
        //...
    }
});
對cbx加鎖其實還是挺常用的,比方說在onCheckedChanged中,你要發一個請求,而請求的結果反過來會更新這個cbx的選中狀態,你就必須要用lockState來直接改變cbx的狀態了,以便於cbx的狀態跟mCheckStates裡面的是一致的.
mada mada,還有一種情況,如果在onCheckedChanged的時候,isChecked跟mCheckStates.get(pos)一致的話,這會導致什麼情況呢.
@Override
public void onCheckedChanged(CompoundButton buttonView, boolean isChecked) {
    int pos =(int)buttonView.getTag();
    if(isChecked){
        mCheckStates.put(pos,true);
        //do something
    }else{
        mCheckStates.delete(pos);
        //do something else
    }
}
這就會讓你的//do something做兩次,這麼做就是沒有必要的啦,而且如果你的//do something是網絡請求的話,這樣就會導致更大問題.所以,我們有必要對這種情況做過濾.
@Override
public void onCheckedChanged(CompoundButton buttonView, boolean isChecked) {
    if(lockState)return;
    int pos =(int)buttonView.getTag();
    if(mCheckStates.get(pos,false) == isChecked)return;
    if(isChecked){
        mCheckStates.put(pos,true);
        //do something
    }else{
        mCheckStates.delete(pos);
        //do something else
    }
}
好啦,如果你能將CheckBox跟SparseBooleanArray聯用,並且能考慮到加鎖和過濾重選的話,那麼說明你使用CheckBox的姿勢擺正了.但是,我要講的精彩的地方才剛剛開始.
一個列表僅僅能讓用戶上滾下滑,那是最簡單的使用,通常,由於列表項過多,產品會給列表項添加篩選的功能,而通常我們做篩選,會考慮到使用Spinner來做,但是,有用android自身提供的Spinner擴展性太差,而且長得丑,往往導致大家一怒之下,棄而不用.我呢,就是這麼干的.經過本人的奇思妙想,本人終於找到了一種很巧妙的機制來很優雅的實現列表的篩選.下面我就來給大家分享一下.
接下來清楚我們今天的另一位主角,那就是PopupWindow(介紹),我先介紹一下原理,首先給CheckBox設置setOnCheckedChangeListener,然後在onCheckedChanged裡面,isChecked分支中彈出PopupWindow,!isChecked中,讀取Popupwindow中的結果,用新的篩選條件來更新列表.ok,上代碼:
MainActivity:
public class MainActivity extends AppCompatActivity {

    String[] filter_type_strs = {"音樂", "書籍", "電影"};
    CheckBox cbx;
    private boolean lockState=false;
    int current_filter_type=0;
    @Override
    protected void onCreate(Bundle savedInstanceState) {
        super.onCreate(savedInstanceState);
        setContentView(R.layout.activity_main);
        cbx = (CheckBox) findViewById(R.id.cbx);

        cbx.setText(filter_type_strs[current_filter_type]);
        cbx.setOnCheckedChangeListener(new CompoundButton.OnCheckedChangeListener() {
            @Override
            public void onCheckedChanged(CompoundButton buttonView, boolean isChecked) {
                if (lockState) return;
                try {
                    if (isChecked) {
                        //此處傳入了cbx做參數
                        PopupWindow pw = new FilterLinePw(buttonView.getContext(), cbx, filter_type_strs);
                        pw.showAsDropDown(cbx);
                    } else {
                        //此處的buttonView就是cbx
                        Integer pos = (Integer) buttonView.getTag();
                        if (pos == null || pos == -1) return;
                        current_filter_type = pos;

                        Toast.makeText(MainActivity.this, "搜索"+filter_type_strs[current_filter_type], Toast.LENGTH_SHORT).show();
                    }
                } catch (NullPointerException e) {
                    //以防萬一
                    lockState = true;
                    buttonView.setChecked(!isChecked);
                    lockState = false;
                }
            }
        });

    }
}
FilterLinePw:
public class FilterLinePw extends PopupWindow {
    RadioGroup radioGroup;
    CheckBox outCbx;

    //為動態生成radioButton生成id
    int[] rbtIds = {0, 1, 2};

    public FilterLinePw(Context context, CheckBox outCbx, String[] items) {
        super(ViewGroup.LayoutParams.MATCH_PARENT, ViewGroup.LayoutParams.MATCH_PARENT);
        View contentview = LayoutInflater.from(context).inflate(R.layout.filter_line_popupwindow, null);
        setContentView(contentview);
        setFocusable(true);
        setOutsideTouchable(true);
        this.outCbx = outCbx;
        contentview.setOnKeyListener(new View.OnKeyListener() {
            @Override
            public boolean onKey(View v, int keyCode, KeyEvent event) {
                if (keyCode == KeyEvent.KEYCODE_BACK) {
                    dismiss();
                    return true;
                }
                return false;
            }
        });
        contentview.setFocusable(true); // 這個很重要
        contentview.setFocusableInTouchMode(true);
        contentview.setOnClickListener(new View.OnClickListener() {
            @Override
            public void onClick(View v) {
                dismiss();
            }
        });

        init(context, contentview,items);

    }

    private void init(Context context, View contentview, String[] items) {
        /**
         * 用傳入的篩選條件初始化UI
         */
        radioGroup = (RadioGroup) contentview.findViewById(R.id.filter_layout);
        radioGroup.clearCheck();
        if (items == null) return;
        for (int i = 0; i < items.length; i++) {

            RadioButton radioButton = (RadioButton) LayoutInflater.from(context).inflate(R.layout.line_popupwindow_rbt, null);
            radioButton.setId(rbtIds[i]);
            radioButton.setText(items[i]);

            radioGroup.addView(radioButton, -1, radioGroup.getLayoutParams());

            if (items[i].equals(outCbx.getText())) {
                outCbx.setTag(i);
                radioButton.setChecked(true);
            }

        }
        radioGroup.setOnCheckedChangeListener(new RadioGroup.OnCheckedChangeListener() {
            @Override
            public void onCheckedChanged(RadioGroup group, int checkedId) {
                dismiss();
            }
        });
    }

    //重點內容,重寫dismiss();
    @Override
    public void dismiss() {
        if (outCbx != null && outCbx.isChecked()) {
            int id = radioGroup.getCheckedRadioButtonId();
            RadioButton rbt = (RadioButton) radioGroup.findViewById(id);
            Integer old_tag = (Integer) outCbx.getTag();
            if (old_tag == null) {
                super.dismiss();
                return;
            }
            if (old_tag != id) {
                outCbx.setTag(id);
                outCbx.setText(rbt.getText());
            } else {
                outCbx.setTag(-1);
            }
            //下面執行之後,會執行MainActivity中的onCheckedChanged裡的否定分支
            outCbx.setChecked(false);
        }
        super.dismiss();
    }
}
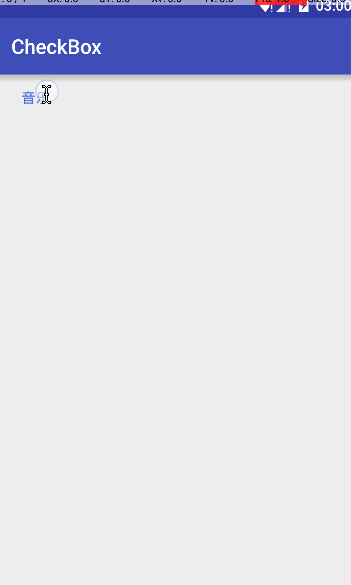
效果圖:
源碼
簡單解釋一下:其實重點在PopupWindow裡面,MainActivity的CheckBox作為參數傳遞到了 PopupWindow裡.首先,用戶點擊MainActivity的CheckBox,接著會執行isChecked分支,這樣PopupWindow就展示給了用戶,這樣用戶操作的環境就到了PopupWindow裡面,等用戶選擇好篩選條件後,PopupWindow就把篩選條件設給outCbx,然後改變outCbx狀態,從而觸發MainActivity中onCheckedChanged中的否定分支,此時展示的是一個Toast,實際應用中可以是一個網絡請求.同時,由於PopupWindow的代碼並沒有阻塞操作,所以會接著執行下一句 super.dismiss(),這樣你在MainActivity就不用擔心PopupWindow的關閉問題啦.最後,在MainActivity中還加入了try-catch來以防萬一,這種機制真是太神奇啦.這種機制把篩選操作從Activity中分離了出來,以後我們寫篩選可以完全獨立於Activity啦,真的是一種很軟件工程的做法.
隨後我會把其他篩選的情況開源,但是最精妙的原理就在於這個簡單的例子上.各位看完之後不妨親自動手試試,感受一下.
好啦,精彩的地方講完了,是不是不過瘾啊.好吧,最後,我再拿點私房菜出來. CheckBox是繼承自TextView,很多時候,我們的CheckBox的button屬性設置的圖片都不大,這就導致點擊CheckBox的區域也小,因此,我們需要用到TouchDelegate來擴大CheckBox的可點擊區域 上代碼:
public class FrameLayoutCheckBox extends FrameLayout {
    CompoundButton cbx;

    public FrameLayoutCheckBox(Context context) {
        super(context);
    }

    public FrameLayoutCheckBox(Context context, AttributeSet attrs) {
        super(context, attrs);
    }

    public FrameLayoutCheckBox(Context context, AttributeSet attrs, int defStyleAttr) {
        super(context, attrs, defStyleAttr);
    }

    private CheckBox findCheckBox(View view) {
        //無遞歸廣度優先遍歷尋找CheckBox - -!我只是想重溫一下C
        ArrayList<View> views = new ArrayList<>();
        views.add(view);
        while (!views.isEmpty()) {
            View c = views.remove(0);
            if (c instanceof CheckBox) {
                return (CheckBox) c;
            } else if (c instanceof ViewGroup) {
                ViewGroup fa = (ViewGroup) c;
                for (int i = 0; i < fa.getChildCount(); i++) {
                    views.add(fa.getChildAt(i));
                }
            }
        }
        return null;
    }

    @Override
    protected void onFinishInflate() {
        super.onFinishInflate();
        if (getChildCount() > 0) {
            View child = findCheckBox(this);
            if (child instanceof CompoundButton) cbx = (CompoundButton) child;
        }
    }

    @Override
    protected void onMeasure(int widthMeasureSpec, int heightMeasureSpec) {
        super.onMeasure(widthMeasureSpec, heightMeasureSpec);
        if (cbx != null) {
            Rect bounds = new Rect(getPaddingLeft(), getPaddingTop(), getPaddingLeft() + getMeasuredWidth() + getPaddingRight(), getPaddingTop() + getMeasuredHeight() + getPaddingBottom());
            TouchDelegate delegate = new TouchDelegate(bounds, cbx);
            setTouchDelegate(delegate);
        }
    }
}
這個類可以當成FrameLayout,我們可以把CheckBox放裡面,然後CheckBox的點擊區域就是整個FrameLayout的區域啦.當然這個類也適用於RadioButton,但是你不能放多個CompoundButton在裡面(- -!)
ok,今天的詳解就到這兒了.視反饋程度更新博文和 源碼 哦!
 Android 網絡圖片查看顯示的實現方法
本篇文章小編為大家介紹,Android 網絡圖片查看顯示的實現方法,需要的朋友參考下。 我們的應用或多或少都會從網絡獲取圖片數據然後進行顯示,下面就將實現一個這樣
 5 個 iOS 和 Android 最佳的開源自動化工具
本文由碼農網 – 小峰原創翻譯,轉載請看清文末的轉載要求,歡迎參與我們的付費投稿計劃! 自動化測試時下在產品測試上有著非常重要的作用。實現測試自動化有多種
 Android 沉浸式全屏的實現方法
Android 4.4 帶來了沉浸式全屏體驗, 在沉浸式全屏模式下, 狀態欄、 虛擬按鍵動態隱藏, 應用可 以使用完整的屏幕空間, 按照 Google 的說法,
 Android 性能監控實現原理
涉及知識點:APM, Java Agent, plugin, bytecode, asm, InvocationHandler, smail 一. 背景介紹 AP