編輯:Android資訊
本文通過建立一個線程,在後台持續輪詢獲取服務器推送消息,主要實現以下幾個功能:
@EBean
public class PushThread extends Thread {
    private Handler advertisementHandler;
    private Handler appPushHandler;
    private Context mContext;
    private int period = 2000;
    private NotificationManager mNM;
    private Notification notification;
    private boolean run;
    @Pref
    MyPrefs_ myPrefs;

    /**
     * 構造方法,初始化參數
     * @param mContext
     */
    public PushThread(Context mContext) {
        this.mContext = mContext;
    }

   /**
     * 啟動線程
     */
    public void startThread() {
        L.d("[PushThread] startThread");
        run = true;
        advertisementHandler = new Handler();
        appPushHandler  = new Handler();
        advertisementHandler.postDelayed(getAdvertisementRunable, period);
        L.d("PushThread run");
    }

    /**
     * 停止線程
     */
    public void stopThread() {
        L.d("[PushThread] stopThread");
        run = false;
        advertisementHandler.removeCallbacks(getAdvertisementRunable);
        appPushHandler.removeCallbacks(getAppPushRunable);
    }
}
startThread()初始化Handler,啟動線程;stopThread()移除線程,標志位run用來確保關閉所有線程。
 /**
 * 獲取advertisement的線程
 */
Runnable getAdvertisementRunable = new Runnable() {
	@Override
	public void run() {
		L.d("getAdvertisementRunable");
		IotClass.getAdvertisementInfo("advertisement", new IotClass.OnPushInfoListener() {
			@Override
			public void receive(String respons) {
				Gson gson = new Gson();
				AdvertismentBean advertismentBean = gson.fromJson(respons, AdvertismentBean.class);
				L.d("respons advertismentBean: " + advertismentBean);
//                    L.d("respons: " + respons);
				if (myPrefs.advertisementId().get() == advertismentBean.getMessageId()) {
					if (myPrefs.advertisementFrequency().get() <= (System.currentTimeMillis() / 1000)) {
						L.d("[PushThread] getAdvertisementRunable time to show");
						showNotification(advertismentBean);
					} else {
						L.d("[PushThread] getAdvertisementRunable wait...");
					}
				} else {
					L.d("[PushThread] getAdvertisementRunable first show");
					showNotification(advertismentBean);
				}
			}
		});
		 if (run)
		appPushHandler.postDelayed(getAppPushRunable, period);
	}
};
IotClass是自己寫好的一個網絡請求的類,IotClass.getAdvertisementInfo方法獲取推送消息,結果回調後進行處理,通過Gjson序列化成對象:
Gson gson = new Gson();
AdvertismentBean advertismentBean = gson.fromJson(respons, AdvertismentBean.class);
後面是判斷messageId,如果是第一次獲取到messageId則顯示消息,否則等到時間間隔過了後再顯示,最後通過appPushHandler.postDelayed(getAppPushRunable, period);繼續去輪詢APP更新推送
/**
     * 獲取app推送信息的線程
     */
    Runnable getAppPushRunable = new Runnable() {
        @Override
        public void run() {
            IotClass.getAdvertisementInfo("android", new IotClass.OnPushInfoListener() {
                @Override
                public void receive(String respons) {
                    String description;
                    Gson gson = new Gson();
                    AppBean appBean = gson.fromJson(respons, AppBean.class);
                    L.d("respons appBean: " + appBean);
//                    L.d("respons: " + respons);
                    if (myPrefs.appPushId().get() == appBean.getMessageId()){
                        if (myPrefs.appPushFrequency().get() <= (System.currentTimeMillis()/1000))
                        {
                            description = getAppDescription(appBean);
                            showUpgradeDialog(appBean, Utils.appDowanloadUrl+appBean.getAndroid_filename(), description);
                            L.d("[PushThread] getAppPushRunable time to show");
                        }
                        else{
                            L.d("[PushThread] getAppPushRunable wait...");
                        }
                    }else{
                        description = getAppDescription(appBean);
                        showUpgradeDialog(appBean, Utils.appDowanloadUrl+appBean.getAndroid_filename(), description);
                        L.d("[PushThread] getAppPushRunable first show");
                    }
                }
            });
if (run)      advertisementHandler.postDelayed(getAdvertisementRunable, period);
        }
    };
同理,獲取app更新推送的處理與獲取推廣信息的方式類似,在最後通過advertisementHandler.postDelayed(getAdvertisementRunable, period);重新去獲取推廣信息的推送,相互調用,達到後台線程持續輪詢推送消息的效果,其中getAppDescription用來判斷系統語言,用於選擇更新提示中用英文還是中文描述:
/**
 * 判斷系統語言版本,返回相應的更新說明
 * @param appBean
 * @return
 */
private String getAppDescription(AppBean appBean) {
	if (Tools.isZh(mContext))
	{
		return  appBean.getDescription();
	}else {
		return appBean.getDescription_en();
	}
}
下面是AppBean的類
public class AppBean {
    String result;
    int messageId;
    long frequency;
    int android_build;
    String versionCode;
    String description;
    String description_en;
    String android_filename;
    String android_file_size;
    String android_id;

    @Override
    public String toString() {
        return "AppBean [result=" + result + ", messageId=" + messageId + ", frequency=" + frequency
                + ", android_build=" + android_build + ", versionCode=" + versionCode + ", description=" + description + ", description_en=" + description_en
                + ", android_filename=" + android_filename + ", android_file_size=" + android_file_size + ", android_id=" + android_id
                + "]";
    }

    public String getResult() {
        return result;
    }

    public void setResult(String result) {
        this.result = result;
    }

    public int getMessageId() {
        return messageId;
    }

    public void setMessageId(int messageId) {
        this.messageId = messageId;
    }

    public long getFrequency() {
        return frequency;
    }

    public void setFrequency(long frequency) {
        this.frequency = frequency;
    }

    public int getAndroid_build() {
        return android_build;
    }

    public void setAndroid_build(int android_build) {
        this.android_build = android_build;
    }

    public String getVersionCode() {
        return versionCode;
    }

    public void setVersionCode(String versionCode) {
        this.versionCode = versionCode;
    }

    public String getDescription() {
        return description;
    }

    public void setDescription(String description) {
        this.description = description;
    }

    public String getDescription_en() {
        return description_en;
    }

    public void setDescription_en(String description_en) {
        this.description_en = description_en;
    }

    public String getAndroid_filename() {
        return android_filename;
    }

    public void setAndroid_filename(String android_filename) {
        this.android_filename = android_filename;
    }

    public String getAndroid_file_size() {
        return android_file_size;
    }

    public void setAndroid_file_size(String android_file_size) {
        this.android_file_size = android_file_size;
    }

    public String getAndroid_id() {
        return android_id;
    }

    public void setAndroid_id(String android_id) {
        this.android_id = android_id;
    }
}
AdvertismentBean與此類似,就不占篇幅了
/**
     * notification通知advertisement
     * @param advertismentBean
     */
    private void showNotification(AdvertismentBean advertismentBean) {
        myPrefs.advertisementId().put(advertismentBean.getMessageId());
        myPrefs.advertisementFrequency().put((int) (System.currentTimeMillis()/1000 + advertismentBean.getFrequency()));
        // The PendingIntent to launch our activity if the user selects this notification
        String url = advertismentBean.getUrl();
        Intent intent = new Intent(Intent.ACTION_VIEW);
        intent.setData(Uri.parse(url));
        PendingIntent contentIntent = PendingIntent.getActivity(mContext, 0, intent, 0);

        //get largeIcon from url
        Bitmap largeIcon = getBitmap(advertismentBean.getLargeIcon());

        // Set the info for the views that show in the notification panel.
        notification = new Notification.Builder(mContext)
                .setSmallIcon(R.drawable.logo)
                .setLargeIcon(largeIcon)
                .setWhen(System.currentTimeMillis())
                .setTicker(advertismentBean.getContentTitle())
                .setContentTitle(advertismentBean.getContentTitle())
                .setContentText(advertismentBean.getContentText())
                .setSubText(advertismentBean.getSubText())
                .setContentIntent(contentIntent)
                .build();

        // Send the notification.
        mNM.notify(advertismentBean.getMessageId(), notification);
    }
首先是存儲ID號和時間間隔,以便下次輪詢判斷使用,後面設置點擊事件,跳轉到相應網頁頁面
 String url = advertismentBean.getUrl();
        Intent intent = new Intent(Intent.ACTION_VIEW);
        intent.setData(Uri.parse(url));
        PendingIntent contentIntent = PendingIntent.getActivity(mContext, 0, intent, 0);
其他的則是常規的notification的消息內容設置,另外,下面用於獲取推送消息中的圖片url並顯示於notification上:
 /**
     * 通過URL獲取圖片,生成bitmap
     * @param path
     * @return
     */
    public static Bitmap getBitmap(String path) {
        try {
            URL url = new URL(path);
            HttpURLConnection conn = (HttpURLConnection) url.openConnection();
            conn.setConnectTimeout(5000);
            conn.setRequestMethod("GET");
            if (conn.getResponseCode() == 200) {
                InputStream inputStream = conn.getInputStream();
                Bitmap bitmap = BitmapFactory.decodeStream(inputStream);
                return bitmap;
            }
        } catch (MalformedURLException e) {
            e.printStackTrace();
        } catch (ProtocolException e) {
            e.printStackTrace();
        } catch (IOException e) {
            e.printStackTrace();
        }
        return null;
    }
該方法實現通過url轉化為bitmap,用於notification大圖標顯示
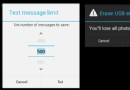
    /**
     * 更新檢測對話框
     * @param downloadUrl
     * @param newVersionInfo
     */
    @UiThread
    void showUpgradeDialog(AppBean appBean, final String downloadUrl, String newVersionInfo) {
        myPrefs.appPushId().put(appBean.getMessageId());
        myPrefs.appPushFrequency().put((int) (System.currentTimeMillis()/1000 + appBean.getFrequency()));
        final AlertDialog.Builder builder = new AlertDialog.Builder(mContext);
        builder.setTitle(R.string.Found_new_version).setMessage(newVersionInfo);
        builder.setPositiveButton(R.string.upgrade, new DialogInterface.OnClickListener() {
            @Override
            public void onClick(DialogInterface dialog, int which) {
                IotClass.downLoadAppOrBin(mContext, downloadUrl, new ProgressDialog(mContext), IotClass.TYPE_APP);
            }
        }).setNegativeButton(R.string.show_next_time, null).show();
    }
與消息推送類似,點擊升級按鈕後下載並安裝,下載及安裝的操作封裝在IotClass.downLoadAppOrBin中,此處不做具體展示。
主要的代碼到這裡基本結束,感覺還比較粗糙,耦合性比較大,後續還可以進行封裝,比如設置接口,將一些設置或處理暴露給外面進行處理等,這方面目前也在學習中,有什麼建議歡迎一起探討!
 Android Studio 1.0 正式版發布!
Android Studio 1.0 正式版發布! Android Studio 1.0 終於發布啦,作為一個 Android 團隊官方的集成開發環境(IDE),
 Android 對話框 Dialog 深度剖析
對話框 對話框是提示用戶作出決定或輸入額外信息的小窗口。 對話框不會填充屏幕,通常用於需要用戶采取行動才能繼續執行的模式事件。 對話框設計 Dialog 類是對
 Android GUI之View布局
在清楚了View繪制機制中的第一步測量之後,我們繼續來了解分析View繪制的第二個過程,那就是布局定位。繼續跟蹤分析源碼,根據之前的流程分析我們知道View的繪制
 再次探究Android ListView緩存機制
概述 雖然現在5.0後Google推出了RecycleView,但在5.0 Lollipop普及前Listview仍會被廣泛使用,所以打算再次探究一下Listvi