編輯:Android資訊
在之前講 Android Paint的使用詳解的時候,其中有一個方法setPathEffect(PathEffect effect)沒有詳細介紹,這篇就結合代碼來介紹一下,在之前說過PathEffect共有6個子類ComposePathEffect,CornerPathEffect,DashPathEffect,DiscretePathEffect,PathDashPathEffect,SumPathEffect,這些類代碼量都很少,這裡先一個個介紹
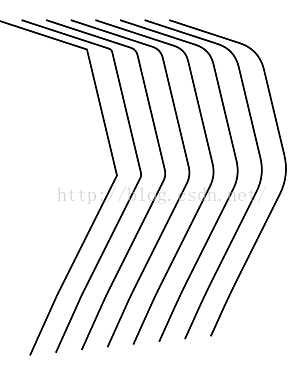
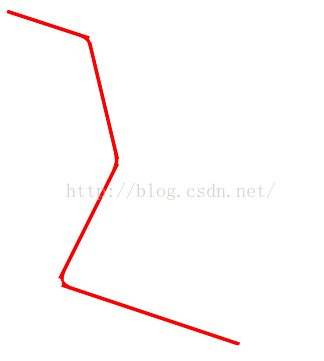
CornerPathEffect將Path的線段之間的夾角變成圓角。構造函數,其中radius為圓角的半徑
/**
 * Transforms geometries that are drawn (either STROKE or FILL styles) by
 * replacing any sharp angles between line segments into rounded angles of
 * the specified radius.
 * @param radius Amount to round sharp angles between line segments.
 */
public CornerPathEffect(float radius) {
    native_instance = nativeCreate(radius);
}
看一下代碼
public class PathEffectView extends View {
    private Paint mPaint;
    private int marging = 82;
    private CornerPathEffect mCornerPathEffect[];
    private Path mPath[];

    public PathEffectView(Context context, AttributeSet attrs) {
        super(context, attrs);
        init();
    }

    private void init() {
        mPaint = new Paint(Paint.ANTI_ALIAS_FLAG);
        mPaint.setColor(Color.BLACK);
        mPaint.setStyle(Style.STROKE);
        mPaint.setStrokeWidth(6);
        mCornerPathEffect = new CornerPathEffect[8];
        mPath = new Path[8];
        for (int i = 0; i < mPath.length; i++) {
            Path path = new Path();
            path.moveTo(i * marging, marging);
            path.lineTo(300 + i * marging, 180);
            path.lineTo(400 + i * marging, 600);
            path.lineTo(200 + i * marging, 1000);
            path.lineTo(110 + i * marging, 1200);
            mPath[i] = path;
            mCornerPathEffect[i] = new CornerPathEffect(i * 10);
        }
    }

    @Override
    protected void onDraw(Canvas canvas) {
        super.onDraw(canvas);
        canvas.drawColor(Color.WHITE);
        for (int i = 0; i < mPath.length; i++) {
            mPaint.setPathEffect(mCornerPathEffect[i]);
            canvas.drawPath(mPath[i], mPaint);
        }
    }
}
運行結果為
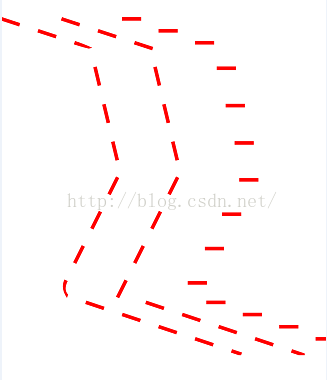
DashPathEffect主要用於畫虛線。構造函數,看注釋,intervals必須大於大於2,phase是偏移量
/**
 * The intervals array must contain an even number of entries (>=2), with
 * the even indices specifying the "on" intervals, and the odd indices
 * specifying the "off" intervals. phase is an offset into the intervals
 * array (mod the sum of all of the intervals). The intervals array
 * controls the length of the dashes. The paint's strokeWidth controls the
 * thickness of the dashes.
 * Note: this patheffect only affects drawing with the paint's style is set
 * to STROKE or FILL_AND_STROKE. It is ignored if the drawing is done with
 * style == FILL.
 * @param intervals array of ON and OFF distances
 * @param phase offset into the intervals array
 */
public DashPathEffect(float intervals[], float phase) {
    if (intervals.length < 2) {
        throw new ArrayIndexOutOfBoundsException();
    }
    native_instance = nativeCreate(intervals, phase);
}
看一下代碼
public class PathEffectView extends View {
    private Paint mPaint;
    private int marging = 82;
    private DashPathEffect mCornerPathEffect[];
    private Path mPath[];

    public PathEffectView(Context context, AttributeSet attrs) {
        super(context, attrs);
        init();
    }

    private void init() {
        mPaint = new Paint(Paint.ANTI_ALIAS_FLAG);
        mPaint.setColor(Color.BLACK);
        mPaint.setStyle(Style.STROKE);
        mPaint.setStrokeWidth(6);
        mCornerPathEffect = new DashPathEffect[8];
        mPath = new Path[8];
        for (int i = 0; i < mPath.length; i++) {
            Path path = new Path();
            path.moveTo(i * marging, marging);
            path.lineTo(300 + i * marging, 180);
            path.lineTo(400 + i * marging, 600);
            path.lineTo(200 + i * marging, 1000);
            path.lineTo(110 + i * marging, 1200);
            mPath[i] = path;
            mCornerPathEffect[i] = new DashPathEffect(
                    new float[] { 1, 2, 4, 8 }, 1);
        }
    }

    @Override
    protected void onDraw(Canvas canvas) {
        super.onDraw(canvas);
        canvas.drawColor(Color.WHITE);
        for (int i = 0; i < mPath.length; i++) {
            mPaint.setPathEffect(mCornerPathEffect[i]);
            canvas.drawPath(mPath[i], mPaint);
        }
    }
}
運行結果為
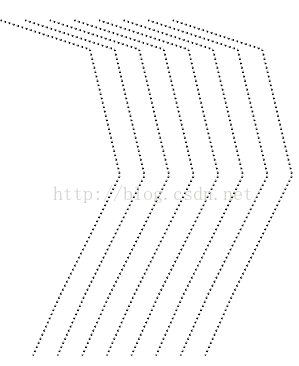
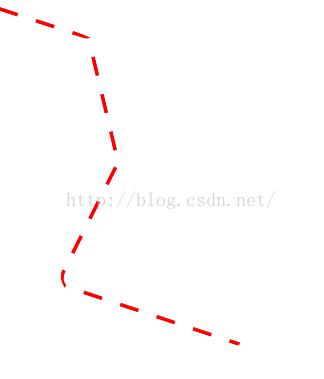
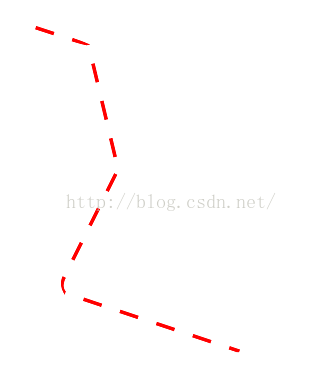
這裡phase的偏移量是指偏移指定長度的位置開始畫,但總長度還是不變,我們改一下再看看
mCornerPathEffect[i] = new DashPathEffect(new float[] { 10, 20, 40,
        80 }, i * 10);
運行結果
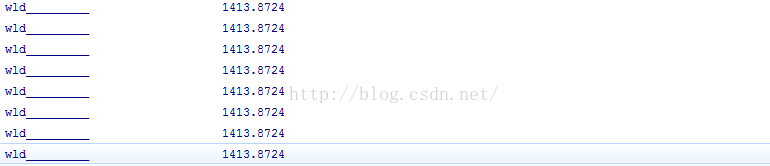
 先畫長度為10的實線,再畫長度為20的虛線,接著畫長度為40的實線,最後畫長度為80的虛線,看一下起始位置,每次的最開始都不一樣,因為每次偏移的都不一樣,但總長度是不變的,因為上面的線只是左右平移,長度並沒有減少,看到上面的線是越來越短,其實這是一種巧合,因為後面到虛線了,看不到了。通俗一點來說就是,線的開始位置和終止位置都沒有改變,線就像一個無限長的繩,偏移量就相當於繩往下(後)拽的距離。我們打印看一下長度就知道了,修改一下
for (int i = 0; i < mPath.length; i++) {
    mPaint.setPathEffect(mCornerPathEffect[i]);
    canvas.drawPath(mPath[i], mPaint);
    PathMeasure measure = new PathMeasure(mPath[i], false);
    Log.d("wld_________", measure.getLength() + "");
}
看一下log,長度都一樣,沒有變。
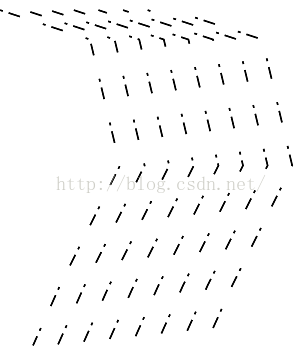
DiscretePathEffect切斷線段,segmentLength是指定切斷的長度,deviation為切斷之後線段的偏移量,隨機的,小於等於deviation。
/**
 * Chop the path into lines of segmentLength, randomly deviating from the
 * original path by deviation.
 */
public DiscretePathEffect(float segmentLength, float deviation) {
    native_instance = nativeCreate(segmentLength, deviation);
}
看一下代碼
public class PathEffectView extends View {
    private Paint mPaint;
    private int marging = 82;
    private DiscretePathEffect mPathEffect[];
    private Path mPath[];

    public PathEffectView(Context context, AttributeSet attrs) {
        super(context, attrs);
        init();
    }

    private void init() {
        mPaint = new Paint(Paint.ANTI_ALIAS_FLAG);
        mPaint.setColor(Color.BLACK);
        mPaint.setStyle(Style.STROKE);
        mPaint.setStrokeWidth(6);
        mPathEffect = new DiscretePathEffect[8];
        mPath = new Path[8];
        for (int i = 0; i < mPath.length; i++) {
            Path path = new Path();
            path.moveTo(i * marging, marging);
            path.lineTo(300 + i * marging, 180);
            path.lineTo(400 + i * marging, 600);
            path.lineTo(200 + i * marging, 1000);
            path.lineTo(110 + i * marging, 1200);
            mPath[i] = path;
            mPathEffect[i] = new DiscretePathEffect(10, 3 * i);
        }
    }

    @Override
    protected void onDraw(Canvas canvas) {
        super.onDraw(canvas);
        canvas.drawColor(Color.WHITE);
        for (int i = 0; i < mPath.length; i++) {
            mPaint.setPathEffect(mPathEffect[i]);
            canvas.drawPath(mPath[i], mPaint);
        }
    }
}
運行結果
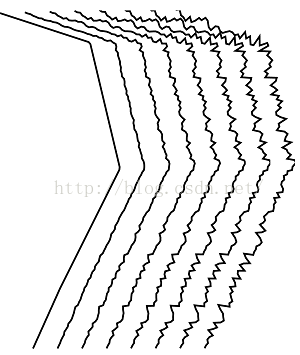
第一條線偏移量為0,所以看不出來有什麼變化。下面再來修改一下,每隔長度為1就中斷一次,3*i是偏移的最大長度,
mPathEffect[i] = new DiscretePathEffect(1, 3 * i);
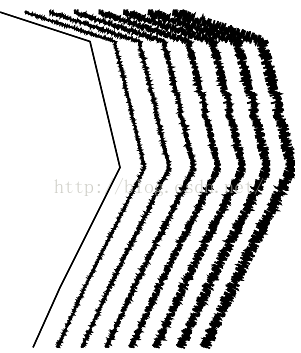
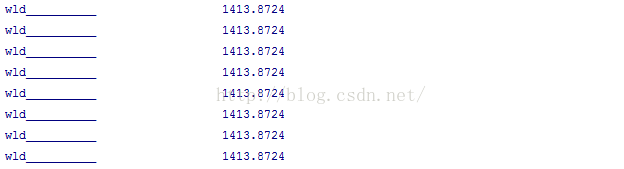
感覺有點像磁鐵一樣,我們來測量一下他的長度
for (int i = 0; i < mPath.length; i++) {
            mPaint.setPathEffect(mPathEffect[i]);
            canvas.drawPath(mPath[i], mPaint);
            PathMeasure measure = new PathMeasure(mPath[i], false);
            Log.d("wld__________", measure.getLength() + "");
        }
不可思議,每個長度都一樣,還和之前測的一樣,一點都沒變。
PathDashPathEffect和DashPathEffect差不多,不同的是PathDashPathEffect可以通過自定義圖形來繪制path,先看一下他的代碼
public enum Style {
    TRANSLATE(0),   //!< translate the shape to each position
    ROTATE(1),      //!< rotate the shape about its center
    MORPH(2);       //!< transform each point, and turn lines into curves

    Style(int value) {
        native_style = value;
    }
    int native_style;
}

/**
 * Dash the drawn path by stamping it with the specified shape. This only
 * applies to drawings when the paint's style is STROKE or STROKE_AND_FILL.
 * If the paint's style is FILL, then this effect is ignored. The paint's
 * strokeWidth does not affect the results.
 * @param shape The path to stamp along
 * @param advance spacing between each stamp of shape
 * @param phase amount to offset before the first shape is stamped
 * @param style how to transform the shape at each position as it is stamped
 */
public PathDashPathEffect(Path shape, float advance, float phase,
                          Style style) {
    native_instance = nativeCreate(shape.ni(), advance, phase,
                                   style.native_style);
}

private static native long nativeCreate(long native_path, float advance,
                                       float phase, int native_style);
shape是填充的圖形,這個圖形可以自己繪制,advance是圖形之間的間距,phase是path的偏移量,其中有3種style,TRANSLATE是指圖形以平移的方式填充path,ROTATE會根據path的旋轉而旋轉,MORPH和ROTATE差不多,不過有一點就是MORPH會在轉角的連接處以平滑的方式連接,下面看一下代碼
public class PathEffectView extends View {
    private Paint mPaint;
    private int marging = 82;
    private PathEffect mPathEffect1;
    private PathEffect mPathEffect2;
    private PathEffect mPathEffect3;
    private Path mPath;

    public PathEffectView(Context context, AttributeSet attrs) {
        super(context, attrs);
        init();
    }

    private void init() {
        mPaint = new Paint(Paint.ANTI_ALIAS_FLAG);
        mPaint.setStyle(Style.STROKE);
        mPaint.setStrokeWidth(6);
        mPaint.setColor(Color.RED);
        mPath = new Path();
        mPath.moveTo(0, marging);
        mPath.lineTo(300, 180);
        mPath.lineTo(400, 600);
        mPath.lineTo(200, 1000);
        mPath.lineTo(800, 1200);
        Path p = new Path();
        p.addRect(0, 0, 64, 12, Path.Direction.CCW);
        mPathEffect1 = new PathDashPathEffect(p, 128, 0,
                android.graphics.PathDashPathEffect.Style.MORPH);
        mPathEffect2 = new PathDashPathEffect(p, 128, 0,
                android.graphics.PathDashPathEffect.Style.ROTATE);
        mPathEffect3 = new PathDashPathEffect(p, 128, 0,
                android.graphics.PathDashPathEffect.Style.TRANSLATE);
    }

    @Override
    protected void onDraw(Canvas canvas) {
        super.onDraw(canvas);
        canvas.drawColor(Color.WHITE);
        mPaint.setPathEffect(mPathEffect1);
        canvas.drawPath(mPath, mPaint);
        canvas.translate(200, 0);
        mPaint.setPathEffect(mPathEffect2);
        canvas.drawPath(mPath, mPaint);
        canvas.translate(200, 0);
        mPaint.setPathEffect(mPathEffect3);
        canvas.drawPath(mPath, mPaint);
    }
}
看一下運行效果,
自定義了一個矩形,前兩個矩形的方向會隨著path的方向而改變,且第一個在連接處會以平滑的方式過渡。下面著重說一下PathDashPathEffect的幾個參數,第一個是自定義的圖形,這個就不在多說,主要分析一下第二個和第三個參數,第二個參數是圖形的間距,這個間距是指第一個圖形和第二個圖形起始位置的間距,修改一下代碼,全部用MORPH模式來測試
mPathEffect1 = new PathDashPathEffect(p, 0, 0,
        android.graphics.PathDashPathEffect.Style.MORPH);
mPathEffect2 = new PathDashPathEffect(p, 64, 0,
        android.graphics.PathDashPathEffect.Style.MORPH);
mPathEffect3 = new PathDashPathEffect(p, 228, 0,
        android.graphics.PathDashPathEffect.Style.MORPH);
看一下運行的結果
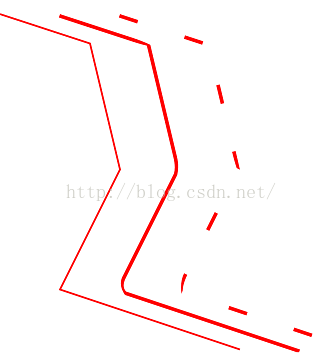
第一個是沒有間距的,第二個間距等於矩形的寬度,所以正好相當於矩形首尾相連中間沒有間隙,最後一個有間隙。再看第三個參數,就是偏移量,這個和第二個參數有關,在1到advance中間時,偏移的距離在逐漸減少,當偏移量等於advance的倍數的時候,偏移的距離為0,當偏移量大於advance的時候,會對他求余。我們看一下代碼
private void init() {
    mPaint = new Paint(Paint.ANTI_ALIAS_FLAG);
    mPaint.setStyle(Style.STROKE);
    mPaint.setStrokeWidth(6);
    mPaint.setColor(Color.RED);
    mPath = new Path();
    mPath.moveTo(0, marging);
    mPath.lineTo(300, 180);
    mPath.lineTo(400, 600);
    mPath.lineTo(200, 1000);
    mPath.lineTo(800, 1200);
    Path p = new Path();
    p.addRect(0, 0, 64, 12, Path.Direction.CCW);
    mPathEffect1 = new PathDashPathEffect(p, 128, 128,
            android.graphics.PathDashPathEffect.Style.MORPH);
}

@Override
protected void onDraw(Canvas canvas) {
    super.onDraw(canvas);
    canvas.drawColor(Color.WHITE);
    mPaint.setPathEffect(mPathEffect1);
    canvas.drawPath(mPath, mPaint);
}
看一下運行結果
我們看到是沒有偏移的,在修改一下代碼
mPathEffect1 = new PathDashPathEffect(p, 128, 129,
        android.graphics.PathDashPathEffect.Style.MORPH);
看一下結果,
我們看到偏移量已經達到最大,其實129和1的結果是一樣的,因為129對128求余所得結果也是1,偏移量從1到128逐漸增大時,偏移的距離逐漸減少,且當偏移量為128時則沒有偏移。再來改一下代碼
mPathEffect1 = new PathDashPathEffect(p, 28, 1,
        android.graphics.PathDashPathEffect.Style.MORPH);
前面已經分析過,當advance大於自定義圖形的尺寸時才會出現間隙(這裡主要是對MORPH這個style,當style為TRANSLATE時,advance必須大於自定義圖形的高時才會出現間隙,這個也很好理解),所以這個就會是一條看不到間隙的path,且有偏移,我們看一下
當把代碼在改一下的時候
mPathEffect1 = new PathDashPathEffect(p, 28, 28,
        android.graphics.PathDashPathEffect.Style.MORPH);
會看到沒有偏移的,這個截圖就不在貼出。如果還是不太明白,也可以看一下下面這個視頻PathDashPathEffect視頻
ComposePathEffect是一種組合模式,把兩種path所具有的特性組合起來,先看一下源碼
/**
 * Construct a PathEffect whose effect is to apply first the inner effect
 * and the the outer pathEffect (e.g. outer(inner(path))).
 */
public ComposePathEffect(PathEffect outerpe, PathEffect innerpe) {
    native_instance = nativeCreate(outerpe.native_instance,
                                   innerpe.native_instance);
}

private static native long nativeCreate(long nativeOuterpe,
                                        long nativeInnerpe);
他會會首先將innerpe的特性表現出來,然後再增加outerpe的效果,我們看一下代碼
public class PathEffectView extends View {
    private Paint mPaint;
    private int marging = 82;
    private PathEffect mEffects[];
    private Path mPath;

    public PathEffectView(Context context, AttributeSet attrs) {
        super(context, attrs);
        init();
    }

    private void init() {
        mPaint = new Paint(Paint.ANTI_ALIAS_FLAG);
        mPaint.setStyle(Style.STROKE);
        mPaint.setStrokeWidth(6);
        mPaint.setColor(Color.RED);
        mPath = new Path();
        mPath.moveTo(0, marging);
        mPath.lineTo(300, 180);
        mPath.lineTo(400, 600);
        mPath.lineTo(200, 1000);
        mPath.lineTo(800, 1200);
        Path p = new Path();
        p.addRect(0, 0, 64, 12, Path.Direction.CCW);
        mEffects = new PathEffect[3];
        mEffects[0] = new CornerPathEffect(80);
        mEffects[1] = new DashPathEffect(new float[] { 20, 10, 5, 10 }, 0);
        mEffects[2] = new ComposePathEffect(mEffects[1], mEffects[0]);
    }

    @Override
    protected void onDraw(Canvas canvas) {
        super.onDraw(canvas);
        for (int i = 0; i < mEffects.length; i++) {
            mPaint.setPathEffect(mEffects[i]);
            canvas.drawPath(mPath, mPaint);
            canvas.translate(200, 0);
        }
    }
}
在看一下運行結果
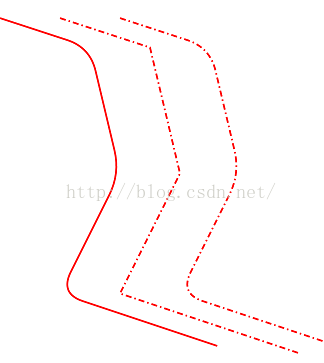
第一個是圓角的,第二個是虛線的,所以組合的第三個就是圓角到虛線的。在修改一下代碼,調換一下組合的位置,
mEffects[2] = new ComposePathEffect(mEffects[0], mEffects[1]);
看一下運行結果
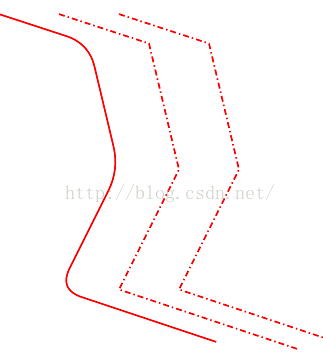
我們看到組合模式基本上沒變,這是因為我們先提取的是第二個圖的效果,再提取的是第一個的,所以看不到上面效果,我們在改一下代碼
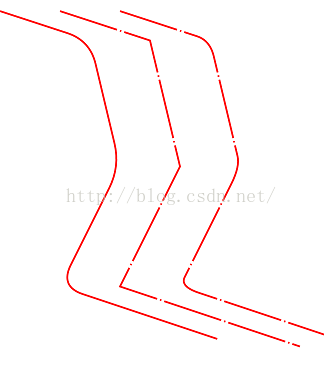
mEffects[1] = new DashPathEffect(new float[] { 200, 10, 5, 10 }, 0);
在看一下運行結果
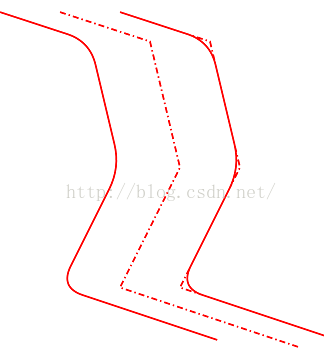
OK,我們再來看最後一種SumPathEffect,他相當於把兩種效果分別展示然後再組合在一起。還是用上面的代碼簡單的修改一下
mEffects[1] = new DashPathEffect(new float[] { 20, 10, 5, 10 }, 0);
mEffects[2] = new SumPathEffect(mEffects[1], mEffects[0]);
來看一下運行效果
OK,到目前為止,PathEffect的6種效果全部分析完畢。當然,如果想制作動態的效果,可以在onDraw方法中調用invalidate()方法,然後不停的修改偏移量就行了。
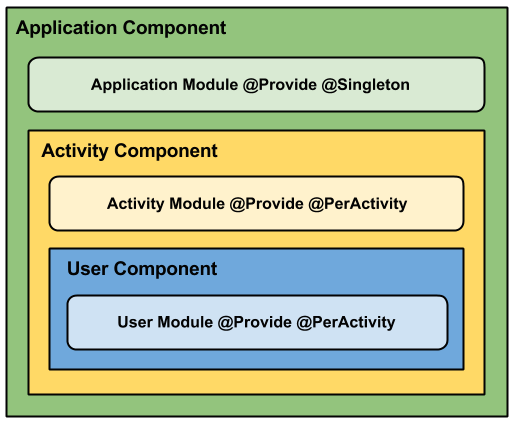 史上最通俗易懂的Android Dagger入門教程
簡介 Dagger2是Dagger1的分支,早期有square開發,現在由谷歌公司接手。 他要解決問題和核心是:利用生成和寫的代碼混合達到看似所有的產生和提供依賴
 Android單元測試與模擬測試詳解
測試驅動式編程(Test-Driven-Development)在RoR中已經是非常普遍的開發模式,是一種十分可靠、優秀的編程思想,可是在Android領域中這塊
 Android Activity的四大啟動模式詳解
在Android中每個界面都是一個Activity,切換界面操作其實是多個不同Activity之間的實例化操作。在Android中Activity的啟動模式決定了
 Android反編譯:反編譯工具和方法
前言 開發過程中有些時候會遇到一些功能,自己不知道該怎麼做,然而別的軟件裡面已經有了,這個時候可以采用反編譯的方式,解開其他的程序,來了解一些它的做法,同時啊,還