編輯:Android資訊
本文由碼農網 – 蘇耀東原創,轉載請看清文末的轉載要求,歡迎參與我們的付費投稿計劃!
本文介紹CircleProgressDialog開源庫的使用及實現的詳細過程,該開源庫主要實現以下幾個功能:
通過本文可了解到自定義view的相關知識及自定義dialog的方法
github鏈接如下,覺得還可以請幫忙點下star~
github鏈接
首先看下使用效果:
有兩種使用方式
提供loading_color、loading_width、shadow_offset進行設置
<com.syd.oden.circleprogressdialog.view.RotateLoading
            oden:loading_color="@color/colorAccent"
            oden:loading_width="6dp"
            oden:shadow_offset="8dp"
            android:layout_width="100dp"
            android:layout_height="100dp" />
如果直接采用默認設置直接調用以下代碼即可
CircleProgressDialog circleProgressDialog;
circleProgressDialog = new CircleProgressDialog(this);
circleProgressDialog.showDialog();
當然,還可以進行相關屬性的設置,同時在等待的過程中可根據程序運行情況動態改變提示文字的內容及顏色
CircleProgressDialog circleProgressDialog;
circleProgressDialog = new CircleProgressDialog(this);
//可對對話框的大小、進度條的顏色、寬度、文字的顏色、內容等屬性進行設置
circleProgressDialog.setDialogSize(15);
circleProgressDialog.setProgressColor(Color.parseColor("#FFFFFF"));
circleProgressDialog.setTextColor(Color.parseColor("#FFFFFF"));
...
circleProgressDialog.showDialog();  //顯示對話框

//顯示過程中可根據狀態改變文字內容及顏色
circleProgressDialog.changeText("erro:...");
circleProgressDialog.changeTextColor(Color.parseColor("##EB0000"));

circleProgressDialog.dismiss();//關閉對話框
當然在使用前需先導入該庫,僅需加入兩行代碼:
在工程的 build.gradle中加入:
allprojects {
        repositories {
            ...
            maven { url "https://jitpack.io" }
        }
    }
module的build.gradle中加入依賴:
dependencies {
            compile 'com.github.autume:CircleProgressDialog:1.0.0'
    }
繪制弧:
drawArc (RectF oval, float startAngle, float sweepAngle, boolean useCenter, Paint paint)
設置矩形:
RectF rectF = new RectF(100, 100, 300, 300);
這四個參數分別代表的意思是:left top right bottom 左 上 右 下
其實就是矩形的左上角和右下角的坐標值
我們定義了顏色,寬度,陰影偏移大小,是否顯示等屬性,format是值該屬性的取值類型:
一共有:string,color,demension,integer,enum,reference,float,boolean,fraction,flag;
<?xml version="1.0" encoding="utf-8"?>
<resources>

    <declare-styleable name="RotateLoading">
        <attr name="loading_width" format="dimension"/>
        <attr name="loading_color" format="color"/>
        <attr name="shadow_offset" format="dimension"/>
        <attr name="loading_visible" format="boolean"/>
    </declare-styleable>

</resources>
預設相關屬性
private final int DEFAULT_COLOR = Color.WHITE; //默認顏色
private final int DEFAULT_WIDTH = 6;
private final int DEFAULT_SHADOW_POSITION = 2;
private final boolean DEFAULT_VISIBLE = true;

private int color = DEFAULT_COLOR;
private int width = dpToPx(DEFAULT_WIDTH);
private int shadowOffset = dpToPx(DEFAULT_SHADOW_POSITION);
private boolean isStart = DEFAULT_VISIBLE;

private Paint mPaint = new Paint();
private RectF loadingRectF;
private RectF shadowRectF;

//對稱的兩個弧形起始角度
private int topDegree = 10;
private int bottomDegree = 190;
獲取自定義屬性
private void obtainStyleAttrs(AttributeSet attrs) {
        TypedArray typedArray = getContext().obtainStyledAttributes(attrs, R.styleable.RotateLoading);
        color = typedArray.getColor(R.styleable.RotateLoading_loading_color, color);
        width = (int) typedArray.getDimension(R.styleable.RotateLoading_loading_width, width);
        shadowOffset = (int) typedArray.getDimension(R.styleable.RotateLoading_shadow_offset, shadowOffset);
        isStart = typedArray.getBoolean(R.styleable.RotateLoading_loading_visible, isStart);
        typedArray.recycle();
    }
Paint初始化
private void initView() {
        mPaint.setColor(color);
        mPaint.setAntiAlias(true);
        mPaint.setStyle(Paint.Style.STROKE);
        mPaint.setStrokeWidth(width);
        mPaint.setStrokeCap(Paint.Cap.ROUND);
    }
初始化繪制弧形所需的RectF
@Override
    protected void onSizeChanged(int w, int h, int oldw, int oldh) {
        super.onSizeChanged(w, h, oldw, oldh);
        arc = 10;
        //占滿界面 邊距為2*width
        loadingRectF = new RectF(2 * width, 2 * width, w - 2 * width, h - 2 * width);
        shadowRectF = new RectF(2 * width + shadowOffset, 2 * width + shadowOffset, w - 2 * width + shadowOffset, h - 2 * width + shadowOffset);
    }
重寫onDraw,繪出圖形
@Override
    protected void onDraw(Canvas canvas) {
        super.onDraw(canvas);

        if (!isStart) {
            return;
        }

        mPaint.setColor(Color.parseColor("#1a000000"));
        canvas.drawArc(shadowRectF, topDegree, arc, false, mPaint);
        canvas.drawArc(shadowRectF, bottomDegree, arc, false, mPaint);

        mPaint.setColor(color);
        canvas.drawArc(loadingRectF, topDegree, arc, false, mPaint);
        canvas.drawArc(loadingRectF, bottomDegree, arc, false, mPaint);

        try {
            Thread.sleep(2);
        } catch (InterruptedException e) {
            e.printStackTrace();
        }
        topDegree += 10;
        bottomDegree += 10;
        if (topDegree > 360) {
            topDegree = topDegree - 360;
        }
        if (bottomDegree > 360) {
            bottomDegree = bottomDegree - 360;
        }

        if (changeBigger) {
            if (arc < 160) {
                arc += 2.5;
                invalidate();
            }
        } else {
            if (arc > 10) {
                arc -= 5;
                invalidate();
            }
        }
        if (arc == 160 || arc == 10) {
            changeBigger = !changeBigger;
            invalidate();
        }
    }
至此,圓形進度條就完成了,完整的代碼可在github上查看
就是放入剛才自定義的RotateLoading,同時在下面放入一個文本
<?xml version="1.0" encoding="utf-8"?>
<LinearLayout xmlns:android="http://schemas.android.com/apk/res/android"
    xmlns:oden="http://schemas.android.com/apk/res-auto"
    android:orientation="vertical"
    android:layout_width="fill_parent"
    android:layout_height="fill_parent"
    android:background="#00000000"
    android:gravity="center">

    <LinearLayout
        android:id="@+id/llProgress"
        android:layout_width="100dp"
        android:layout_height="100dp">

        <com.syd.oden.circleprogressdialog.view.RotateLoading
            android:id="@+id/rotateloading"
            oden:loading_visible="false"
            android:layout_width="wrap_content"
            android:layout_height="wrap_content" />

    </LinearLayout>

    <TextView
        android:id="@+id/progreeTextView"
        android:layout_width="wrap_content"
        android:layout_height="wrap_content"
        android:textSize="16sp"
        android:textColor="#c0000000"
        android:text="loading..." />

</LinearLayout>
public class CircleProgressDialog {
private Context mContext;
private Dialog mDialog;

//默認參數
private int dialogSize = 65;
private int progressColor = Color.WHITE;
private int progressWidth = 6;
private int shadowOffset = 2;
private int textColor = Color.parseColor("#c0000000");
private String text = "loading...";

private TextView progressTextView;
private boolean isShowing = false;

...
}
public CircleProgressDialog(Context context) {
    this.mContext = context;
    init();
}

private void init() {
//dialog的大小,轉化成dp
float scale = mContext.getResources().getDisplayMetrics().density;
dialogSize = (int) (dialogSize * scale + 0.5f);

mDialog = new AlertDialog.Builder(mContext).create();
mDialog.getWindow().setBackgroundDrawableResource(android.R.color.transparent);
}
加載剛才的布局文件,調用自定義view的顯示
 public void showDialog() {
        mDialog.show();
        mDialog.setContentView(R.layout.dialog_circle_progress);

        //獲取控件
        progressTextView = (TextView) mDialog.findViewById(R.id.progreeTextView);
        RotateLoading mRotateLoading = (RotateLoading) mDialog.findViewById(R.id.rotateloading);
        LinearLayout layout = (LinearLayout) mDialog.findViewById(R.id.llProgress);

        //配置相關屬性
        layout.setLayoutParams(new LinearLayout.LayoutParams(dialogSize, dialogSize));
        mRotateLoading.setWidth(progressWidth);
        mRotateLoading.setColor(progressColor);
        mRotateLoading.setShadowOffset(shadowOffset);
        progressTextView.setTextColor(textColor);
        progressTextView.setText(text);

        mRotateLoading.start();
        isShowing = true;
    }
包括相關屬性的set方法及兩個改變文字屬性的方法
public void changeText(String str) {
        if (progressTextView != null)
        {
            progressTextView.setText(str);
        }
    }

    public void changeTextColor(int color) {
        if (progressTextView != null)
        {
            progressTextView.setTextColor(color);
        }
    }
...
 public void setCancelable(boolean isCancelable) {
        if (mDialog != null)
        {
            mDialog.setCancelable(isCancelable);
        }
    }
...
ok,至此,自定義dialog也完成了。
本文介紹了CircleProgressDialog開源庫的使用及其實現方法,借此也介紹了自定義view及自定義dialog的方法。
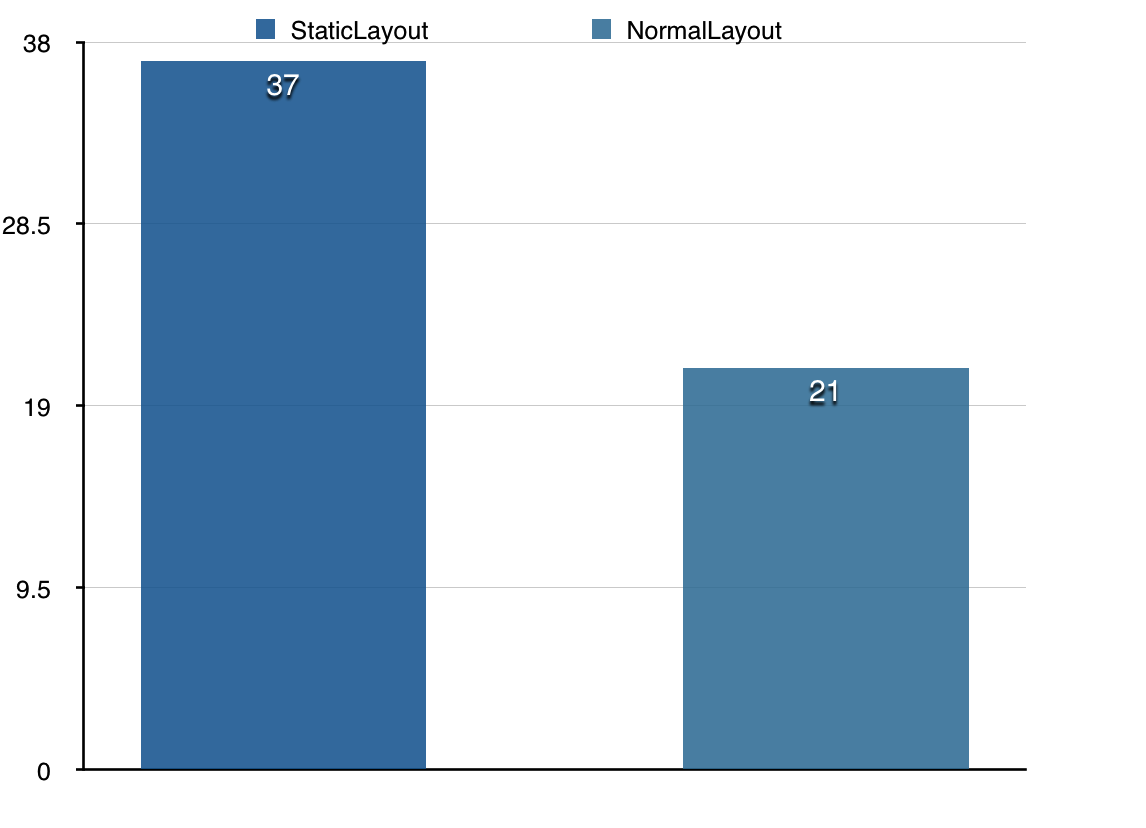 Android TextView 預渲染詳解
Android中的TextView是整個framework中最復雜的控件之一,負責Android中顯示文本的大部分工作,framwork中 的許多控件也直接或者間
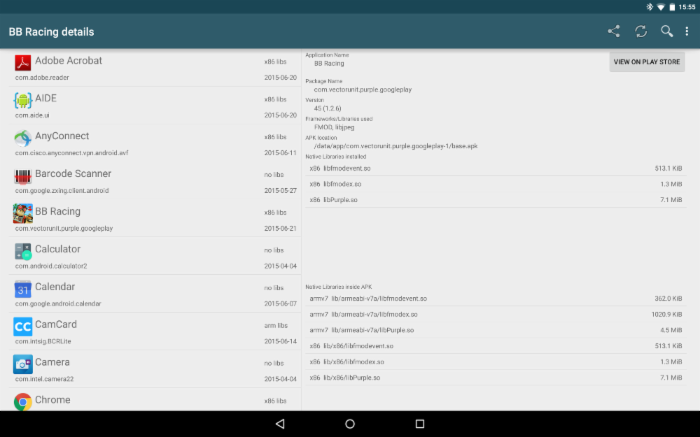 Android的.so文件詳細解讀
早期的Android系統幾乎只支持ARMv5的CPU架構,你知道現在它支持多少種嗎?7種! Android系統目前支持以下七種不同的CPU架構:ARMv5,ARM
 Android單元測試與模擬測試詳解
測試驅動式編程(Test-Driven-Development)在RoR中已經是非常普遍的開發模式,是一種十分可靠、優秀的編程思想,可是在Android領域中這塊
 Android實現帶動畫的下拉刷新RecyclerView
不廢話,先看效果,嗯…看起來有點卡,截圖軟件的問題: 圖中普通列表是ListView樣式,沒有設置Header和Footer時使用默認的下拉刷新和上