編輯:Android資訊
之前寫過一篇關於Android項目如何架構的,有MVC和MCVP,前幾天又看到了新的一種架構,當然並不是新出的,出了有一段時間,當前被應用的並不是很普遍,接下來從其特點和使用上來介紹Flux架構。本文主要目的是讓你對Flux的一個架構大體面貌有個了解。
Flux 架構 被Facebook使用來構建他們的客戶端web應用。跟Clean Architecture一樣,它不是為移動應用設計的,但是它的特性和簡單可以讓我們很好的在安卓項目中采用。

要理解Flux,有兩個關鍵的特點
在安卓開發中使用Flux設計規范的目的是建立一個在簡單性與易擴展易測試之間都比較平衡的架構。
第一步是找到Flux元素和安卓app組件之間的映射。
其中兩個元素非常容易找到與實現。
View: Activity o或者Fragment
Dispatcher: 一個事件總線( event bus),在我的例子中將使用Otto,但是其它任何實現都應該是ok的。
Actions
Actions也不復雜。它們的實現和POJO一樣簡單,有兩個主要屬性:
Type: 一個String,定義了事件的類型。
Data: 一個map,裝載了本次操作。
Store是Flux理論中最難的部分。
Stores響應Dispatcher發出的Action,執行業務邏輯並發送change事件。Stores的唯一輸出是這單一的事件:change。其它對Store內部狀態感興趣的組件必須監聽這個事件,同時使用它獲取需要的數據。最後,stores必須對外公開一個獲取application狀態的接口。這樣,view元素可以查詢Stores然後相應的更新UI。
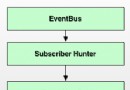
這裡通過一個簡單的小demo來講述整個流程。我們的界面上有一個Button和一個TextView,點擊Button後讓TextView顯示出文字。常規的實現,直接在Activity中完成邏輯,MVP模式,在Presenter層來進行,對於Flux架構,我們要怎麼實現呢。通過上圖我們可以看到,View會產生Action,然後被Dispatcher進行調度,經過Store相應處理,將數據顯示出來。
如何產生Action
首先要知道Action是什麼樣
public class Action {

    private final String type;
    private final HashMap<String, Object> data;

    public Action(String type, HashMap<String, Object> data) {
        this.type = type;
        this.data = data;
    }

    public static Builder type(String type) {
        return  new Builder().with(type);
    }

    public String getType() {
        return type;
    }

    public HashMap getData() {
        return data;
    }

    public static class Builder {
        private String type;
        private HashMap<String, Object> data;

        Builder with(String type) {
            if(type == null) {
                throw  new IllegalArgumentException("Type may not be null.");
            }
            this.type = type;
            this.data = new HashMap<>();
            return this;
        }

        public Builder bundle(String key, Object value) {
            if (key == null) {
                throw  new IllegalArgumentException("Key may not be null.");
            }
            if(value == null) {
                throw new IllegalArgumentException("Value may not be null.");
            }
            data.put(key, value);
            return this;
        }

        public Action build() {
            if (TextUtils.isEmpty(type)) {
                throw  new IllegalArgumentException("At least one key is required.");
            }
            return new Action(type, data);
        }
    }
}
每一個Action有兩個屬性,一個來標記Type,另一個字段來存儲傳送的數據,通過Map來存放。
對於Action Type,我們可以通過一個接口或者類來進行記錄,將所有的類型保存在其中。方便我們的調用。
public interface ShowActions {
    String TODO_SHOW = "todo-show";
    String GET_TEXT = "get-text";
}
如何創建Action,定義一個類,專門用來根據我們可能會出現的各種View的事件,定義出來各種Action。
public class ActionsCreator {

    private  static ActionsCreator instance;

    final Dispatcher mDispatcher;

    ActionsCreator(Dispatcher dispatcher){
        mDispatcher = dispatcher;
    }

    public static ActionsCreator get(Dispatcher dispatcher) {
        if (instance == null) {
            instance = new ActionsCreator(dispatcher);
        }
        return instance;
    }

    public void create(String text) {
        mDispatcher.dispatch(ShowActions.TODO_SHOW, ShowActions.GET_TEXT, text);
    }
在我們准備用ActionsCreator來創建Action的時候,我們並沒有直接new Action這種方式來做,而是將其通過調度器,對其進行了分發。這裡的事件分發,我們使用的是Otto的Bus來進行事件的分發。
public class Dispatcher {

    private final Bus bus;
    private static Dispatcher instance;

    Dispatcher(Bus bus){
        this.bus = bus;
    }

    public static  Dispatcher get(Bus bus) {
        if (instance == null) {
            instance = new Dispatcher(bus);
        }
        return instance;
    }

    public void register(final Object cls) {
        bus.register(cls);
    }

    public void unRegister(final Object cls) {
        bus.unregister(cls);
    }

    public void emitChange(Store.StoreChangeEvent o) {post(o);}

    public void dispatch(String type, Object... data) {
        if(TextUtils.isEmpty(type)) {
            throw new IllegalArgumentException("Type must not be empty");
        }

        if (data.length % 2 != 0) {
            throw  new IllegalArgumentException("Data must be a valid list of key");
        }

        Action.Builder actionBuilder = Action.type(type);
        for (int i = 0; i < data.length; i++) {
            String key = (String) data[i++];
            Object value = data[i++];
            actionBuilder.bundle(key, value);
        }
        post(actionBuilder.build());
    }

    private boolean isEmpty(String type) {
        return TextUtils.isEmpty(type);
    }

    private void post(final Object event) {
        bus.post(event);
    }
}
在調度的過程中,我們將傳遞進來的數據進行一個解析,然後根據數據創建出相應的Action,然後對Action進行分發,這個時候關注了相應的Action的Store就會開始根據相應的Action開始執行相應的操作。在Store中,聲明了一個抽象方法onAction來負責進行對於Action的判斷和分發,然後定義了StoreChangeEvent接口作為事件變化,當有變化的時候,通過這個進行傳遞,我們可以自己實現這個接口,然後在裡面添加一些方法和字段用來攜帶數據。
public abstract class Store {
    final Dispatcher mDispatcher;

    protected Store(Dispatcher dispatcher) {
        this.mDispatcher = dispatcher;
    }

    void emitStoreChange() {
        mDispatcher.emitChange(changeEvent());
    }

    abstract StoreChangeEvent changeEvent();

    public abstract void onAction(Action action);

    public interface StoreChangeEvent {}

}
我們自定義的Store類
public class ShowStore extends Store {

    private static ShowStore instance;
    private String showText;

    public ShowStore(Dispatcher dispatcher){
        super(dispatcher);
    }

    public static ShowStore get(Dispatcher dispatcher) {
        if (instance == null) {
            instance = new ShowStore(dispatcher);
        }
        return instance;
    }

    @Subscribe
    public void onAction(Action action) {
        switch (action.getType()) {
            case ShowActions.TODO_SHOW :
                showText = ((String)action.getData().get(ShowActions.GET_TEXT));
                Log.i("showText", showText);
                emitStoreChange();
                break;
            default:
                break;
        }
    }

    public String getShowText(){
        return showText;
    }

    @Override
    StoreChangeEvent changeEvent() {
        return new ShowChangeEvent();
    }

    public class ShowChangeEvent implements StoreChangeEvent {

    }
}
然後我們在View也就是Activity中訂閱了變化時間的方法,這個時候就可以實現對於View中的數據的一個動態更新。
  @Subscribe
    public void showText (ShowStore.ShowChangeEvent event){
        mTextView.setText(mShowStore.getShowText());
     }
通過Flux架構,使用的流程是,我們的View的事件會攜帶數據,通過一個ActionsCreate創建一個Type的Action,實際完成過程是在Dispatcher的dispatch中,然後再將這個Action丟給訂閱了該Action的Store方法中,在這裡完成各種邏輯,處理,甚至是可以發起網絡請求獲取數據,處理完成,可以將結果封裝成一個事件,然後這個事件會再次通過調度器中的emitChangeEvent將事件傳遞給訂閱了該事件的函數,而這個接收響應事件的函數被我們定義在我們View中,從而實現對於我們View的更新。
 捕獲Android文本中鏈接點擊事件
Android中的TTextView很強大,我們可以不僅可以設置純文本為其內容,還可以設置包含網址和電子郵件地址的內容,並且使得這些點擊可以點擊。但是我們可以捕獲
 GreenDroid:增強型Android UI類庫
本文由碼農網 – 小峰原創,轉載請看清文末的轉載要求,歡迎參與我們的付費投稿計劃! GreenDroid是一款很不錯的開源Android UI類庫,利用G
 為什麼Android App質量不高並且卡頓崩潰
和前幾年iOS能夠憑籍App數量將安卓壓倒在地、安卓嬌喘吁吁起身不能的情況不同,現在安卓的App數量對比iOS平台可謂是有過之而無不及。2009年安卓系統起航伊始
 AndroidEventBus (事件總線) 的設計與實現
1. 功能介紹 AndroidEventBus是一個Android平台的事件總線庫, 它簡化了Activity、Fragment、Service等組件或者對象之間