前言
在一個主界面中做Activity切換一般都會用TabActivity,使用方便,Activity互相之間相對獨立,但是可定制性不強,而且修改起來很麻煩。當然也可以把layout分開,把邏輯代碼全寫在主界面的邏輯代碼中,但是很明顯可維護性相當差,這裡通過ActivityGroup來解決這個問題。
文章
1. Android: TabActivity Nested Activities
2. Android ActivityGroup的使用代碼將子activty 的layout加入到主activity中
正文
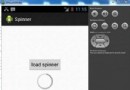
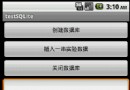
一、效果圖
要求點擊底部不同圖片按鈕切換不同的Activity,並在中間顯示Activity對應的ContentView。
二、 實現代碼
2.1 layout.xml
<?xml version="1.0" encoding="utf-8"?>
<LinearLayout xmlns:android="http://schemas.android.com/apk/res/android"
android:layout_width="fill_parent" android:orientation="vertical"
android:layout_height="fill_parent">
<LinearLayout android:gravity="center_horizontal"
android:background="@drawable/myinfor2" android:layout_width="fill_parent"
android:layout_height="wrap_content">
<TextView android:id="@+id/cust_title" android:textColor="@android:color/white"
android:textSize="28sp" android:text="模塊1" android:layout_width="wrap_content"
android:layout_height="wrap_content"></TextView>
</LinearLayout>
<!-- 中間動態加載View -->
<ScrollView android:measureAllChildren="true" android:id="@+id/containerBody"
android:layout_weight="1" android:layout_height="fill_parent"
android:layout_width="fill_parent">
</ScrollView>
<LinearLayout android:background="@android:color/black"
android:layout_gravity="bottom" android:orientation="horizontal"
android:layout_width="fill_parent" android:layout_height="wrap_content">
<!-- 功能模塊按鈕1 -->
<ImageView android:id="@+id/btnModule1" android:src="@android:drawable/ic_dialog_dialer"
android:layout_marginLeft="7dp" android:layout_marginTop="3dp"
android:layout_marginBottom="3dp" android:layout_width="wrap_content"
android:layout_height="wrap_content" />
<!-- 功能模塊按鈕2 -->
<ImageView android:id="@+id/btnModule2" android:src="@android:drawable/ic_dialog_info"
android:layout_marginLeft="7dp" android:layout_marginTop="3dp"
android:layout_marginBottom="3dp" android:layout_width="wrap_content"
android:layout_height="wrap_content" />
<!-- 功能模塊按鈕3 -->
<ImageView android:id="@+id/btnModule3" android:src="@android:drawable/ic_dialog_alert"
android:layout_marginLeft="7dp" android:layout_marginTop="3dp"
android:layout_marginBottom="3dp" android:layout_width="wrap_content"
android:layout_height="wrap_content" />
</LinearLayout>
</LinearLayout>
2.2 TestView.java
/**
* 使用ActivityGroup來切換Activity和Layout
* @author 農民伯伯
* @version 2010-9-7
*
*/
public class TestView extends ActivityGroup {
private ScrollView container = null;
@Override
protected void onCreate(Bundle savedInstanceState) {
super.onCreate(savedInstanceState);
// 隱藏標題欄
requestWindowFeature(Window.FEATURE_NO_TITLE);
// 設置視圖
setContentView(R.layout.layout);
container = (ScrollView) findViewById(R.id.containerBody);
// 模塊1
ImageView btnModule1 = (ImageView) findViewById(R.id.btnModule1);
btnModule1.setOnClickListener(new OnClickListener() {
@Override
public void onClick(View v) {
container.removeAllViews();
container.addView(getLocalActivityManager().startActivity(
"Module1",
new Intent(TestView.this, ModuleView1.class)
.addFlags(Intent.FLAG_ACTIVITY_CLEAR_TOP))
.getDecorView());
}
});
// 模塊2
ImageView btnModule2 = (ImageView) findViewById(R.id.btnModule2);
btnModule2.setOnClickListener(new OnClickListener() {
@Override
public void onClick(View v) {
container.removeAllViews();
container.addView(getLocalActivityManager().startActivity(
"Module2",
new Intent(TestView.this, ModuleView2.class)
.addFlags(Intent.FLAG_ACTIVITY_CLEAR_TOP))
.getDecorView());
}
});
// 模塊3
ImageView btnModule3 = (ImageView) findViewById(R.id.btnModule3);
btnModule3.setOnClickListener(new OnClickListener() {
@Override
public void onClick(View v) {
container.removeAllViews();
container.addView(getLocalActivityManager().startActivity(
"Module3",
new Intent(TestView.this, ModuleView3.class)
.addFlags(Intent.FLAG_ACTIVITY_CLEAR_TOP))
.getDecorView());
}
});
}
}
代碼說明:
a). ModuleView1、ModuleView2、 ModuleView3分別繼承自Activity。
b). 想動態改變標題可以通過cust_title獲取TextView進行設置。
轉自:http://www.cnblogs.com/over140/archive/2010/09/07/1820876.html
 Android最佳實踐
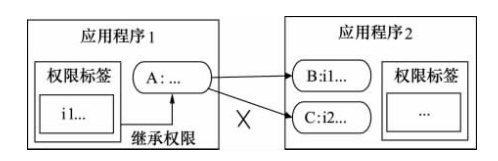 Android中Permission權限機制的具體使用
 Android提高之SQLite分頁讀取實現方法
 Android本地化