編輯:Android開發實例
Intent 是Android Activity之間傳遞數據的橋梁!
我們要從一個界面切換到另一個界面需要用到它,同時,應用間的相互調用也要用它!
Android uses Intents to do specific jobs within applications.
Android通過Intent在application之間完成指定的任務。
下面,是一段我從《Android, A programmer’s guide》中摘的一段話,
Once you master the use of Intents, a whole new world of application
development will be open to you. This section defines what an Intent is and how it is used.
An Intent is Android’s method for relaying certain information from one Activity to
another. An Intent, in simpler terms, expresses to Android your intent to do something.
You can think of an Intent as a message passed between Activities. For example, assume
that you have an Activity that needs to open a web browser and display a page on your
Android device. Your Activity would send an “intent to open x page in the web browser,”
known as a WEB_SEARCH_ACTION Intent, to the Android Intent Resolver. The Intent
Resolver parses through a list of Activities and chooses the one that would best match
your Intent; in this case, the Web Browser Activity. The Intent Resolver then passes your
page to the web browser and starts the Web Browser Activity.
Intents 分為兩大類:
● Activity 間動作 Intents
這些Intents用於在你的Application中呼叫其他的Activities.
且只能一個Activity可以處理這個Intent, 例如,浏覽一個網頁,你需要打開一個Web Browser Activity.
● 廣播型Intents
這些Intents 發送給多個 Activities 進行處理.
一個廣播型Intent的例子是,當手機電量在低水平時,Android將會發出一個當前電量level的消息,任何
Activity都可以進行處理,並執行相關的動作,例如消息某些Activity當電量低於某個特定點時!
我學習的時候用了一個簡單的例子:
package nw.neugls.first;

import android.app.Activity;
import android.content.Intent;
import android.os.Bundle;
import android.view.View;
import android.view.View.OnClickListener;
import android.widget.Button;
import android.widget.TextView;

public class Android01 extends Activity {
    /** Called when the activity is first created. */
    @Override
    public void onCreate(Bundle savedInstanceState) {
        super.onCreate(savedInstanceState);
        setContentView(R.layout.main);

        TextView MyTextView=(TextView)findViewById(R.id.MyTextView);
        Button MyButton=(Button)findViewById(R.id.MyButton);

        MyTextView.setText("My first Activity");
        MyButton.setText("Click me");
        MyButton.setOnClickListener(new MyButtonListener());

    }

    class MyButtonListener implements OnClickListener{

		@Override
		public void onClick(View arg0) {
			// TODO Auto-generated method stub
			Intent intent=new Intent();
			intent.setClass(Android01.this,Activity02.class);
			intent.putExtra("Key", "NeuglsWorkStudio");
			Android01.this.startActivity(intent);
		}

    }
}
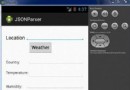
在上面的代碼中,我們可以看到,我在這個Activity中包含兩個控件:一個是TextView MyTextView, 另一個是Button MyButton.
MyTextView用來顯示一些標志信息,MyButton用於切換到另一個Activity中!
findViewByID(int resourceID)只能被用在View 上面。這些View 是放進布局中的。而這個布局被Activity 使用setContentView()
來加載的。
類似於As3一樣,需要給Android添加一OnClick監聽!不過java的做法與As3不太一樣!
首先需要需要聲明一個類實現onClickListener這個接口!在這類中我們需要覆蓋onClick方法!我是初學者,對於怎麼學我不知道,不過
看了視頻後,我學會了!有兩種方法:
方法1. 將鼠標放在MyButtonListener上,會出現一人提示:
點擊Add unimplemented methods就可以了!
方法2.點擊右鍵或者按Alt+Shift+S,選擇Override/Implements methods
然後我們往這個OnClick函數中寫代碼:
		public void onClick(View arg0) {
			// TODO Auto-generated method stub
			Intent intent=new Intent();
			intent.setClass(Android01.this,Activity02.class);
			intent.putExtra("Key", "NeuglsWorkStudio");
			Android01.this.startActivity(intent);
		}
Intent intent=new Intent() 創建了一個intent實例。
intent.setClass(Android01.this,Activity02.class)
下面是setClass的聲明與參數:
public IntentsetClass(Context packageContext, Class<?> cls)
Parameters
packageContext: A Context of the application package implementing this class.
實現這個類的應用程序包的Context。我猜測這個Context應該理解為實例!還請高手指證!
cls: The class name to set, equivalent to setClassName(context, cls.getName()).
要設置的類名!相當於setClassName(context, cls.getName()).
意思是告訴Android, Context要啟動一個Activity,他的名這是cls。
intent.putExtra("Key", "NeuglsWorkStudio");
這個很簡單,往intent中加入一個Key-Value對!
Android01.this.startActivity(intent);
啟動Activity.
這就是第一個Activity的任務!
下面是第二個Activity的程序:
他從啟動他的Intent獲得數據,然後在一個TextView中顯示出來。
package nw.neugls.first;

import android.app.Activity;
import android.content.Intent;
import android.net.Uri;
import android.os.Bundle;
import android.view.View;
import android.view.View.OnClickListener;
import android.widget.Button;
import android.widget.TextView;

public class Activity02 extends Activity {

	@Override
	protected void onCreate(Bundle savedInstanceState) {
		// TODO Auto-generated method stub
		super.onCreate(savedInstanceState);

		setContentView(R.layout.activity02);
		TextView tvActivity2=(TextView)findViewById(R.id.tvActivity02);

		Intent intent=getIntent();

		String str=intent.getStringExtra("Key");

		Button CreateMsgBtn=(Button)findViewById(R.id.btnCreateMsg);
		CreateMsgBtn.setText("Create Message");
		CreateMsgBtn.setOnClickListener(new CreateMsgBtnListener());

		tvActivity2.setText(str);
	}

	class CreateMsgBtnListener implements OnClickListener{

		@Override
		public void onClick(View arg0) {
			// TODO Auto-generated method stub

			Uri uri=Uri.parse("smsto://13539441914");
			Intent intent=new Intent(Intent.ACTION_SENDTO,uri);
			intent.putExtra("sms_body", "Write to neugls");
			startActivity(intent);
		}

	}

}
在這個Activity中還有一個Button CreateMsgBtn. 這個Button的OnClick代碼中演示了Intent如何用於啟動另一個App!上面代碼是演示如何發送消息。
下面是實現監聽onClick事件的另一種寫法:
Button CreateMsgBtn=(Button)findViewById(R.id.btnCreateMsg);
CreateMsgBtn.setText("Create Message");
CreateMsgBtn.setOnClickListener(new OnClickListener(){
	@Override
	public void onClick(View v){
		Intent intent=new Intent(Android01.this,Activity02.class);
		//其他代碼
	}
});
;
 Android本地化
Android應用程序可以在許多不同地區的許多設備上運行。為了使應用程序更具交互性,應用程序應該處理以適合應用程序將要使用的語言環境方面的文字,數字,文件等。在本章中,我
 Android編程實現3D滑動旋轉效果的方法
本文實例講述了Android編程實現3D滑動旋轉效果的方法。分享給大家供大家參考,具體如下: 這裡我們通過代碼實現一些滑動翻頁的動畫效果。 Animation實現
 Android MediaPlayer(多媒體播放)
Android提供了許多方法來控制播放的音頻/視頻文件和流。其中該方法是通過一類稱為MediaPlayer。Android是提供MediaPlayer類訪問內置的媒體播放
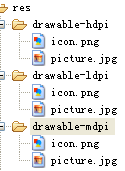 Android控件系列之ImageView使用方法
學習目的: 1、掌握在Android中如何插入圖片 圖片的加入可以立刻讓您的程序增色不少,我們樣例選用一張Android機器人(picture.jpg),您可以使