編輯:Android開發實例
大家好,今天我講一下Android OpenGL,這個系列是我的學習筆記,希望對大家有所幫助!這一節將給大家簡潔的介紹一下術語,以及第一個Android OpenGL程序.
首先讓我看們看一下術語:
Vertex (頂點)
A vertex is a point in 3D space and is the building block for many objects. In OpenGL you can specify as few as two coordinates (X,Y) and as many as four (X,Y,Z,W). The w-axis is optional, the default value is set to 1.0. The z-axis is also optional, the default value is set to 0. In this series, we will use the three main coordinates X, Y, and Z, since the W is generally used as a placeholder. The plural of vertex is vertices (mainly important for non native speakers, because it may create confusion). All objects are drawn using vertices as their points, so a point will refer to a vertex.
Triangle (三角)
A triangle requires three points to be created. So in OpenGL, we use three vertices to create one.
Polygon (多邊形)
A polygon is an object which has at least three connected points. Therefor a triangle is also a polygon.
Primitives (基本實體)
A primitive is a three-dimensional object created using either triangles or polygons. A bit ironic: A detailed model with 50.000 vertices is also a primitive like a low detailed model with 500 vertices.
下面就是我們的第一個Android OpenGL程序:
- package com.android.tutor;
- import android.app.Activity;
- import android.opengl.GLSurfaceView;
- import android.os.Bundle;
- public class OpenGl_Lesson1 extends Activity {
- public void onCreate(Bundle savedInstanceState) {
- super.onCreate(savedInstanceState);
- GLSurfaceView mGlSurfaceView = new GLSurfaceView(this);
- mGlSurfaceView.setRenderer(new OpenGLRender());
- setContentView(mGlSurfaceView);
- }
- }
我們這裡的View是用的GLSurfaceView,但是它要setRenderer()一下,就像我們Activity裡面的setContentView()方法一樣!
這裡的OpenGLRender是我重新寫的類,它繼承於GLSurfaceView.Renderer,我們要實現其種的三個方法:
onSurfaceCreated(),onSurfaceChanged(),onDrawFrame()。代碼如下:
- package com.android.tutor;
- import javax.microedition.khronos.egl.EGLConfig;
- import javax.microedition.khronos.opengles.GL10;
- import android.opengl.GLSurfaceView.Renderer;
- public class OpenGLRender implements Renderer {
- @Override
- public void onSurfaceCreated(GL10 gl, EGLConfig config) {
- // TODO Auto-generated method stub
- gl.glClearColor(0.9f, 0.2f, 0.2f, 1.0f);
- gl.glClear(GL10.GL_COLOR_BUFFER_BIT);
- }
- @Override
- public void onSurfaceChanged(GL10 gl, int width, int height) {
- gl.glViewport(0, 0, width, height);
- }
- @Override
- public void onDrawFrame(GL10 gl) {
- // TODO Auto-generated method stub
- }
- }
第10行就是相當於我們設置畫布顏色RGBA(紅綠藍透),第11行這裡是清除深度顏色緩存,不加上一句,第10句不起作用,整個View的顏色
還是黑黑的!
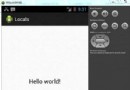
運行效果如下:
 Android基礎之使用Fragment適應不同屏幕和分辨率(分享)
最近事情很忙,一個新項目趕著出來,但是很多功能都要重新做,一直在編寫代碼、Debug。今天因為一個新程序要使用Fragment來做,雖然以前也使用過Fragmen
 Android中檢查、設置默認程序詳解
Android作為一個偉大的系統,自然提供了設置默認打開程序的實現.在這篇文章中,我會介紹如何在Android系統中設置默認的程序. 在設置默認程序之前,無非有兩
 Android MediaPlayer(多媒體播放)
Android提供了許多方法來控制播放的音頻/視頻文件和流。其中該方法是通過一類稱為MediaPlayer。Android是提供MediaPlayer類訪問內置的媒體播放
 Facebook Android閃光效果開源庫shimmer的用法
shimmer開源庫介紹 Shimmer是Fa