編輯:Android開發實例
Action屬性應用實例
1、自定義Action屬性
程序文件
/Chapter06_Intent_TestAction/src/com/amaker/ch06/app/MainActivity.java
package com.amaker.ch06.app;

import android.app.Activity;
import android.content.Intent;
import android.os.Bundle;
import android.view.View;
import android.view.View.OnClickListener;
import android.widget.Button;
/**
 *
 * 測試Intent Action 屬性
 */
public class MainActivity extends Activity {
    // 定義Action 屬性常量
    public static final String MY_ACTION="com.amaker.ch07.app.MY_ACTION";
    // 聲明Button
    private Button btn;
    @Override
    public void onCreate(Bundle savedInstanceState) {
        super.onCreate(savedInstanceState);
        // 設置布局視圖
        setContentView(R.layout.main);
        // 實例化Button
        btn = (Button)findViewById(R.id.Button01);
        btn.setOnClickListener(new OnClickListener() {
            @Override
            public void onClick(View v) {
                 // 實例化Intent
                Intent intent = new Intent();
                // 為Intent設置Action屬性
                intent.setAction(MY_ACTION);
                // 啟動Activity
                startActivity(intent);
            }
        });
    }
}
/Chapter06_Intent_TestAction/src/com/amaker/ch06/app/MyActivity.java
package com.amaker.ch06.app;

import android.app.Activity;
import android.content.Intent;
import android.os.Bundle;
import android.widget.TextView;
/**
 * 測試Intent Action 屬性
 */
public class MyActivity extends Activity {
    // 聲明TextView
    private TextView tv;
    @Override
    public void onCreate(Bundle savedInstanceState) {
        super.onCreate(savedInstanceState);
        // 設置視圖布局
        setContentView(R.layout.my_layout);
        // 獲得Intent對象
        Intent intent = getIntent();
        // 獲得Action
        String action = intent.getAction();
        // 獲得TextView
        tv = (TextView)findViewById(R.id.TextView01);
        // 設置內容
        tv.setText(action);
    }
}
布局文件
/Chapter06_Intent_TestAction/res/layout/main.xml
<?xml version="1.0" encoding="utf-8"?>
<LinearLayout xmlns:android="http://schemas.android.com/apk/res/android"
    android:orientation="vertical"
    android:layout_width="fill_parent"
    android:layout_height="fill_parent"
    >

    <Button
        android:text="測試Intent的Action屬性"
        android:id="@+id/Button01"
        android:layout_width="wrap_content"
        android:layout_height="wrap_content"></Button>

</LinearLayout>
/Chapter06_Intent_TestAction/res/layout/my_layout.xml
<?xml version="1.0" encoding="utf-8"?>
<LinearLayout xmlns:android="http://schemas.android.com/apk/res/android"
    android:orientation="vertical"
    android:layout_width="fill_parent"
    android:layout_height="fill_parent"
    >

    <TextView
        android:text="@+id/TextView01"
        android:id="@+id/TextView01"
        android:layout_width="wrap_content"
        android:layout_height="wrap_content"></TextView>

</LinearLayout>
清單文件
/Chapter06_Intent_TestAction/AndroidManifest.xml
<?xml version="1.0" encoding="utf-8"?>
<manifest xmlns:android="http://schemas.android.com/apk/res/android"
      package="com.amaker.ch06.app"
      android:versionCode="1"
      android:versionName="1.0">
    <application android:icon="@drawable/icon" android:label="@string/app_name">

        <activity android:name=".MainActivity"
                  android:label="@string/app_name">
            <intent-filter>
                <action android:name="android.intent.action.MAIN" />
                <category android:name="android.intent.category.LAUNCHER" />
            </intent-filter>
        </activity>

        <activity android:name="MyActivity">
            <intent-filter>
                <action android:name="com.amaker.ch06.app.MY_ACTION" />
                <category android:name="android.intent.category.DEFAULT" />
            </intent-filter>
        </activity>

    </application>
    <uses-sdk android:minSdkVersion="3" />

</manifest>
2、訪問系統的Action屬性
程序文件
/Chapter06_Intent_TestAction2/src/com/amaker/ch06/app/MainActivity.java
package com.amaker.ch06.app;

import android.app.Activity;
import android.content.Intent;
import android.os.Bundle;
import android.view.View;
import android.view.View.OnClickListener;
import android.widget.Button;

/**
 *
 * 測試Intent Action 屬性
 */
public class MainActivity extends Activity {
    // 聲明Button
    private Button btn;
    @Override
    public void onCreate(Bundle savedInstanceState) {
        super.onCreate(savedInstanceState);
        // 設置當前布局視圖
        setContentView(R.layout.main);
        // 實例化Button
        btn = (Button)findViewById(R.id.Button01);
        btn.setOnClickListener(new OnClickListener() {
            @Override
            public void onClick(View v) {
                // 創建Intent
                Intent intent = new Intent();
                // 設置Intent Action屬性
                intent.setAction(Intent.ACTION_GET_CONTENT);
                // 設置Intent Type 屬性
                intent.setType("vnd.android.cursor.item/phone");
                // 啟動Activity
                startActivity(intent);
            }
        });
    }
}
布局文件
/Chapter06_Intent_TestAction2/res/layout/main.xml
<?xml version="1.0" encoding="utf-8"?>
<LinearLayout xmlns:android="http://schemas.android.com/apk/res/android"
    android:orientation="vertical"
    android:layout_width="fill_parent"
    android:layout_height="fill_parent"
    >

    <Button
        android:text="測試Intent的 Action屬性"
        android:id="@+id/Button01"
        android:layout_width="wrap_content"
        android:layout_height="wrap_content"></Button>

</LinearLayout>
清單文件
/Chapter06_Intent_TestAction2/AndroidManifest.xml
<?xml version="1.0" encoding="utf-8"?>
<manifest xmlns:android="http://schemas.android.com/apk/res/android"
      package="com.amaker.ch06.app"
      android:versionCode="1"
      android:versionName="1.0">
    <application android:icon="@drawable/icon" android:label="@string/app_name">
        <activity android:name=".MainActivity"
                  android:label="@string/app_name">
            <intent-filter>
                <action android:name="android.intent.action.MAIN" />
                <category android:name="android.intent.category.LAUNCHER" />
            </intent-filter>
        </activity>

    </application>
    <uses-sdk android:minSdkVersion="3" />

</manifest>
 深入淺析Android Fragment(下篇)
在上篇文章給大家介紹深入淺析Android Fragment(上篇),包括一些基本的用法和各種API,如果還想深入學習請繼續關注本篇文章。 本篇將介紹上篇提到的:
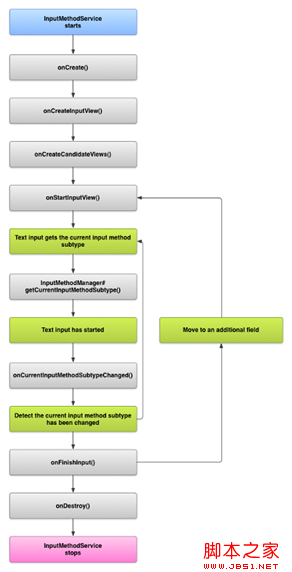 Android的文本和輸入之創建輸入法教程
輸入法編輯器(IME)是讓用戶輸入文本的控件。Android提供了一個可擴展的的輸入法的框架,它允許應用程序給用戶提供另外的輸入法,如軟鍵盤或語音輸入。這些輸入法
 Android 程序應用的生命周期
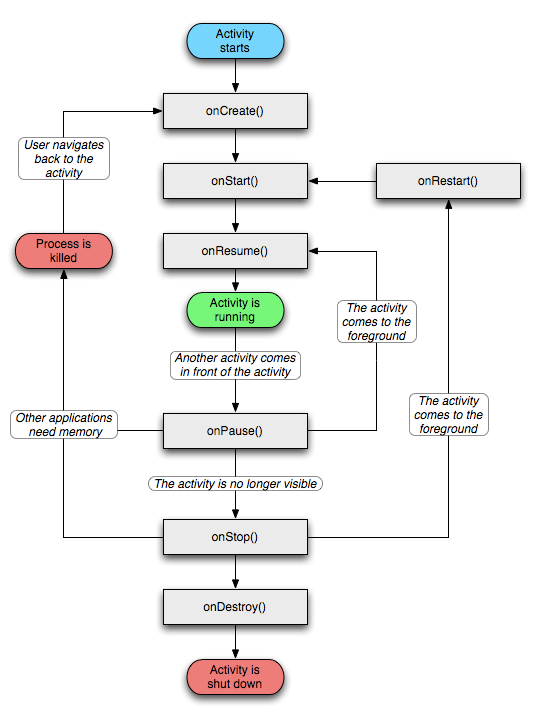
程序應用步驟: 打開應用:onCreateonStartonResume BACK鍵:onPauseonStoponDestory HOME鍵:onPauseo
 用Android MenuInflater創建菜單項的方法步驟
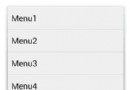
之前在一篇文章中已經講過了菜單項的創建方法,但是那種方法效率較低,維護不易,現在實現另一種方法創建菜單。 MenuInflater,通過此類我們可以輕松的創建菜單