編輯:Android開發實例
一.Broadcast Receive為廣播接收器,它和事件處理機制類似,只不過事件的處理機制是程序組件級別的,而廣播處理機制是系統級別的。
Broadcast Receiver用於接收並處理廣播通知(broadcast announcements)。多數的廣播是系統發起的,如地域變換、電量不足、來電來信等。程序也可以播放一個廣播。程序可以有任意數量的 broadcast receivers來響應它覺得重要的通知。broadcast receiver可以通過多種方式通知用戶:啟動activity、使用NotificationManager、開啟背景燈、振動設備、播放聲音等,最典型的是在狀態欄顯示一個圖標,這樣用戶就可以點它打開看通知內容。
通常我們的某個應用或系統本身在某些事件(電池電量不足、來電來短信)來臨時會廣播一個Intent出去,我們可以利用注冊一個Broadcast Receiver來監聽到這些Intent並獲取Intent中的數據。
二.事件的廣播比價簡單,構建Intent對象,調用sendBroadcast()方法將廣播發出。事件的接收是通過定義一個繼承BroadcastReceiver類來實現,繼承該類後覆蓋其onReceiver方法,並在該方法中相應事件。
MainActivity:
Intent intent=new Intent();
intent.setAction(MY_ACTION);
intent.putExtra("msg","請回復");
sendBroadcast(intent);
MyReceiver:
public calss MyReceiver extends BroadcastReceiver{
public void onReceiver(Context ctx,intent intent){
//從Intent中獲得信息
String msg=intent.getString("msg");
Toast.makeText(ctx,msg,Toast.LENGTH_LONG).show()
}
}
三.系統廣播事件的使用
1. 這些廣播是系統自動發出,我們直接定義事件接收器進行接收。
通過配置文件注冊
MyReceiver2:
public class MyReceiver2 extends BroadcastReceiver{
public void onReceiver( Context context,Intent intent){
Log.i("my_tag","BOOT_COMPLETED")
}
}
AndroidMainifest.xml:
<receiver android:name="MyReceiver2">
<intent-filter>
<android android:name="android.intent.android.BOOT_COMPLETED">
</intent-filter>
</receiver>
通過代碼注冊:
IntentFilter filter=new IntentFilter();//實例化
//實例化Receiver
MyReceiver2=new MyReceiver2();
//注冊Receiver
registerReceiver(r,filter);
//注銷Receiver
unregisterReceiver(r);
四.Notification和NotificationManager的使用
實例一、自定義broadcast receive來處理廣播事件
/Chapter08_Broadcast_Receiver1/src/com/amaker/ch08/app/MainActivity.java
package com.amaker.ch08.app;

import com.amaker.ch08.app.R;

import android.app.Activity;
import android.content.Intent;
import android.os.Bundle;
import android.view.View;
import android.view.View.OnClickListener;
import android.widget.Button;
/**
 *
 * 發出廣播
 */
public class MainActivity extends Activity {
    // 定義一個Action常量
    private static final String MY_ACTION = "com.amaker.ch08.action.MY_ACTION";
    // 定義一個Button對象
    private Button btn;
    @Override
    public void onCreate(Bundle savedInstanceState) {
        super.onCreate(savedInstanceState);
        // 設置當前布局視圖
        setContentView(R.layout.main);
        btn = (Button)findViewById(R.id.Button01);
        // 為按鈕設置單擊監聽器
        btn.setOnClickListener(new OnClickListener() {
            @Override
            public void onClick(View v) {
                // 實例化Intent對象
                Intent intent = new Intent();
                // 設置Intent action屬性
                intent.setAction(MY_ACTION);
                // 為Intent添加附加信息
                intent.putExtra("msg", "地瓜地瓜,我是土豆,收到請回復,收到請回復!");
                // 發出廣播
                sendBroadcast(intent);
            }
        });
    }
}
自定義廣播事件的使用
/Chapter08_Broadcast_Receiver1/src/com/amaker/ch08/app/MyReceiver.java
package com.amaker.ch08.app;

import android.content.BroadcastReceiver;
import android.content.Context;
import android.content.Intent;
import android.widget.Toast;

/**
 * 接收廣播
 */
public class MyReceiver extends BroadcastReceiver{

    @Override
    public void onReceive(Context cxt, Intent intent) {
        // 從Intent中獲得信息
        String msg = intent.getStringExtra("msg");
        // 使用Toast顯示
        Toast.makeText(cxt, msg, Toast.LENGTH_LONG).show();
    }
}
/Chapter08_Broadcast_Receiver1/src/com/amaker/ch08/app/MyReceiver2.java
package com.amaker.ch08.app;

import android.content.BroadcastReceiver;
import android.content.Context;
import android.content.Intent;
import android.util.Log;

/**
 *
 * 顯示系統啟動完成廣播接收器
 */
public class MyReceiver2 extends BroadcastReceiver{

    @Override
    public void onReceive(Context context, Intent intent) {
        // 顯示廣播信息
        Log.i("my_tag", "BOOT_COMPLETED~~~~~~~~~~~~~~~~");
    }

}
系統廣播事件的使用
/Chapter08_Broadcast_Receiver1/res/layout/main.xml
<?xml version="1.0" encoding="utf-8"?>
<LinearLayout xmlns:android="http://schemas.android.com/apk/res/android"
    android:orientation="vertical"
    android:layout_width="fill_parent"
    android:layout_height="fill_parent"
    >

    <Button
        android:text="發出廣播..."
        android:id="@+id/Button01"
        android:layout_width="wrap_content"
        android:layout_height="wrap_content"/>

</LinearLayout>
/Chapter08_Broadcast_Receiver1/AndroidManifest.xml
<?xml version="1.0" encoding="utf-8"?>
<manifest xmlns:android="http://schemas.android.com/apk/res/android"
      package="com.amaker.ch08.app"
      android:versionCode="1"
      android:versionName="1.0">
    <application android:icon="@drawable/icon" android:label="@string/app_name">
        <activity android:name=".MainActivity"
                  android:label="@string/app_name">
            <intent-filter>
                <action android:name="android.intent.action.MAIN" />
                <category android:name="android.intent.category.LAUNCHER" />
            </intent-filter>
        </activity>

        <receiver android:name="MyReceiver">
            <intent-filter>
                <action  android:name="com.amaker.ch08.action.MY_ACTION"/>
            </intent-filter>
        </receiver>

        <receiver android:name="MyReceiver2">
            <intent-filter>
                <action  android:name="android.intent.action.BOOT_COMPLETED"/>
            </intent-filter>
        </receiver>

    </application>
    <uses-sdk android:minSdkVersion="3" />
</manifest>
二、notification和notificationmanager的使用
1、獲取系統級的服務notificationmanager
String service = NOTIFICATION_SERVICE;
NotificationManager nm = (NotificationManager)getSystemService(service);
2、實例化Notification
Notification n = new Notification();
// 設置顯示圖標,該圖標會在狀態欄顯示
int icon = n.icon = R.drawable.icon;
// 設置顯示提示信息,該信息也會在狀態欄顯示
String tickerText = "Test Notification";
// 顯示時間
long when = System.currentTimeMillis();
n.icon = icon;
n.tickerText = tickerText;
n.when = when;
// 也可以通過這種構造方法來設置
Notification n1 = new Notification(icon, tickerText, when);
3、實例化Intent
Intent intent = new Intent(this, MainActivity_Temp.class);
// 獲得PendingIntent
PendingIntent pi = PendingIntent.getActivity(this, 0, intent, 0);
// 設置事件信息
n.setLatestEventInfo(this, "My Title", "My Content", pi);
n.defaults |= Notification.DEFAULT_SOUND;
n.sound = Uri.parse("file:///sdcard/sound.mp3");
n.sound = Uri.withAppendedPath(Audio.Media.INTERNAL_CONTENT_URI, "6");
n.defaults |= Notification.DEFAULT_VIBRATE;
long[] vibrate = {0,50,100,150};
n.vibrate = vibrate;
n.defaults |= Notification.DEFAULT_LIGHTS;
n.ledARGB = 0xff00ff00;
n.ledOnMS = 300;
n.ledOffMS = 1000;
n.flags |= Notification.FLAG_SHOW_LIGHTS;
4、發通知
// 標示該通知的ID
int ID = 1;
// 發出通知
nm.notify(ID, n);
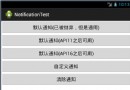
利用notification和notificationmanager來實現可視化的消息顯示。
/Chapter08_Notification1/src/com/amaker/ch08/app/MainActivity.java
package com.amaker.ch08.app;

import com.amaker.ch08.app.R;

import android.app.Activity;
import android.app.Notification;
import android.app.NotificationManager;
import android.app.PendingIntent;
import android.content.Intent;
import android.os.Bundle;
import android.view.View;
import android.view.View.OnClickListener;
import android.widget.Button;

/**
 * 測試通知
 */

public class MainActivity extends Activity {
    // 聲明按鈕
    private Button sendBtn,cancelBtn;
    // 聲明Notification
    private Notification n ;
    // 聲明NotificationManager
    private NotificationManager nm;
    // Notification標示ID
    private static final int ID = 1;
    @Override
    public void onCreate(Bundle savedInstanceState) {
        super.onCreate(savedInstanceState);
        setContentView(R.layout.main);
        // 實例化按鈕
        sendBtn = (Button)findViewById(R.id.sendButton01);
        cancelBtn = (Button)findViewById(R.id.cancelButton02);

        // 獲得NotificationManager實例
        String service = NOTIFICATION_SERVICE;
        nm = (NotificationManager)getSystemService(service);

        // 實例化Notification
        n = new Notification();
        // 設置顯示圖標,該圖標會在狀態欄顯示
        int icon = n.icon = R.drawable.happy;
        // 設置顯示提示信息,該信息也會在狀態欄顯示
        String tickerText = "Test Notification";
        // 顯示時間
        long when = System.currentTimeMillis();
        n.icon = icon;
        n.tickerText = tickerText;
        n.when = when;
        // 為按鈕添加監聽器
        sendBtn.setOnClickListener(sendListener);
        cancelBtn.setOnClickListener(cancelListener);

    }
    // 發送通知監聽器
    private OnClickListener sendListener = new OnClickListener() {
        @Override
        public void onClick(View v) {
            // 實例化Intent
            Intent intent = new Intent(MainActivity.this, MainActivity.class);
            // 獲得PendingIntent
            PendingIntent pi = PendingIntent.getActivity(MainActivity.this, 0, intent, 0);
            // 設置事件信息
            n.setLatestEventInfo(MainActivity.this, "My Title", "My Content", pi);
            // 發出通知
            nm.notify(ID, n);
        }
    };
    // 取消通知監聽器
     private OnClickListener cancelListener = new OnClickListener() {
        @Override
        public void onClick(View v) {
            // 取消通知
            nm.cancel(ID);
        }
    };
}
/Chapter08_Notification1/res/layout/main.xml
<?xml version="1.0" encoding="utf-8"?>
<LinearLayout xmlns:android="http://schemas.android.com/apk/res/android"
    android:orientation="vertical"
    android:layout_width="fill_parent"
    android:layout_height="fill_parent"
    >
<TextView
    android:layout_width="fill_parent"
    android:layout_height="wrap_content"
    android:text="測試Notification"
    />

<Button
    android:text="發出通知"
    android:id="@+id/sendButton01"
    android:layout_width="wrap_content"
    android:layout_height="wrap_content"></Button>

<Button
    android:text="取消通知"
    android:id="@+id/cancelButton02"
    android:layout_width="wrap_content"
    android:layout_height="wrap_content"></Button>

</LinearLayout>
/Chapter08_Notification1/AndroidManifest.xml
<?xml version="1.0" encoding="utf-8"?>
<manifest xmlns:android="http://schemas.android.com/apk/res/android"
      package="com.amaker.ch08.app"
      android:versionCode="1"
      android:versionName="1.0">
    <application android:icon="@drawable/icon" android:label="@string/app_name">
        <activity android:name=".MainActivity"
                  android:label="@string/app_name">
            <intent-filter>
                <action android:name="android.intent.action.MAIN" />
                <category android:name="android.intent.category.LAUNCHER" />
            </intent-filter>
        </activity>

    </application>
    <uses-sdk android:minSdkVersion="3" />

</manifest>
二、notification、notificationmanager和broadcast receiver的綜合實例
/Chapter08_Notification2/src/com/amaker/ch08/app/MainActivity.java
package com.amaker.ch08.app;

import com.amaker.ch08.app.R;

import android.app.Activity;
import android.content.Intent;
import android.os.Bundle;
import android.view.View;
import android.view.View.OnClickListener;
import android.widget.Button;
/**
 * 測試廣播和通知
 */
public class MainActivity extends Activity {
    // 聲明Button
    private Button btn;
    // 定義Broadcast Receiver action
    private static final String MY_ACTION = "com.amaker.ch08.app.MY_ACTION";
    @Override
    public void onCreate(Bundle savedInstanceState) {
        super.onCreate(savedInstanceState);
        // 設置當前布局視圖
        setContentView(R.layout.main);
        // 實例化Button
        btn = (Button)findViewById(R.id.Button01);
        // 添加事件監聽器
        btn.setOnClickListener(listener);
    }
    // 創建事件監聽器
    private OnClickListener listener = new OnClickListener() {
        @Override
        public void onClick(View v) {
            // 實例化Intent
            Intent intent = new Intent();
            // 設置Intent action屬性
            intent.setAction(MY_ACTION);
            // 發起廣播
            sendBroadcast(intent);
        }
    };
}
/Chapter08_Notification2/src/com/amaker/ch08/app/DisplayActivity.java
package com.amaker.ch08.app;

import com.amaker.ch08.app.R;

import android.app.Activity;
import android.app.Notification;
import android.app.NotificationManager;
import android.app.PendingIntent;
import android.content.Intent;
import android.os.Bundle;
import android.view.View;
import android.view.View.OnClickListener;
import android.widget.Button;

public class DisplayActivity extends Activity {
    // 聲明按鈕
    private Button cancelBtn;
    // 聲明Notification
    private Notification n ;
    // 聲明NotificationManager
    private NotificationManager nm;
    // Notification標示ID
    private static final int ID = 1;
    @Override
    public void onCreate(Bundle savedInstanceState) {
        super.onCreate(savedInstanceState);
        setContentView(R.layout.main2);
        // 實例化按鈕
        cancelBtn = (Button)findViewById(R.id.cancelButton02);
        // 獲得NotificationManager實例
        String service = NOTIFICATION_SERVICE;
        nm = (NotificationManager)getSystemService(service);

        // 實例化Notification
        n = new Notification();
        // 設置顯示圖標,該圖標會在狀態欄顯示
        int icon = n.icon = R.drawable.happy;
        // 設置顯示提示信息,該信息也會在狀態欄顯示
        String tickerText = "Test Notification";
        // 顯示時間
        long when = System.currentTimeMillis();
        n.icon = icon;
        n.tickerText = tickerText;
        n.when = when;

        // 實例化Intent
        Intent intent = new Intent(this, MainActivity.class);
        // 獲得PendingIntent
        PendingIntent pi = PendingIntent.getActivity(this, 0, intent, 0);
        // 設置事件信息
        n.setLatestEventInfo(this, "My Title", "My Content", pi);
        // 發出通知
        nm.notify(ID, n);

        // 為按鈕添加監聽器
        cancelBtn.setOnClickListener(cancelListener);
    }

    // 取消通知監聽器
     private OnClickListener cancelListener = new OnClickListener() {
        @Override
        public void onClick(View v) {
            // 取消通知
            nm.cancel(ID);
        }
    };
}
/Chapter08_Notification2/src/com/amaker/ch08/app/MyReceiver.java
package com.amaker.ch08.app;

import android.content.BroadcastReceiver;
import android.content.Context;
import android.content.Intent;

public class MyReceiver extends BroadcastReceiver{
    @Override
    public void onReceive(Context context, Intent intent) {
        // 實例化Intent
        Intent i = new Intent();
        // 在新的任務中啟動Activity
        i.setFlags(Intent.FLAG_ACTIVITY_NEW_TASK);
        // 設置Intent啟動的組件名稱
        i.setClass(context, DisplayActivity.class);
        // 啟動Activity顯示通知
        context.startActivity(i);
    }

}
/Chapter08_Notification2/res/layout/main.xml
<?xml version="1.0" encoding="utf-8"?>
<LinearLayout xmlns:android="http://schemas.android.com/apk/res/android"
    android:orientation="vertical"
    android:layout_width="fill_parent"
    android:layout_height="fill_parent"
    >

    <Button
        android:text="發出廣播"
        android:id="@+id/Button01"
        android:layout_width="wrap_content"
        android:layout_height="wrap_content"></Button>

</LinearLayout>
<?xml version="1.0" encoding="utf-8"?>
<manifest xmlns:android="http://schemas.android.com/apk/res/android"
      package="com.amaker.ch08.app"
      android:versionCode="1"
      android:versionName="1.0">
    <application android:icon="@drawable/icon" android:label="@string/app_name">
        <activity android:name=".MainActivity"
                  android:label="@string/app_name">
            <intent-filter>
                <action android:name="android.intent.action.MAIN" />
                <category android:name="android.intent.category.LAUNCHER" />
            </intent-filter>
        </activity>

        <receiver android:name="MyReceiver">
            <intent-filter>
                <action android:name="com.amaker.ch08.app.MY_ACTION"/>
            </intent-filter>
        </receiver>

        <activity android:name="DisplayActivity"/>

    </application>
    <uses-sdk android:minSdkVersion="3" />

</manifest>
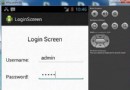 Android登錄實例
登錄應用程序的屏幕,詢問憑據登錄到一些特定的應用。可能需要登錄到Facebook,微博等本章介紹了,如何創建一個登錄界面,以及如何管理安全問題和錯誤嘗試。首先,必須定義兩
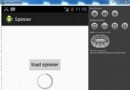 Android加載Spinner
可以顯示在的Android任務,通過加載進度條的進展。進度條有兩種形狀。加載欄和加載微調(spinner)。在本章中,我們將討論微調(spinner)。Spinner 用
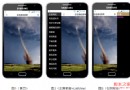 Android左右滑出菜單實例分析
現在的Android應用,只要有一個什麼新的創意,過不了多久,幾乎所有的應用都帶這個創意。這不,咱們公司最近的一個持續性的項目,想在首頁加個從左滑動出來的菜單,我
 Android JSON解析器
JSON代表JavaScript對象符號。它是一個獨立的數據交換格式,是XML的最佳替代品。本章介紹了如何解析JSON文件,並從中提取所需的信息。Android提供了四個