編輯:Android開發實例
我們寫了HelloAndroid 之後,一直覺得沒有寫半行代碼對不起自己,所以本節,我們將在HelloAndroid 基礎之上,進行與TextView 文字標簽的第一次接觸.在此例中,將會在Layout 中創建TextView 對象,並學會定義res/values/string.xml 裡的字符串常數,最後通過TextView 的setText 方法,在預加載程序之初,更改TextView 文字.
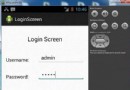
首先看一下運行結果如下圖:
首先"歡迎來到魏祝林的博客"這幾個字是從什麼地方來的呢,我們是在res->values->string.xml裡面加了如下一句(黑體):
<?xml version="1.0" encoding="utf-8"?>
<resources>
<string name="hello">Hello World, HelloAndroid!</string>
<string name="app_name">HelloAndroid</string>
<string name="textView_text">歡迎來到魏祝林的博客</string>
</resources>
而加載"歡迎來到魏祝林的博客"是在main.xml (定義手機布局界面的)裡加入的,如下面代碼,其中我們閨將@string/hello 改成了@string/textView_text .
<?xml version="1.0" encoding="utf-8"?>
<LinearLayout xmlns:android="http://schemas.android.com/apk/res/android"
android:orientation="vertical"
android:layout_width="fill_parent"
android:layout_height="fill_parent"
>
<TextView
android:layout_width="fill_parent"
android:layout_height="wrap_content"
android:text="@string/textView_text"
/>
</LinearLayout>
這樣我們運行HelloAndroid.java時,手機畫面裡將顯示"歡迎來到魏祝林的博客"的歡迎界面,貌似我們又是沒有寫代碼,只是在.xml加了一兩行搞定,對習慣了編程的同學,感覺有點不適應.其實在HelloAndroid.java寫代碼也可以完全達到一樣的效果.
在這裡我們首先將main.xml回歸到原樣在原樣的基礎上加上一行見下方(黑體行)這裡ID是為了在Java類裡,找到TextView對象,並且可以控制它:
<?xml version="1.0" encoding="utf-8"?>
<LinearLayout xmlns:android="http://schemas.android.com/apk/res/android"
android:orientation="vertical"
android:layout_width="fill_parent"
android:layout_height="fill_parent"
>
<TextView
android:id="@+id/myTextView"
android:layout_width="fill_parent"
android:layout_height="wrap_content"
android:text="@string/hello"
/>
</LinearLayout>
在主程序HelloAndroid.java裡代碼如下:
package com.android.test;
import android.app.Activity;
import android.os.Bundle;
import android.widget.TextView;
public class HelloAndroid extends Activity {
private TextView myTextView;
public void onCreate(Bundle savedInstanceState) {
super.onCreate(savedInstanceState);
//載入main.xml Layout,此時myTextView:text為hello
setContentView(R.layout.main);
//使用findViewById函數,利用ID找到該TextView對象
myTextView = (TextView)findViewById(R.id.myTextView);
String welcome_mes = "歡迎來到魏祝林的博客";
//利用setText方法將TextView文字改變為welcom_mes
myTextView.setText(welcome_mes);
}
}
兩種方法都可以達到一樣的效果,不過我在此建議用第一種比較規范一點.這一節就到此為至!!下一節我們將講一下Android五大布局.希望大家繼續關注~
注意:
1.setContentView(R.layout.main); 表示加載res/layout/main.xml布局文件的內容呈現在模擬器中
2.myTextView = (TextView)findViewById(R.id.myTextView); 在布局文件中查找id為myTextView的控件,並將其強轉為TextView.
 Android提高之MediaPlayer播放網絡視頻的實現方法
前面講解了MediaPlayer播放網絡音頻,主要介紹了MediaPlayer關於網絡音頻的緩沖和進度條控制的方法,本文再來講解一下MediaPlayer播放網絡
 Android上使用ZXing識別條形碼與二維碼的方法
目前有越來越多的手機具備自動對焦的拍攝功能,這也意味著這些手機可以具備條碼掃描的功能。手機具備條碼掃描的功能,可以優化購物流程,快速存儲電子名片(二維碼)等。 本
 Android提高之Service用法實例解析
前面文章介紹了Activity以及Intent的使用,本文就來介紹Service。如果把Activity比喻為前台程序,那麼Service就是後台程序,Servi
 Android編程實現ViewPager多頁面滑動切換及動畫效果的方法
本文實例講述了Android編程實現ViewPager多頁面滑動切換及動畫效果的方法。分享給大家供大家參考,具體如下: 一、首先,我們來看一下效果圖,這是新浪微博