編輯:Android開發實例
在實際開發種LayoutInflater這個類還是非常有用的,它的作用類似於 findViewById()。
不同點是LayoutInflater是用來找layout下xml布局文件,並且實例化!而findViewById()是找具體xml下的具體 widget控件(如:Button,TextView等)。
為了讓大家容易理解我做了一個簡單的Demo,主布局main.xml裡有一個TextView和一個Button,當點擊Button,出現 Dialog,而這個Dialog的布局方式是我們在layout目錄下定義的custom_dialog.xml文件(裡面左右分布,左邊 ImageView,右邊TextView)。
java代碼:
<?xml version="1.0" encoding="utf-8"?>
<LinearLayout xmlns:android="http://schemas.android.com/apk/res/android"
android:orientation="vertical"
android:layout_width="fill_parent"
android:layout_height="fill_parent"
>
<TextView
android:layout_width="fill_parent"
android:layout_height="wrap_content"
android:text="@string/hello"
/>
<Button
android:id="@+id/myButton"
android:layout_width="wrap_content"
android:layout_height="wrap_content"
android:text="ShowCustomDialog"/>
</LinearLayout>
//custom_dialog.xml
<?xml version="1.0" encoding="utf-8"?>
<LinearLayout xmlns:android="http://schemas.android.com/apk/res/android"
android:orientation="horizontal" android:layout_width="fill_parent"
android:layout_height="fill_parent" android:padding="10dp">
<ImageView android:id="@+id/image"
android:layout_width="wrap_content"
android:layout_height="fill_parent" android:layout_marginRight="10dp" />
<TextView android:id="@+id/text" android:layout_width="wrap_content"
android:layout_height="fill_parent" android:textColor="#7CFC00" />
</LinearLayout>
java代碼:
package eoe.demo;
import android.app.Activity;
import android.app.AlertDialog;
import android.content.Context;
import android.os.Bundle;
import android.view.LayoutInflater;
import android.view.View;
import android.view.View.OnClickListener;
import android.widget.Button;
import android.widget.ImageView;
import android.widget.TextView;
public class Activity01 extends Activity implements OnClickListener{
private Button button;
@Override
public void onCreate(Bundle savedInstanceState) {
super.onCreate(savedInstanceState);
setContentView(R.layout.main);
button = (Button)findViewById(R.id.myButton);
button.setOnClickListener(this);
}
@Override
public void onClick(View v) {
showCustomDialog();
}
public void showCustomDialog(){
AlertDialog.Builder builder;
AlertDialog alertDialog;
Context mContext = Activity01.this;
//下面3種方法都可以
//LayoutInflater inflater = getLayoutInflater();
// mInflater = LayoutInflater.from(this);
LayoutInflater inflater = (LayoutInflater)mContext.getSystemServic(LAYOUT_INFLATER_SERVICE);
View layout = inflater.inflate(R.layout.custom_dialog, null);
TextView text = (TextView)layout.findViewById(R.id.text);
text.setText("Hello, Welcome to xh blog");
ImageView image = (ImageView)layout.findViewById(R.id.image);
//給ImageView 設置圖標
image.setImageResource(R.drawable.icon);
builder = new AlertDialog.Builder(mContext);
builder.setView(layout);
alertDialog = builder.create();
alertDialog.show();
}
}
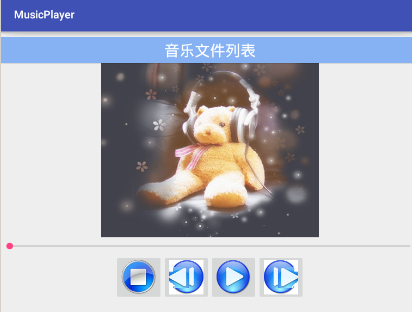 Android簡易版音樂播放器
1. 布局XML/HTML代碼 <?xml version=&q
 Android提高之藍牙傳感應用實例
前面文章介紹了Android利用麥克風采集並顯示模擬信號的實現方法,這種采集手段適用於無IO控制、單純讀取信號的情況。如果傳感器本身需要包含控制電路(例如采集血氧
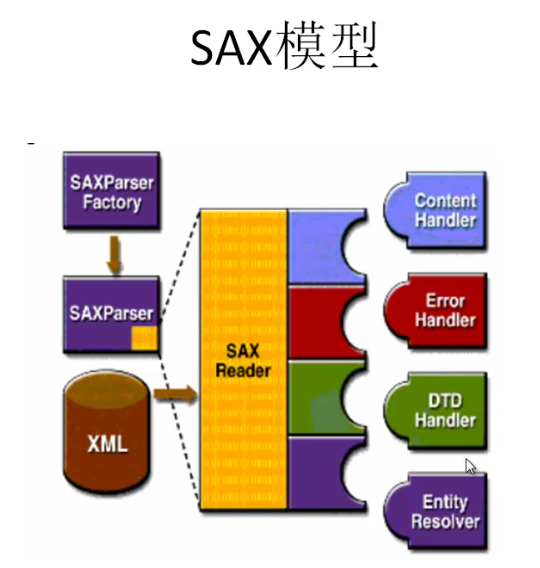 Android開發之XML文件解析的使用
前言 本文主要介紹在Android中怎樣來解析XML文件。主要采用的是SAX機制,SAX全稱為Simple API for XML,它既是一種
 Android MediaPlayer(多媒體播放)
Android提供了許多方法來控制播放的音頻/視頻文件和流。其中該方法是通過一類稱為MediaPlayer。Android是提供MediaPlayer類訪問內置的媒體播放