編輯:Android開發實例
安卓開發中ListActivity綁定數據庫實例
XML/HTML代碼:
view plaincopy to clipboardprint?
//ListActivity綁定動態數據,本例使用SimpleCursorAdapter
//bookmark3.xml:
<?xml version="1.0" encoding="utf-8"?>
<LinearLayout xmlns:android="http://schemas.android.com/apk/res/android"
android:orientation="vertical"
android:layout_width="match_parent"
android:layout_height="match_parent"
android:paddingLeft="8dp"
android:paddingRight="8dp">
<ListView android:id="@id/android:list"
android:layout_width="match_parent"
android:layout_height="match_parent"
android:background="#00FF00"
android:layout_weight="1"
android:drawSelectorOnTop="false"/>
<TextView android:id="@+id/android:empty"
android:layout_width="match_parent"
android:layout_height="match_parent"
android:background="#FF0000"
android:text="No data"/>
</LinearLayout>
//BookMarks3.Java:
Java代碼:
package com.cx_browser;
import com.cx_browser.db.DatabaseHelper;
import android.app.Activity;
import android.app.ListActivity;
import android.content.Intent;
import android.database.Cursor;
import android.database.sqlite.SQLiteDatabase;
import android.os.Bundle;
import android.view.View;
import android.widget.ListAdapter;
import android.widget.ListView;
import android.widget.SimpleCursorAdapter;
public class BookMarks3 extends ListActivity{
@Override
protected void onListItemClick(ListView l, View v, int position, long id) {
// TODO Auto-generated method stub
super.onListItemClick(l, v, position, id);
Intent intent=new Intent();
//String et1=e1.getText().toString();
String et1="www.baidu.com";//換成數據庫中取來的地址
intent.putExtra("URL_Wlc", et1);
intent.setClass(BookMarks3.this,WebPage.class);
BookMarks3.this.startActivity(intent);
}
//數據庫名
private static final String DATABASE_NAME="test_db4";
//表名
private static final String TABLE_NAME="bookmarks";
//表中字段
private static final String TABLE_ID="_id";
private static final String TABLE_TITLE="title";
private static final String TABLE_URL="url";
//創建ListView列表視圖
ListView m_ListView =null;
@Override
protected void onCreate(Bundle savedInstanceState) {
// TODO Auto-generated method stub
super.onCreate(savedInstanceState);
setContentView(R.layout.bookmarks3);
//m_ListView=(ListView)this.findViewById(R.id.list1);
//創建ListView對象
// m_ListView = new ListView(this);
DatabaseHelper dbHelper=new DatabaseHelper(BookMarks3.this,DATABASE_NAME);
//SQLiteDatabase db=dbHelper.getWritableDatabase();
SQLiteDatabase db=dbHelper.getReadableDatabase();
Cursor cursor=db.query(TABLE_NAME,new String[]{TABLE_ID,TABLE_TITLE,TABLE_URL},null,null,null, null,null);
//String TITLE=cursor.getString(cursor.getColumnIndex("title"));
//String URL=cursor.getString(cursor.getColumnIndex("url"));
//startManagingCursor(cursor);
// Now create a new list adapter bound to the cursor.
// SimpleListAdapter is designed for binding to a Cursor.
//獲得查詢的數據的條數
int count = cursor.getCount();
//if(cursor !=null && count>=0){
System.out.println("Count--->"+count);
System.out.println(TABLE_TITLE);
System.out.println(TABLE_URL);
SimpleCursorAdapter adapter = new SimpleCursorAdapter(
this, // Context.
// android.R.layout.two_line_list_item,
android.R.layout.simple_expandable_list_item_1,
// Specify the row template to use (here, two columns bound to the two retrieved cursor rows).
cursor,
// Pass in the cursor to bind to.
new String[] {TABLE_TITLE},
// Array of cursor columns to bind to.
new int[] {android.R.id.text1});
// Parallel array of which template objects to bind to those columns.
// Bind to our new adapter.
setListAdapter(adapter);
// }
// cursor.close();
}
}
//另外可以使用maps方式靜態的綁定數據:
//a3.xml:
XML/HTML代碼
<?xml version="1.0" encoding="utf-8"?>
<LinearLayout
xmlns:android="http://schemas.android.com/apk/res/android"
android:layout_width="match_parent"
android:layout_height="wrap_content"
android:orientation="horizontal"
android:paddingLeft="8dip"
android:paddingRight="8dip"
android:paddingBottom="8dip">
<TextView android:id="@+id/name"
android:textSize="16sp"
android:text
android:layout_width="180dip"
android:layout_height="25dip"/>
<TextView android:id="@+id/ip"
android:textSize="16sp"
android:layout_width="fill_parent"
android:layout_height="fill_parent"/>
</LinearLayout>
//Activity3.java:
Java代碼:
package com.helloworld;
import java.util.ArrayList;
import java.util.HashMap;
import android.app.Activity;
import android.app.ListActivity;
import android.os.Bundle;
import android.widget.SimpleAdapter;
import android.widget.TextView;
public class Activity3 extends ListActivity {
@Override
protected void onCreate(Bundle savedInstanceState) {
// TODO Auto-generated method stub
super.onCreate(savedInstanceState);
//setContentView(R.layout.a3);
//TextView t1=(TextView) this.findViewById(R.id.textView1);
ArrayList<HashMap<String,String>> list=new ArrayList<HashMap<String,String>>();
HashMap<String,String> map1=new HashMap<String,String>();
HashMap<String,String> map2=new HashMap<String,String>();
HashMap<String,String> map3=new HashMap<String,String>();
map1.put("name", "chenxi");
map1.put("ip", "192.168.1.0");
map2.put("name", "zhoujielun");
map2.put("ip", "192.168.1.1");
map3.put("name", "caiyilin");
map3.put("ip", "192.168.1.2");
list.add(map1);
list.add(map2);
list.add(map3);
SimpleAdapter listAdapter=new SimpleAdapter(this, list,
R.layout.a3,new String[]{"name","ip"},
new int[]{R.id.name,R.id.ip});
setListAdapter(listAdapter);
}
}
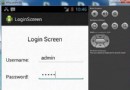 Android登錄實例
登錄應用程序的屏幕,詢問憑據登錄到一些特定的應用。可能需要登錄到Facebook,微博等本章介紹了,如何創建一個登錄界面,以及如何管理安全問題和錯誤嘗試。首先,必須定義兩
 Android中搜索SD卡文件的開發實例
我們在進行Android開發時往往需要訪問SD卡的內容,而且因為文件很多,希望
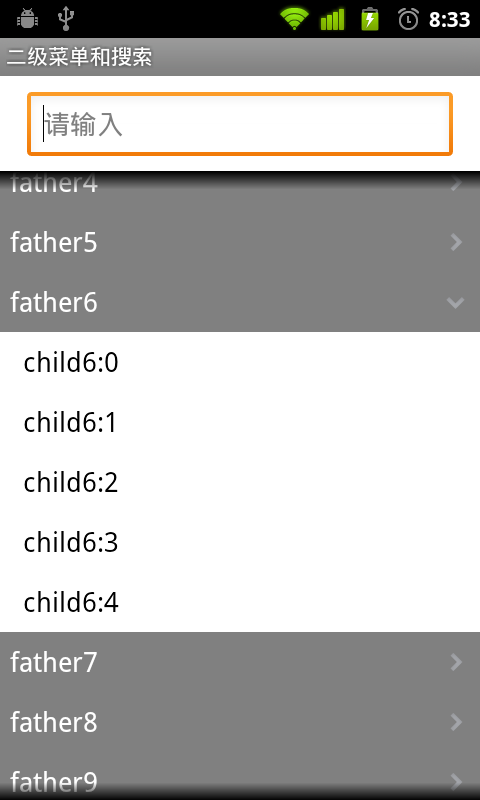 Android編程實現二級下拉菜單及快速搜索的方法
本文實例講述了Android編程實現二級下拉菜單及快速搜索的方法。分享給大家供大家參考,具體如下: 一、我們要做什麼? 上面有個搜索框,下面是一個二級下拉菜單。
 Eclipse開發環境導入android sdk的sample中的源碼
初學Android編程,Android SDK中提供的Sample代碼自然是最好的學習材料。 &nb