編輯:Android開發實例
很多寫登錄界面的開發者都會遇到一個問題:那就是在登錄界面時,當你點擊輸入框時,下邊的按鈕有時會被輸入框擋住,這個不利於用戶的體驗,所以很多人希望軟鍵盤彈出時,也能把按鈕擠上去。很多開發者想要監聽鍵盤的狀態,這無疑是一個很麻煩的做法。
我們可以在AndroidManifest.xml的Activity設置屬性:android:windowSoftInputMode = "adjustResize" ,軟鍵盤彈出時,要對主窗口布局重新進行布局,並調用onSizeChanged方法,切記一點當我們設置為“adjustResize”時,我們的界面不要設置為全屏模式,否則設置了這個屬性也不會有什麼效果。而當我們設置android: windowSoftInputMode = "adjustPan"時,主窗口就不會調用onSizeChanged方法,界面的一部分就會被軟鍵盤覆蓋住,就不會被擠到軟鍵盤之上了。
我們通過一段代碼來測試一下,當我們設置了該屬性後,彈出輸入法時,系統做了什麼:
重寫Layout布局:
- public class ResizeLayout extends LinearLayout{
- private static int count = 0;
- public ResizeLayout(Context context, AttributeSet attrs) {
- super(context, attrs);
- }
- @Override
- protected void onSizeChanged(int w, int h, int oldw, int oldh) {
- super.onSizeChanged(w, h, oldw, oldh);
- Log.e("onSizeChanged " + count++, "=>onResize called! w="+w + ",h="+h+",oldw="+oldw+",oldh="+oldh);
- }
- @Override
- protected void onLayout(boolean changed, int l, int t, int r, int b) {
- super.onLayout(changed, l, t, r, b);
- Log.e("onLayout " + count++, "=>OnLayout called! l=" + l + ", t=" + t + ",r=" + r + ",b="+b);
- }
- @Override
- protected void onMeasure(int widthMeasureSpec, int heightMeasureSpec) {
- super.onMeasure(widthMeasureSpec, heightMeasureSpec);
- Log.e("onMeasure " + count++, "=>onMeasure called! widthMeasureSpec=" + widthMeasureSpec + ", heightMeasureSpec=" + heightMeasureSpec);
- }
我們的布局設置為:
- <com.winuxxan.inputMethodTest.ResizeLayout
- xmlns:android="http://schemas.android.com/apk/res/android"
- android:id="@+id/root_layout"
- android:layout_width="fill_parent"
- android:layout_height="fill_parent"
- android:orientation="vertical"
- >
- <EditText
- android:layout_width="fill_parent"
- android:layout_height="wrap_content"
- />
- <LinearLayout
- android:id="@+id/bottom_layout"
- android:layout_width="fill_parent"
- android:layout_height="fill_parent"
- android:orientation="vertical"
- android:gravity="bottom">s
- <TextView
- android:layout_width="fill_parent"
- android:layout_height="wrap_content"
- android:text="@string/hello"
- android:background="#77777777"
- />
- </LinearLayout>
- </com.winuxxan.inputMethodTest.ResizeLayout>
AndroidManifest.xml的Activity設置屬性:android:windowSoftInputMode = "adjustResize"
運行程序,點擊文本框,查看調試信息:
E/onMeasure 6(7960): =>onMeasure called! widthMeasureSpec=1073742144, heightMeasureSpec = 1073742024
E/onMeasure 7(7960): =>onMeasure called! widthMeasureSpec=1073742144, heightMeasureSpec = 1073742025
E/onSizeChanged 8(7960): =>onSizeChanged called! w=320,h=201,oldw=320,oldh=377
E/onLayout 9(7960): =>OnLayout called! l=0, t=0,r=320,b=201
從調試結果我們可以看出,當我們點擊文本框後,根布局調用了onMeasure,onSizeChanged和onLayout。
windowSoftInputMode的值如果設置為adjustPan,那麼該Activity主窗口並不調整屏幕的大小以便留出軟鍵盤的空間。相反,當前窗口的內容將自動移動以便當前焦點從不被鍵盤覆蓋和用戶能總是看到輸入內容的部分。這個通常是不期望比調整大小,因為用戶可能關閉軟鍵盤以便獲得與被覆蓋內容的交互操作。
上面的例子中,我們將AndroidManifest.xml的屬性進行更改:android: windowSoftInputMode = "adjustPan"
重新運行,並點擊文本框,查看調試信息:
E/onMeasure 6(8378): =>onMeasure called! widthMeasureSpec=1073742144, heightMeasureSpec=1073742200
E/onMeasure 7(8378): =>onMeasure called! widthMeasureSpec=1073742144, heightMeasureSpec=1073742201
E/onLayout 8(8378): =>OnLayout called! l=0, t=0,r=320,b=377
我們看到:系統也重新進行了measrue和layout,但是我們發現,layout過程中onSizeChanged並沒有調用,這說明輸入法彈出前後並沒有改變原有布局的大小。
當然還有其他屬性可以設置:
"stateUnspecified"
軟鍵盤的狀態(是否它是隱藏或可見)沒有被指定。系統將選擇一個合適的狀態或依賴於主題的設置。
這個是為了軟件盤行為默認的設置。
"stateUnchanged"
軟鍵盤被保持無論它上次是什麼狀態,是否可見或隱藏,當主窗口出現在前面時。
"stateHidden"
當用戶選擇該Activity時,軟鍵盤被隱藏——也就是,當用戶確定導航到該Activity時,而不是返回到它由於離開另一個Activity。
"stateAlwaysHidden"
軟鍵盤總是被隱藏的,當該Activity主窗口獲取焦點時。
"stateVisible"
軟鍵盤是可見的,當那個是正常合適的時(當用戶導航到Activity主窗口時)。
"stateAlwaysVisible"
當用戶選擇這個Activity時,軟鍵盤是可見的——也就是,也就是,當用戶確定導航到該Activity時,而不是返回到它由於離開另一個Activity。
"adjustUnspecified"
它不被指定是否該Activity主窗口調整大小以便留出軟鍵盤的空間,或是否窗口上的內容得到屏幕上當前的焦點是可見的。系統將自動選擇這些模式中一種主要依賴於是否窗口的內容有任何布局視圖能夠滾動他們的內容。如果有這樣的一個視圖,這個窗口將調整大小,這樣的假設可以使滾動窗口的內容在一個較小的區域中可見的。這個是主窗口默認的行為設置。
"adjustResize"
該Activity主窗口總是被調整屏幕的大小以便留出軟鍵盤的空間
"adjustPan"
該Activity主窗口並不調整屏幕的大小以便留出軟鍵盤的空間。相反,當前窗口的內容將自動移動以便當前焦點從不被鍵盤覆蓋和用戶能總是看到輸入內容的部分。這個通常是不期望比調整大小,因為用戶可能關閉軟鍵盤以便獲得與被覆蓋內容的交互操作。
相應用過Android手機的朋友都知道,有時候在文本框中輸入文字後,操作按鈕被輸入法遮擋了,不得不關閉輸入法才可以繼續操作。
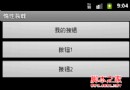
比如下面這個畫面:
畫面布局:
如果不做任何操作,那麼點擊文本框後的效果肯定是下圖:
此時,【共享】按鈕被輸入法擋住了,必須關閉輸入法才可以操作了。
有的朋友會說,可以在布局外面再加一個ScrollView,這樣的畫,UI布局就和輸入法分離了,輸入法出現後,上面還可以滾動。
但是這樣的效果好嗎? 我們來看一下效果(布局外加ScrollView的效果):
畫面布局:
從圖中可以看出,上面部分右側有一個滾動條,用戶可以通過從下滾動來點擊按鈕。但是個人覺得,這樣還不如直接關閉輸入法來點擊按鈕來的方便!
那麼有沒有更好的辦法呢? 答案是有!
先看一下這個更好的方法是什麼效果:
從圖中可以看出,UI布局也與輸入法分離了,同時EditText區域自動縮小了。這樣的話,即不影響用戶輸入,也不影響用戶進一步操作!
而且即使打開了輸入法,用戶也可以看到UI全貌,感覺比較舒服、友好。
下面就說一下,這個效果是如何做到的.
其實答案很簡單,不需要更改局部文件,而是修改AndroidManifest.xml文件,在Activity屬性中加一條:
android:windowSoftInputMode="adjustResize"
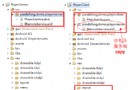
AndroidManifest.xml修改前後比較:
 Android 使用XML做動畫UI的深入解析
效果: http://www.56.com/u82/v_OTM4MDk5MTk.html第一步: 創建anim文件夾放置動畫xml文件在res文件夾下,
 Android開發技巧之ViewStub控件惰性裝載
在4.5.6節介紹過一個<include>標簽,該標簽可以在布局文件中引用另外一個布局文件,並可以覆蓋被引用布局文件根節點所有與布局相關的屬性,也就是
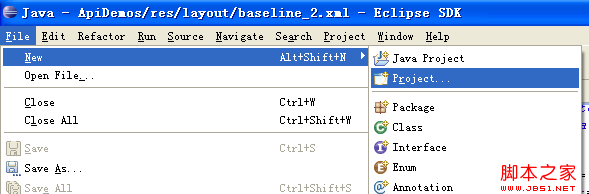 Eclipse開發環境導入android sdk的sample中的源碼
初學Android編程,Android SDK中提供的Sample代碼自然是最好的學習材料。 &nb
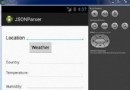 Android JSON解析器
JSON代表JavaScript對象符號。它是一個獨立的數據交換格式,是XML的最佳替代品。本章介紹了如何解析JSON文件,並從中提取所需的信息。Android提供了四個