編輯:Android開發實例
今天主要說的是對Layout_weight屬性的完全解析,以及利用Layout_weight這個屬性使用ListView來實現表格的效果,我們都知道Android裡面專門有一個TableLayout來實現表格的,說實話,我平常開發中用TableLayout還是比較少的,幾乎沒有用到,我們完全可以用LinearLayout和RelativeLayout來代替TableLayout的使用,自己開發中主要使用LinearLayout,RelativeLayout這兩種布局,不過剛開始我還是偏愛於RelativeLayout,因為在RelativeLayout裡面我們可以直接拖拽控件來布局,比較方便,現在對這兩種布局偏愛各半吧,LinearLayout裡面有一個屬性android:layout_weight比較重要,我們在開發中常常使用它來調節界面效果,也行很多人還不了解這個屬性的使用,不過沒關系,我首先先帶大家理解android:layout_weight屬性然後在利用它來實現一個表格效果
android:layout_weight是指LinearLayout先給裡面的控件分配完大小之後剩余空間的權重,也許你暫時還是摸不到頭腦,不過沒有關系,下面我通過例子來解釋layout_weight到底是什麼意思,先看下面的布局文件,一個LinearLayout,裡面3個文本框
- <LinearLayout xmlns:android="http://schemas.android.com/apk/res/android"
- xmlns:tools="http://schemas.android.com/tools"
- android:layout_width="match_parent"
- android:layout_height="match_parent"
- android:orientation="horizontal" >
- <TextView
- android:layout_width="wrap_content"
- android:layout_height="wrap_content"
- android:background="#0045f5"
- android:gravity="center"
- android:text="1" />
- <TextView
- android:layout_width="wrap_content"
- android:layout_height="wrap_content"
- android:background="#00ff47"
- android:gravity="center"
- android:text="2"
- android:layout_weight="1"/>
- <TextView
- android:layout_width="wrap_content"
- android:layout_height="wrap_content"
- android:background="#ff5600"
- android:gravity="center"
- android:layout_weight="1"
- android:text="3" />
- </LinearLayout>
為什麼效果是這個樣子呢,首先3個文本框的寬度都是“wrap_content”,根據視圖內部內容自動擴展,LinearLayout就先給3個TextView分配空間適當的空間大小,假設為每個TextView分配10dip的寬度,屏幕的寬度為480dip, 那麼LinearLayout的剩余空間就是 480 - 3*10 = 450dip,由於第一個TextView沒有設置layout_weight,所以它的寬度就是10dip,而後面兩個TextView設置layout_weight都是1,所以後面兩個TextView就平均分配LinearLayout的剩余空間,即為 450 / 2 = 225dip,所以後面兩個TextView的寬度為10 + 225 = 235dip
如果我們實際開發中,你設置裡面控件的寬度為”wrap_content“,然後想讓裡面的控件按比例占用大小,那麼你就大錯特錯了,為什麼呢?我們看看下面的代碼
- <LinearLayout xmlns:android="http://schemas.android.com/apk/res/android"
- xmlns:tools="http://schemas.android.com/tools"
- android:layout_width="match_parent"
- android:layout_height="match_parent"
- android:orientation="horizontal" >
- <TextView
- android:layout_width="wrap_content"
- android:layout_height="wrap_content"
- android:background="#0045f5"
- android:gravity="center"
- android:text="1" />
- <TextView
- android:layout_width="wrap_content"
- android:layout_height="wrap_content"
- android:background="#00ff47"
- android:gravity="center"
- android:text="2222222222222222222"
- android:layout_weight="1"/>
- <TextView
- android:layout_width="wrap_content"
- android:layout_height="wrap_content"
- android:background="#ff5600"
- android:gravity="center"
- android:layout_weight="1"
- android:text="3" />
- </LinearLayout>
你本來想讓後面兩個TextView平均分配剩余控件,可是下面的效果卻並不是你想要的,如下圖
其實因為3個TextView的寬度都是”wrap_content“,LinearLayout會先按照TextView裡面的內容分配好大小,由於第2個TextView內容很多,所以LinearLayout為其分配更多的空間,使得剩余空間變小了,原理和上面的一樣,那麼我們在實際開發中要怎麼設置按比例分配呢。知道原理其實就很簡單,比如我們想要3個TextView按照1:2:3的效果
- <LinearLayout xmlns:android="http://schemas.android.com/apk/res/android"
- xmlns:tools="http://schemas.android.com/tools"
- android:layout_width="match_parent"
- android:layout_height="match_parent"
- android:orientation="horizontal" >
- <TextView
- android:layout_width="0dip"
- android:layout_height="wrap_content"
- android:background="#0045f5"
- android:gravity="center"
- android:layout_weight="1"
- android:text="1" />
- <TextView
- android:layout_width="0dip"
- android:layout_height="wrap_content"
- android:background="#00ff47"
- android:gravity="center"
- android:text="2222222222222222222"
- android:layout_weight="2"/>
- <TextView
- android:layout_width="0dip"
- android:layout_height="wrap_content"
- android:background="#ff5600"
- android:gravity="center"
- android:layout_weight="3"
- android:text="3" />
- </LinearLayout>
我們只需要將3個TextView的寬度設置為0dip,首先LinearLayout為3個TextView分配0dip的寬度,剩余空間就是 480 - 3 * 0 = 480dip,然後剩余空間在按照權重分配,所以我們看到的效果就是1:2:3
通過上面的講解,也許你會得出一個結論,權重越大,LinearLayout為其分配的空間就越大,我只能說這個結論下有點早了,我們繼續看布局
- <LinearLayout xmlns:android="http://schemas.android.com/apk/res/android"
- xmlns:tools="http://schemas.android.com/tools"
- android:layout_width="match_parent"
- android:layout_height="match_parent"
- android:orientation="horizontal" >
- <TextView
- android:layout_width="fill_parent"
- android:layout_height="wrap_content"
- android:background="#0045f5"
- android:gravity="center"
- android:layout_weight="1"
- android:text="1" />
- <TextView
- android:layout_width="fill_parent"
- android:layout_height="wrap_content"
- android:background="#00ff47"
- android:gravity="center"
- android:text="2"
- android:layout_weight="2"/>
- <TextView
- android:layout_width="fill_parent"
- android:layout_height="wrap_content"
- android:background="#ff5600"
- android:gravity="center"
- android:layout_weight="2"
- android:text="3" />
- </LinearLayout>
也許你會很納悶,怎麼不是你想要的1:2:2的效果,我來為你解決疑惑吧,原理跟上面的還是一樣的,因為我們這裡為每個TextView設置的寬度為”fill_parent",即為充滿整個LinearLayout,假如屏幕依然為480dip, 首先LinearLayout為3個TextView分配的寬度為480dip,屏幕剩余寬度為 480 - 3* 480 = -960dip,然後3個TextView按照權重分配剩余空間,第一個TextView分配寬度為 480 + (-960) * (1/5) = 288dip,後面兩個TextView就為480 + (-960) * (2/5) = 96dip,比例為3:1:1
通過上面的例子和分析,你是不是對Layout_weight屬性理解很透徹了呢,如果我們想要按照權重比例來分配LinearLayout,我們需要將其寬度設置為0dip,如果我們將其寬度設置為“fill_parent"的時候,其控件所占的比例不是權重的比例,我們需要自行計算比例
接下來我們就通過Layout_weight用ListView來實現表格,我們先看Activity的布局
- <LinearLayout xmlns:android="http://schemas.android.com/apk/res/android"
- xmlns:tools="http://schemas.android.com/tools"
- android:orientation="vertical"
- android:layout_margin="10dip"
- android:layout_width="match_parent"
- android:layout_height="match_parent" >
- <include
- layout="@layout/list_item"
- android:id="@+id/table_title"/>
- <ListView
- android:id="@+id/list"
- android:divider="#f9b68b"
- android:dividerHeight="1.0dip"
- android:scrollbars="none"
- android:background="@drawable/listview_bg"
- android:cacheColorHint="@android:color/transparent"
- android:fadingEdge="none"
- android:layout_width="fill_parent"
- android:layout_height="wrap_content" >
- </ListView>
- </LinearLayout>
一個線性布局,然後就是表格的title布局,下面就是一個ListView了,很簡單的布局,接下來就是ListView每個item的布局
- <?xml version="1.0" encoding="UTF-8"?>
- <LinearLayout xmlns:android="http://schemas.android.com/apk/res/android"
- android:orientation="horizontal"
- android:layout_width="fill_parent"
- android:layout_height="wrap_content" >
- <TextView
- android:id="@+id/text_name"
- android:layout_width="0dip"
- android:layout_height="wrap_content"
- android:layout_weight="2"
- android:gravity="center"
- android:paddingBottom="10dip"
- android:paddingTop="10dip"
- android:text="姓名" />
- <View
- android:layout_width="1.5dip"
- android:layout_height="fill_parent"
- android:background="#f9b68b"/>
- <TextView
- android:id="@+id/text_sex"
- android:layout_width="0dip"
- android:layout_height="wrap_content"
- android:layout_weight="1"
- android:paddingBottom="10dip"
- android:paddingTop="10dip"
- android:gravity="center"
- android:text="性別" />
- <View
- android:layout_width="1.5dip"
- android:layout_height="fill_parent"
- android:background="#f9b68b"/>
- <TextView
- android:id="@+id/text_age"
- android:layout_width="0dip"
- android:layout_height="wrap_content"
- android:layout_weight="1"
- android:paddingBottom="10dip"
- android:paddingTop="10dip"
- android:gravity="center"
- android:text="年齡" />
- </LinearLayout>
3個TextView的寬度都是0dip,那兩個View是中間的分割線,3個TextView的權重比值是2:1:1 ,這樣子3個TextView不會因為裡面內容的長度而變形
- package com.example.listviewtable;
- public class Person {
- private String name;
- private String sex;
- private int age;
- public Person() {
- super();
- }
- public Person(String name, String sex, int age) {
- super();
- this.name = name;
- this.sex = sex;
- this.age = age;
- }
- public String getName() {
- return name;
- }
- public void setName(String name) {
- this.name = name;
- }
- public String getSex() {
- return sex;
- }
- public void setSex(String sex) {
- this.sex = sex;
- }
- public int getAge() {
- return age;
- }
- public void setAge(int age) {
- this.age = age;
- }
- }
用來存放ListView每個item數據的實體類
- package com.example.listviewtable;
- import java.util.List;
- import android.content.Context;
- import android.view.LayoutInflater;
- import android.view.View;
- import android.view.ViewGroup;
- import android.widget.BaseAdapter;
- import android.widget.TextView;
- public class TableAdapter extends BaseAdapter {
- private List<Person> list;
- private LayoutInflater inflater;
- public TableAdapter(Context context, List<Person> list){
- this.list = list;
- inflater = LayoutInflater.from(context);
- }
- @Override
- public int getCount() {
- return list.size();
- }
- @Override
- public Object getItem(int position) {
- return list.get(position);
- }
- @Override
- public long getItemId(int position) {
- return position;
- }
- @Override
- public View getView(int position, View convertView, ViewGroup parent) {
- Person person = (Person) this.getItem(position);
- ViewHolder viewHolder;
- if(convertView == null){
- viewHolder = new ViewHolder();
- convertView = inflater.inflate(R.layout.list_item, null);
- viewHolder.mTextName = (TextView) convertView.findViewById(R.id.text_name);
- viewHolder.mTextSex = (TextView) convertView.findViewById(R.id.text_sex);
- viewHolder.mTextAge = (TextView) convertView.findViewById(R.id.text_age);
- convertView.setTag(viewHolder);
- }else{
- viewHolder = (ViewHolder) convertView.getTag();
- }
- viewHolder.mTextName.setText(person.getName());
- viewHolder.mTextSex.setText(person.getSex());
- viewHolder.mTextAge.setText(person.getAge() + "歲");
- return convertView;
- }
- public static class ViewHolder{
- public TextView mTextName;
- public TextView mTextSex;
- public TextView mTextAge;
- }
- }
ListView的適配器類,代碼很簡單,我也沒有注釋也不去講解,相信大家都看得懂這些代碼,這就是一個基本的自己定義的適配器類,最後就是Activity界面代碼
- package com.example.listviewtable;
- import java.util.ArrayList;
- import java.util.List;
- import android.app.Activity;
- import android.graphics.Color;
- import android.os.Bundle;
- import android.view.ViewGroup;
- import android.widget.ListView;
- public class ListTableActivity extends Activity {
- @Override
- protected void onCreate(Bundle savedInstanceState) {
- super.onCreate(savedInstanceState);
- setContentView(R.layout.activity_main);
- //設置表格標題的背景顏色
- ViewGroup tableTitle = (ViewGroup) findViewById(R.id.table_title);
- tableTitle.setBackgroundColor(Color.rgb(255, 100, 10));
- List<Person> list = new ArrayList<Person>();
- list.add(new Person("劉德華", "男", 50));
- list.add(new Person("劉德華", "男", 50));
- list.add(new Person("劉德華", "男", 50));
- list.add(new Person("劉德華", "男", 50));
- list.add(new Person("劉德華", "男", 50));
- list.add(new Person("劉德華", "男", 50));
- list.add(new Person("劉德華", "男", 50));
- list.add(new Person("劉德華", "男", 50));
- list.add(new Person("劉德華", "男", 50));
- list.add(new Person("劉德華", "男", 50));
- ListView tableListView = (ListView) findViewById(R.id.list);
- TableAdapter adapter = new TableAdapter(this, list);
- tableListView.setAdapter(adapter);
- }
- }
運行程序效果如下:
通過layout_weight這個屬性,我們就輕松實現了表格的功能,通過本文章相信大家對這個屬性有了深刻的理解。
源碼下載
 Android提高之Activity+Intent用法示例
一般來說。熟悉Android程序設計的人都知道Android有三個基礎組件Activity,Service和BroadcastReceiver,他們都是依賴Int
 Android加載Spinner
可以顯示在的Android任務,通過加載進度條的進展。進度條有兩種形狀。加載欄和加載微調(spinner)。在本章中,我們將討論微調(spinner)。Spinner 用
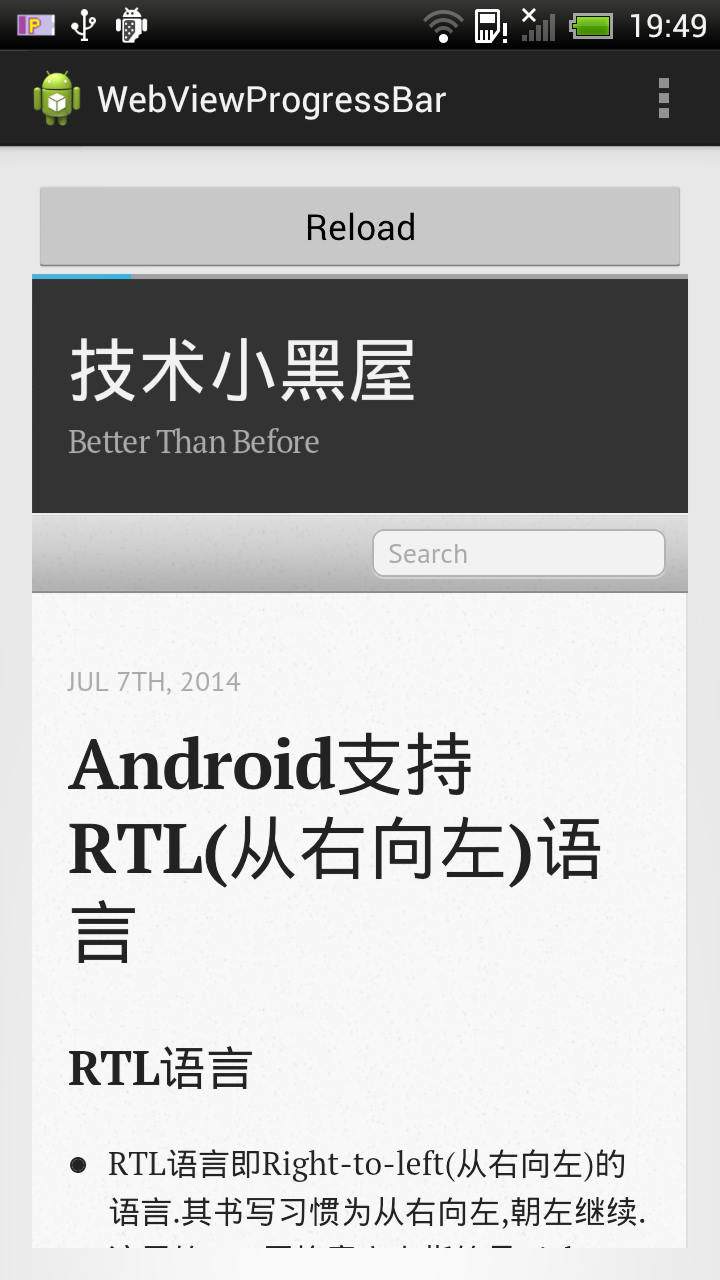 Android中實現Webview頂部帶進度條的方法
寫這篇文章,做份備忘,簡單滴展示一個帶進度條的Webview示例,進度條位於Webview上面. 示例圖如下: 主Activity代碼: 代碼如下: packa
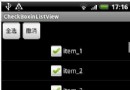 Android在listview添加checkbox實現原理與代碼
主界面CheckBoxinListViewActivity.java代碼如下: 代碼如下: public class CheckBoxinListViewActi