編輯:Android開發實例
分類
notification有以下幾種:
1>普通notification
1.內容標題
2.大圖標
3.內容
4.內容附加信息
5.小圖標
6.時間
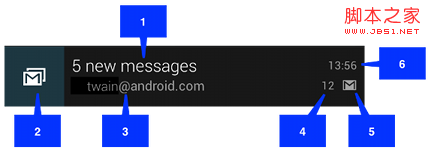
2>大布局Notification
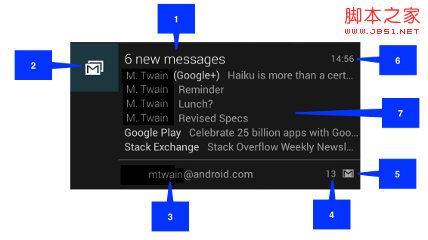 圖1
圖1
大布局notification是在android4.1以後才增加的,大布局notification與小布局notification只在‘7'部分有區別,其它部分都一致。大布局notification只有在所有notification的最上 面時才會顯示大布局,其它情況下顯示小布局。你也可以用手指將其擴展為大布局(前提是它是大布局)。如下圖:
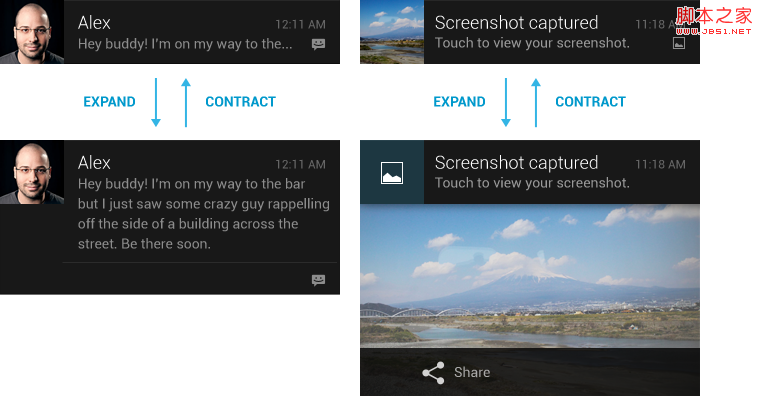 圖2
圖2
大布局notification有三種類型:如圖1為NotificationCompat.InboxStyle 類型。圖2左部為NotificationCompat.BigTextStyle。圖2右部 為:NotificationCompat.BigPictureStyle
3>自定義布局notification
除了系統提供的notification,我們也可以自定義notification。如下圖所示的一個音樂播放器控制notification:
 圖3
圖3
如何創建notification
1>實例化一個NotificationCompat.Builder對象;如builder
2>調用builder的相關方法對notification進行上面提到的各種設置
3>調用builder.build()方法此方法返回一個notification對象。
4>實例化一個NotificationManager對象;如:manager
5>調用manager的notify方法。
注:
一個notification不必對上面所有的選項都進行設置,但有3項是必須的:
小圖標, set by setSmallIcon()
內容標題, set by setContentTitle()
內容, set by setContentText()
示例代碼

0>初始化部分代碼
代碼如下:
View Code
public class MainActivity extends Activity implements OnClickListener {
private static final int NOTIFICATION_ID_1 = 0;
private static final int NOTIFICATION_ID_2 = 1;
private static final int NOTIFICATION_ID_3 = 2;
private static final int NOTIFICATION_ID_4 = 3;
private static final int NOTIFICATION_ID_5 = 4;
private static final int NOTIFICATION_ID_6 = 5;
private static final int NOTIFICATION_ID_7 = 6;
private static final int NOTIFICATION_ID_8 = 7;
private static int messageNum = 0;
private Context context = this;
private NotificationManager manager;
private Bitmap icon;
private static final int[] btns = new int[] { R.id.btn1, R.id.btn2,
R.id.btn3, R.id.btn4, R.id.btn5, R.id.btn6, R.id.btn7, R.id.btn8,
R.id.btn9 };
@Override
protected void onCreate(Bundle savedInstanceState) {
super.onCreate(savedInstanceState);
setContentView(R.layout.activity_main);
init();
}
private void init() {
// 獲取通知服務
manager = (NotificationManager) getSystemService(Context.NOTIFICATION_SERVICE);
// 注冊監聽器
for (int btn : btns) {
findViewById(btn).setOnClickListener(this);
}
icon = BitmapFactory.decodeResource(getResources(),
R.drawable.ic_launcher);
}
@Override
public void onClick(View v) {
switch (v.getId()) {
case R.id.btn1:
showNormal();
break;
case R.id.btn2:
showBigView_Text();
break;
case R.id.btn3:
showBigView_Pic();
break;
case R.id.btn4:
showBigView_Inbox();
break;
case R.id.btn5:
showCustomView();
break;
case R.id.btn6:
backApp();
break;
case R.id.btn7:
backScreen();
break;
case R.id.btn8:
showProgressBar();
break;
case R.id.btn9:
dismiss();
break;
default:
Toast.makeText(context, "error", Toast.LENGTH_SHORT).show();
break;
}
}
private void dismiss() {
manager.cancelAll();
}
1>普通notification
代碼如下:
View Code
private void showNormal() {
Notification notification = new NotificationCompat.Builder(context)
.setLargeIcon(icon).setSmallIcon(R.drawable.ic_launcher)
.setTicker("showNormal").setContentInfo("contentInfo")
.setContentTitle("ContentTitle").setContentText("ContentText")
.setNumber(++messageNum)
.setAutoCancel(true).setDefaults(Notification.DEFAULT_ALL)
.build();
manager.notify(NOTIFICATION_ID_1, notification);
}
2>大布局Text類型notification
代碼如下:
View Code
private void showBigView_Text() {
NotificationCompat.BigTextStyle textStyle = new BigTextStyle();
textStyle
.setBigContentTitle("BigContentTitle")
.setSummaryText("SummaryText")
.bigText(
"I am Big Texttttttttttttttttttttttttttttttttttttttttttt!!!!!!!!!!!!!!!!!!!......");
Notification notification = new NotificationCompat.Builder(context)
.setLargeIcon(icon).setSmallIcon(R.drawable.ic_launcher)
.setTicker("showBigView_Text").setContentInfo("contentInfo")
.setContentTitle("ContentTitle").setContentText("ContentText")
.setStyle(textStyle)
.setAutoCancel(true).setDefaults(Notification.DEFAULT_ALL)
.build();
manager.notify(NOTIFICATION_ID_2, notification);
}
3> 大布局Picture類型notificatio
代碼如下:
View Code
private void showBigView_Pic() {
NotificationCompat.BigPictureStyle pictureStyle = new BigPictureStyle();
pictureStyle.setBigContentTitle("BigContentTitle")
.setSummaryText("SummaryText").bigPicture(icon);
Notification notification = new NotificationCompat.Builder(context)
.setLargeIcon(icon).setSmallIcon(R.drawable.ic_launcher)
.setTicker("showBigView_Pic").setContentInfo("contentInfo")
.setContentTitle("ContentTitle").setContentText("ContentText")
.setStyle(pictureStyle)
.setAutoCancel(true).setDefaults(Notification.DEFAULT_ALL)
.build();
manager.notify(NOTIFICATION_ID_3, notification);
}
4>大布局Inbox類型notification
代碼如下:
View Code
private void showBigView_Inbox() {
NotificationCompat.InboxStyle inboxStyle = new NotificationCompat.InboxStyle();
inboxStyle.setBigContentTitle("BigContentTitle").setSummaryText(
"SummaryText");
for (int i = 0; i < 5; i++)
inboxStyle.addLine("news:" + i);
Notification notification = new NotificationCompat.Builder(context)
.setLargeIcon(icon).setSmallIcon(R.drawable.ic_launcher)
.setTicker("showBigView_Inbox").setContentInfo("contentInfo")
.setContentTitle("ContentTitle").setContentText("ContentText")
.setStyle(inboxStyle)
.setAutoCancel(true).setDefaults(Notification.DEFAULT_ALL)
.build();
manager.notify(NOTIFICATION_ID_4, notification);
}
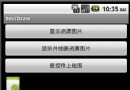
5>自定義notification
效果圖:
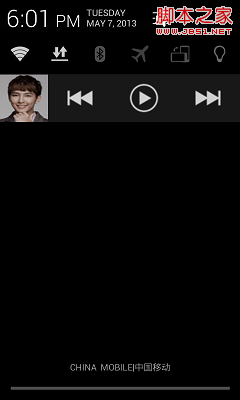
並對中間的播放按鈕做了一個簡單的點擊處理事件(點擊播放後,請關閉幕簾否則可能會看不到toast提示)
代碼如下:
View Code
private void showCustomView() {
RemoteViews remoteViews = new RemoteViews(getPackageName(),
R.layout.custom_notification);
Intent intent = new Intent(this, TestMusicControl.class);
PendingIntent pendingIntent = PendingIntent.getBroadcast(context, 0,
intent, 0);
remoteViews.setOnClickPendingIntent(R.id.paly_pause_music,
pendingIntent);
NotificationCompat.Builder builder = new Builder(context);
builder.setContent(remoteViews).setSmallIcon(R.drawable.music_icon)
.setLargeIcon(icon).setOngoing(true)
.setTicker("music is playing");
manager.notify(NOTIFICATION_ID_8, builder.build());
}
布局文件:
代碼如下:
View Code
<?xml version="1.0" encoding="utf-8"?>
<LinearLayout xmlns:android="http://schemas.android.com/apk/res/android"
android:layout_width="match_parent"
android:layout_height="match_parent"
android:gravity="center_vertical"
android:orientation="horizontal" >
<ImageView
android:id="@+id/songer_pic"
android:layout_width="64dp"
android:layout_height="64dp"
android:src="@drawable/yan" />
<LinearLayout
android:layout_width="fill_parent"
android:layout_height="fill_parent"
android:gravity="center_vertical"
android:orientation="horizontal" >
<ImageView
android:id="@+id/last_music"
android:layout_width="0dp"
android:layout_height="48dp"
android:layout_weight="1"
android:src="@drawable/music_previous" />
<ImageView
android:id="@+id/paly_pause_music"
android:layout_width="0dp"
android:layout_height="48dp"
android:layout_weight="1"
android:src="@drawable/music_play" />
<ImageView
android:id="@+id/next_music"
android:layout_width="0dp"
android:layout_height="48dp"
android:layout_weight="1"
android:src="@drawable/music_next" />
</LinearLayout>
</LinearLayout>
帶進度條的notification
代碼如下:
View Code
private void showProgressBar() {
final NotificationCompat.Builder builder = new NotificationCompat.Builder(
context);
builder.setLargeIcon(icon).setSmallIcon(R.drawable.ic_launcher)
.setTicker("showProgressBar").setContentInfo("contentInfo")
.setOngoing(true).setContentTitle("ContentTitle")
.setContentText("ContentText");
new Thread(new Runnable() {
@Override
public void run() {
int progress = 0;
for (progress = 0; progress < 100; progress += 5) {
//將setProgress的第三個參數設為true即可顯示為無明確進度的進度條樣式
builder.setProgress(100, progress, false);
manager.notify(NOTIFICATION_ID_7, builder.build());
try {
// Sleep for 5 seconds
Thread.sleep(2 * 1000);
} catch (InterruptedException e) {
System.out.println("sleep failure");
}
}
builder.setContentTitle("Download complete")
.setProgress(0, 0, false).setOngoing(false);
manager.notify(NOTIFICATION_ID_7, builder.build());
}
}).start();
}
點擊事件處理
--------------------------------------------------------------------------------
有時候我們可能需要實現這樣的功能:當新notification出現時,我們希望點擊它後可直接進入應用相應的界面中去完整查看或處理此消息的功能。然後,當我們點擊back按鈕時返回到應用主界面而不是桌面。比如:當我們有新的短信來時,我們在任務欄中點擊它後進入讀信息頁面,當我們讀完短信後,按“返回”鍵回到短信的主界面,而不是手機桌面。要實現這樣的功能要我們做相應的處理:
1>返回應用主界面
代碼如下:
View Code
private void backApp() {
TaskStackBuilder stackBuilder = TaskStackBuilder.create(this);
// Adds the back stack
stackBuilder.addParentStack(OtherActivity.class);
// Adds the Intent to the top of the stack
Intent resultIntent = new Intent(this, OtherActivity.class);
stackBuilder.addNextIntent(resultIntent);
// Gets a PendingIntent containing the entire back stack
PendingIntent resultPendingIntent = stackBuilder.getPendingIntent(0,
PendingIntent.FLAG_UPDATE_CURRENT);
Notification notification = new NotificationCompat.Builder(context)
.setLargeIcon(icon).setSmallIcon(R.drawable.ic_launcher)
.setTicker("backApp").setContentInfo("contentInfo")
.setContentTitle("ContentTitle").setContentText("ContentText")
.setContentIntent(resultPendingIntent).setAutoCancel(true)
.setDefaults(Notification.DEFAULT_ALL).build();
manager.notify(NOTIFICATION_ID_5, notification);
this.finish();
}
並需要我們在配置文件中對我們用來顯示詳細信息的OtherActivity進行相應的配置如下:
代碼如下:
<activity
android:name="com.example.notification.OtherActivity"
android:label="@string/title_activity_other"
android:parentActivityName=".MainActivity" >
<meta-data
android:name="android.support.PARENT_ACTIVITY"
android:value=".MainActivity" />
</activity>
2>直接返回桌面
有些時候我們可能需要實現這樣的功能:當我們點擊notification時彈出一個稍大點的窗口來顯示整個消息,這窗口的作用就是用來顯示整個消息內容的,和此應用內的其它Activity都沒有關系,然後當我們點擊"back"後直接返回到手機桌面。要實現這樣的功能我們只需要調用builder的.setContentIntent方法,然後對所要跳轉到的activity在配置文件中進行一些配置:
代碼如下:
View Code
private void backScreen() {
Intent notifyIntent = new Intent(this, SpecialActivity.class);
// Sets the Activity to start in a new, empty task
notifyIntent.setFlags(Intent.FLAG_ACTIVITY_NEW_TASK
| Intent.FLAG_ACTIVITY_CLEAR_TASK);
// Creates the PendingIntent
PendingIntent notify_Intent = PendingIntent.getActivity(this, 0,
notifyIntent, PendingIntent.FLAG_UPDATE_CURRENT);
Notification notification = new NotificationCompat.Builder(context)
.setLargeIcon(icon).setSmallIcon(R.drawable.ic_launcher)
.setTicker("backScreen").setContentInfo("contentInfo")
.setContentTitle("ContentTitle").setContentText("ContentText")
.setContentIntent(notify_Intent).setAutoCancel(true)
.setDefaults(Notification.DEFAULT_ALL).build();
manager.notify(NOTIFICATION_ID_6, notification);
this.finish();
}
配置文件:
代碼如下:
<activity
android:name="com.example.notification.SpecialActivity"
android:excludeFromRecents="true"
android:label="@string/title_activity_special"
android:launchMode="singleTask"
android:taskAffinity="" >
源碼下載
 Android手機衛士(七):簽名文件說明&包名說明
在《Android 手機衛士(六):打包生成apk維護到服務器》一文中,實現了新版本的apk到服務器,當打開客戶端apk的時候,發現有新版本,提示更
 Android登錄實例
登錄應用程序的屏幕,詢問憑據登錄到一些特定的應用。可能需要登錄到Facebook,微博等本章介紹了,如何創建一個登錄界面,以及如何管理安全問題和錯誤嘗試。首先,必須定義兩
 Android實現偵聽電池狀態顯示、電量及充電動態顯示的方法
本文實例講述了Android實現偵聽電池狀態顯示、電量及充電動態顯示的方法,是Android應用程序開發中非常常用的重要功能。分享給大家供大家參考之用。具體方法如
 Android加載Spinner
可以顯示在的Android任務,通過加載進度條的進展。進度條有兩種形狀。加載欄和加載微調(spinner)。在本章中,我們將討論微調(spinner)。Spinner 用