編輯:Android開發實例
Message:消息,其中包含了消息ID,消息處理對象以及處理的數據等,由MessageQueue統一列隊,終由Handler處理。
Handler:處理者,負責Message的發送及處理。使用Handler時,需要實現handleMessage(Message msg)方法來對特定的Message進行處理,例如更新UI等。
MessageQueue:消息隊列,用來存放Handler發送過來的消息,並按照FIFO規則執行。當然,存放Message並非實際意義的保存,而是將Message以鏈表的方式串聯起來的,等待Looper的抽取。
Looper:消息泵,不斷地從MessageQueue中抽取Message執行。因此,一個MessageQueue需要一個Looper。
Thread:線程,負責調度整個消息循環,即消息循環的執行場所。
Android系統的消息隊列和消息循環都是針對具體線程的,一個線程可以存在(當然也可以不存在)一個消息隊列和一個消 息循環(Looper),特定線程的消息只能分發給本線程,不能進行跨線程,跨進程通訊。但是創建的工作線程默認是沒有消息循環和消息隊列的,如果想讓該 線程具有消息隊列和消息循環,需要在線程中首先調用Looper.prepare()來創建消息隊列,然後調用Looper.loop()進入消息循環。 如下例所示:
 LooperThread Thread {
    Handler mHandler;

    run() {
     Looper.prepare();

     mHandler = Handler() {
        handleMessage(Message msg) {

       }
     };

     Looper.loop();
   }
 }
//Looper類分析
//沒找到合適的分析代碼的辦法,只能這麼來了。每個重要行的上面都會加上注釋
//功能方面的代碼會在代碼前加上一段分析
 public class Looper {
  //static變量,判斷是否打印調試信息。
   private static final boolean DEBUG = false;
   private static final boolean localLOGV = DEBUG ? Config.LOGD : Config.LOGV;

   // sThreadLocal.get() will return null unless you've called prepare().
 //線程本地存儲功能的封裝,TLS,thread local storage,什麼意思呢?因為存儲要麼在棧上,例如函數內定義的內部變量。要麼在堆上,例如new或者malloc出來的東西
 //但是現在的系統比如Linux和windows都提供了線程本地存儲空間,也就是這個存儲空間是和線程相關的,一個線程內有一個內部存儲空間,這樣的話我把線程相關的東西就存儲到
 //這個線程的TLS中,就不用放在堆上而進行同步操作了。
   private static final ThreadLocal sThreadLocal = new ThreadLocal();
 //消息隊列,MessageQueue,看名字就知道是個queue..
   final MessageQueue mQueue;
   volatile boolean mRun;
 //和本looper相關的那個線程,初始化為null
   Thread mThread;
   private Printer mLogging = null;
 //static變量,代表一個UI Process(也可能是service吧,這裡默認就是UI)的主線程
   private static Looper mMainLooper = null;

   /** Initialize the current thread as a looper.
    * This gives you a chance to create handlers that then reference
    * this looper, before actually starting the loop. Be sure to call
    * {@link #loop()} after calling this method, and end it by calling
    * {@link #quit()}.
    */
 //往TLS中設上這個Looper對象的,如果這個線程已經設過了looper的話就會報錯
 //這說明,一個線程只能設一個looper
   public static final void prepare() {
     if (sThreadLocal.get() != null) {
       throw new RuntimeException("Only one Looper may be created per thread");
     }
     sThreadLocal.set(new Looper());
   }

   /** Initialize the current thread as a looper, marking it as an application's main
   * looper. The main looper for your application is created by the Android environment,
   * so you should never need to call this function yourself.
   * {@link #prepare()}
   */
 //由framework設置的UI程序的主消息循環,注意,這個主消息循環是不會主動退出的
 //
   public static final void prepareMainLooper() {
     prepare();
     setMainLooper(myLooper());
 //判斷主消息循環是否能退出....
 //通過quit函數向looper發出退出申請
     if (Process.supportsProcesses()) {
       myLooper().mQueue.mQuitAllowed = false;
     }
   }

   private synchronized static void setMainLooper(Looper looper) {
     mMainLooper = looper;
   }

   /** Returns the application's main looper, which lives in the main thread of the application.
   */
   public synchronized static final Looper getMainLooper() {
     return mMainLooper;
   }

   /**
   * Run the message queue in this thread. Be sure to call
   * {@link #quit()} to end the loop.
   */
 //消息循環,整個程序就在這裡while了。
 //這個是static函數喔!
   public static final void loop() {
     Looper me = myLooper();//從該線程中取出對應的looper對象
     MessageQueue queue = me.mQueue;//取消息隊列對象...
     while (true) {
       Message msg = queue.next(); // might block取消息隊列中的一個待處理消息..
       //if (!me.mRun) {//是否需要退出?mRun是個volatile變量,跨線程同步的,應該是有地方設置它。
       //  break;
       //}
       if (msg != null) {
         if (msg.target == null) {
           // No target is a magic identifier for the quit message.
           return;
         }
         if (me.mLogging!= null) me.mLogging.println(
             ">>>>> Dispatching to " + msg.target + " "
             + msg.callback + ": " + msg.what
             );
         msg.target.dispatchMessage(msg);
         if (me.mLogging!= null) me.mLogging.println(
             "<<<<< Finished to  " + msg.target + " "
             + msg.callback);
         msg.recycle();
       }
     }
   }

   /**
   * Return the Looper object associated with the current thread. Returns
   * null if the calling thread is not associated with a Looper.
  */
//返回和線程相關的looper
 public static final Looper myLooper() {
   return (Looper)sThreadLocal.get();
 }

 /**
  * Control logging of messages as they are processed by this Looper. If
  * enabled, a log message will be written to <var>printer</var>
  * at the beginning and ending of each message dispatch, identifying the
  * target Handler and message contents.
  *
  * @param printer A Printer object that will receive log messages, or
  * null to disable message logging.
  */
//設置調試輸出對象,looper循環的時候會打印相關信息,用來調試用最好了。
 public void setMessageLogging(Printer printer) {
   mLogging = printer;
 }

 /**
  * Return the {@link MessageQueue} object associated with the current
  * thread. This must be called from a thread running a Looper, or a
  * NullPointerException will be thrown.
  */
 public static final MessageQueue myQueue() {
   return myLooper().mQueue;
 }
//創建一個新的looper對象,
//內部分配一個消息隊列,設置mRun為true
 private Looper() {
   mQueue = new MessageQueue();
   mRun = true;
   mThread = Thread.currentThread();
 }

 public void quit() {
   Message msg = Message.obtain();
   // NOTE: By enqueueing directly into the message queue, the
   // message is left with a null target. This is how we know it is
   // a quit message.
   mQueue.enqueueMessage(msg, 0);
 }

 /**
  * Return the Thread associated with this Looper.
  */
 public Thread getThread() {
   return mThread;
 }
 //後面就簡單了,打印,異常定義等。
 public void dump(Printer pw, String prefix) {
   pw.println(prefix + this);
   pw.println(prefix + "mRun=" + mRun);
   pw.println(prefix + "mThread=" + mThread);
   pw.println(prefix + "mQueue=" + ((mQueue != null) ? mQueue : "(null"));
   if (mQueue != null) {
     synchronized (mQueue) {
       Message msg = mQueue.mMessages;
       int n = 0;
       while (msg != null) {
         pw.println(prefix + " Message " + n + ": " + msg);
         n++;
         msg = msg.next;
       }
       pw.println(prefix + "(Total messages: " + n + ")");
     }
   }
 }

 public String toString() {
   return "Looper{"
     + Integer.toHexString(System.identityHashCode(this))
     + "}";
 }

 static class HandlerException extends Exception {

   HandlerException(Message message, Throwable cause) {
     super(createMessage(cause), cause);
   }

   static String createMessage(Throwable cause) {
     String causeMsg = cause.getMessage();
     if (causeMsg == null) {
       causeMsg = cause.toString();
     }
     return causeMsg;
   }
 }
}
那怎麼往這個消息隊列中發送消息呢??調用looper的static函數myQueue可以獲得消息隊列,這樣你就可用自己往裡邊插入消息了。不過這種方法比較麻煩,這個時候handler類就發揮作用了。先來看看handler的代碼,就明白了。
 class Handler{
 ..........
 //handler默認構造函數
 public Handler() {
 //這個if是干嘛用的暫時還不明白,涉及到java的深層次的內容了應該
     if (FIND_POTENTIAL_LEAKS) {
       final Class<? extends Handler> klass = getClass();
       if ((klass.isAnonymousClass() || klass.isMemberClass() || klass.isLocalClass()) &&
           (klass.getModifiers() & Modifier.STATIC) == 0) {
         Log.w(TAG, "The following Handler class should be static or leaks might occur: " +
           klass.getCanonicalName());
       }
     }
 //獲取本線程的looper對象
 //如果本線程還沒有設置looper,這回拋異常
     mLooper = Looper.myLooper();
     if (mLooper == null) {
       throw new RuntimeException(
         "Can't create handler inside thread that has not called Looper.prepare()");
     }
 //無恥啊,直接把looper的queue和自己的queue搞成一個了
 //這樣的話,我通過handler的封裝機制加消息的話,就相當於直接加到了looper的消息隊列中去了
     mQueue = mLooper.mQueue;
     mCallback = null;
   }
 //還有好幾種構造函數,一個是帶callback的,一個是帶looper的
 //由外部設置looper
   public Handler(Looper looper) {
     mLooper = looper;
     mQueue = looper.mQueue;
     mCallback = null;
   }
 // 帶callback的,一個handler可以設置一個callback。如果有callback的話,
 //凡是發到通過這個handler發送的消息,都有callback處理,相當於一個總的集中處理
 //待會看dispatchMessage的時候再分析
 public Handler(Looper looper, Callback callback) {
     mLooper = looper;
     mQueue = looper.mQueue;
     mCallback = callback;
   }
 //
 //通過handler發送消息
 //調用了內部的一個sendMessageDelayed
 public final boolean sendMessage(Message msg)
   {
     return sendMessageDelayed(msg, 0);
   }
 //FT,又封裝了一層,這回是調用sendMessageAtTime了
 //因為延時時間是基於當前調用時間的,所以需要獲得絕對時間傳遞給sendMessageAtTime
 public final boolean sendMessageDelayed(Message msg, long delayMillis)
   {
     if (delayMillis < 0) {
       delayMillis = 0;
     }
     return sendMessageAtTime(msg, SystemClock.uptimeMillis() + delayMillis);
   }


 public boolean sendMessageAtTime(Message msg, long uptimeMillis)
   {
     boolean sent = false;
     MessageQueue queue = mQueue;
     if (queue != null) {
 //把消息的target設置為自己,然後加入到消息隊列中
 //對於隊列這種數據結構來說,操作比較簡單了
       msg.target = this;
       sent = queue.enqueueMessage(msg, uptimeMillis);
     }
     else {
       RuntimeException e = new RuntimeException(
         this + " sendMessageAtTime() called with no mQueue");
       Log.w("Looper", e.getMessage(), e);
     }
     return sent;
   }
 //還記得looper中的那個消息循環處理嗎
 //從消息隊列中得到一個消息後,會調用它的target的dispatchMesage函數
 //message的target已經設置為handler了,所以
 //最後會轉到handler的msg處理上來
 //這裡有個處理流程的問題
 public void dispatchMessage(Message msg) {
 //如果msg本身設置了callback,則直接交給這個callback處理了
     if (msg.callback != null) {
       handleCallback(msg);
     } else {
 //如果該handler的callback有的話,則交給這個callback處理了---相當於集中處理
      if (mCallback != null) {
         if (mCallback.handleMessage(msg)) {
           return;
         }
      }
 //否則交給派生處理,基類默認處理是什麼都不干
       handleMessage(msg);
     }
   }
 ..........
 }
生成
    Message msg = mHandler.obtainMessage();
    msg.what = what;
    msg.sendToTarget();
發送
    MessageQueue queue = mQueue;
    if (queue != null) {
      msg.target = this;
      sent = queue.enqueueMessage(msg, uptimeMillis);
    }
在Handler.java的sendMessageAtTime(Message msg, long uptimeMillis)方法中,我們看到,它找到它所引用的MessageQueue,然後將Message的target設定成自己(目的是為了在處理消息環節,Message能找到正確的Handler),再將這個Message納入到消息隊列中。
抽取
    Looper me = myLooper();
    MessageQueue queue = me.mQueue;
    while (true) {
      Message msg = queue.next(); // might block
      if (msg != null) {
        if (msg.target == null) {
          // No target is a magic identifier for the quit message.
          return;
        }
        msg.target.dispatchMessage(msg);
        msg.recycle();
      }
    }
在Looper.java的loop()函數裡,我們看到,這裡有一個死循環,不斷地從MessageQueue中獲取下一個(next方法)Message,然後通過Message中攜帶的target信息,交由正確的Handler處理(dispatchMessage方法)。
處理
    if (msg.callback != null) {
      handleCallback(msg);
    } else {
      if (mCallback != null) {
        if (mCallback.handleMessage(msg)) {
          return;
        }
      }
      handleMessage(msg);
    }
在Handler.java的dispatchMessage(Message msg)方法裡,其中的一個分支就是調用handleMessage方法來處理這條Message,而這也正是我們在職責處描述使用Handler時需要實現handleMessage(Message msg)的原因。
至於dispatchMessage方法中的另外一個分支,我將會在後面的內容中說明。
至此,我們看到,一個Message經由Handler的發送,MessageQueue的入隊,Looper的抽取,又再一次地回到Handler的懷抱。而繞的這一圈,也正好幫助我們將同步操作變成了異步操作。
3)剩下的部分,我們將討論一下Handler所處的線程及更新UI的方式。
在主線程(UI線程)裡,如果創建Handler時不傳入Looper對象,那麼將直接使用主線程(UI線程)的Looper對象(系統已經幫我們創建了);在其它線程裡,如果創建Handler時不傳入Looper對象,那麼,這個Handler將不能接收處理消息。在這種情況下,通用的作法是:
        class LooperThread extends Thread {
                public Handler mHandler;
                public void run() {
                        Looper.prepare();
                        mHandler = new Handler() {
                                public void handleMessage(Message msg) {
                                       // process incoming messages here
                                }
                        };
                        Looper.loop();
                }
        }
在創建Handler之前,為該線程准備好一個Looper(Looper.prepare),然後讓這個Looper跑起來(Looper.loop),抽取Message,這樣,Handler才能正常工作。
因此,Handler處理消息總是在創建Handler的線程裡運行。而我們的消息處理中,不乏更新UI的操作,不正確的線程直接更新UI將引發異常。因此,需要時刻關心Handler在哪個線程裡創建的。
如何更新UI才能不出異常呢?SDK告訴我們,有以下4種方式可以從其它線程訪問UI線程:
· Activity.runOnUiThread(Runnable)
· View.post(Runnable)
· View.postDelayed(Runnable, long)
· Handler
其中,重點說一下的是View.post(Runnable)方法。在post(Runnable action)方法裡,View獲得當前線程(即UI線程)的Handler,然後將action對象post到Handler裡。在Handler裡,它將傳遞過來的action對象包裝成一個Message(Message的callback為action),然後將其投入UI線程的消息循環中。在Handler再次處理該Message時,有一條分支(未解釋的那條)就是為它所設,直接調用runnable的run方法。而此時,已經路由到UI線程裡,因此,我們可以毫無顧慮的來更新UI。
4) 幾點小結
· Handler的處理過程運行在創建Handler的線程裡
· 一個Looper對應一個MessageQueue
· 一個線程對應一個Looper
· 一個Looper可以對應多個Handler
· 不確定當前線程時,更新UI時盡量調用post方法
 Android學習筆記——Menu介紹(二)
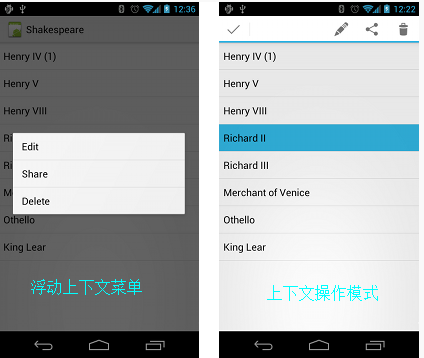
知識點: 這次將繼續上一篇文章沒有講完的Menu的學習,上下文菜單(Context menu)和彈出菜單(Popup menu)。 上下文菜單 上下文菜單提供對U
 Android編程實現3D滑動旋轉效果的方法
本文實例講述了Android編程實現3D滑動旋轉效果的方法。分享給大家供大家參考,具體如下: 這裡我們通過代碼實現一些滑動翻頁的動畫效果。 Animation實現
 Android本地化
Android應用程序可以在許多不同地區的許多設備上運行。為了使應用程序更具交互性,應用程序應該處理以適合應用程序將要使用的語言環境方面的文字,數字,文件等。在本章中,我
 Android本地化
Android應用程序可以在許多不同地區的許多設備上運行。為了使應用程序更具交互性,應用程序應該處理以適合應用程序將要使用的語言環境方面的文字,數字,文件等。在本章中,我