編輯:Android開發實例
相信對於手機的時間日期設置大家一定都不陌生吧,今天舉一個關於時間日期設置的示例,其中有些許不完善之處,例如如何使設置的時間日期和手機系統同步等。感興趣的讀者可以根據自身經驗加以完善。
現來看看具體示例,希望對大家有所幫助。
首先是時間設置:
.java文件(MainActivity.java)代碼如下:
package com.example.activity_time_date;
import java.util.Calendar;
import android.app.Activity;
import android.app.Dialog;
import android.app.TimePickerDialog;
import android.content.Intent;
import android.os.Bundle;
import android.view.Menu;
import android.view.MenuItem;
import android.view.View;
import android.view.View.OnClickListener;
import android.widget.Button;
import android.widget.TextView;
import android.widget.TimePicker;
public class MainActivity extends Activity {
 private TextView mytext = null;
 private Button mybutton1 = null;
 private Button mybutton2 = null;
 private int mHour;
 private int mMinute;
 static final int TIME_DIALOG_ID = 0;
 private TimePickerDialog.OnTimeSetListener mTimeSetListener = new TimePickerDialog.OnTimeSetListener() {
  @Override
  public void onTimeSet(TimePicker view, int hourOfDay, int minute) {
   // TODO Auto-generated method stub
   mHour = hourOfDay;
   mMinute = minute;
   updateDisplay();
  }
 };
 @Override
 protected void onCreate(Bundle savedInstanceState) {
  super.onCreate(savedInstanceState);
  setContentView(R.layout.activity_main);
  mytext = (TextView)findViewById(R.id.textview);
  mybutton1 = (Button)findViewById(R.id.button1);
  mybutton2 = (Button)findViewById(R.id.button2);
  mybutton1.setOnClickListener(new OnClickListener() {
   @Override
   public void onClick(View v) {
    // TODO Auto-generated method stub
    showDialog(TIME_DIALOG_ID);
   }
  });
  mybutton2.setOnClickListener(new OnClickListener() {
   @Override
   public void onClick(View v) {
    // TODO Auto-generated method stub
    MainActivity.this.startActivity(new Intent(MainActivity.this, dateActivity.class));
   }
  });
  final Calendar cal = Calendar.getInstance();
  mHour = cal.get(Calendar.HOUR_OF_DAY);
  mMinute = cal.get(Calendar.MINUTE);
  updateDisplay();
 }
 private void updateDisplay(){
  mytext.setText(new StringBuilder().append(pad(mHour)).append(":")
    .append(pad(mMinute)));
 }
 private static String pad(int i){
  if (i >= 10)
   return String.valueOf(i);
  else
   return "0" + String.valueOf(i);
 }
 @Override
 protected Dialog onCreateDialog(int id) {
  switch (id) {
  case TIME_DIALOG_ID:
   return new TimePickerDialog(this, mTimeSetListener, mHour, mMinute,
     false);
  }
  return null;
 }
}
布局文件(activity_main.xml)代碼如下:
<RelativeLayout xmlns:android="http://schemas.android.com/apk/res/android"
 xmlns:tools="http://schemas.android.com/tools"
 android:layout_width="match_parent"
 android:layout_height="match_parent"
 tools:context="${relativePackage}.${activityClass}" >
<LinearLayout
  android:layout_width="fill_parent"
  android:layout_height="fill_parent"
  android:orientation="vertical"
 >
 <TextView
  android:id="@+id/textview"
  android:layout_width="wrap_content"
  android:layout_height="wrap_content"
  />
 <Button
  android:id="@+id/button1"
  android:layout_width="fill_parent"
  android:layout_height="wrap_content"
  android:text="設置時間"
  />
 <Button
  android:id="@+id/button2"
  android:layout_width="fill_parent"
  android:layout_height="wrap_content"
  android:text="下一頁"
  />
</LinearLayout>
</RelativeLayout>
運行效果如下圖所示:
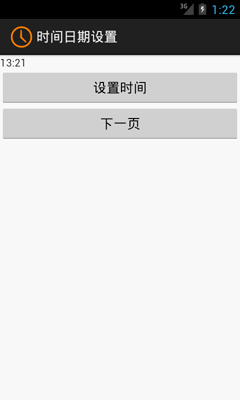
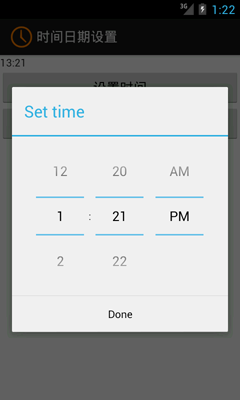
日期設置和時間設置基本一致,在此不再贅述。讀者可以調試並改進本文示例代碼,相信會有新的收獲!
 實現Android K的偽沉浸式
在Android 5.0之後引入了MD風格,從而狀態欄沉浸也成為了一種設計習慣。而停留在之Andr
 Android加載Spinner
可以顯示在的Android任務,通過加載進度條的進展。進度條有兩種形狀。加載欄和加載微調(spinner)。在本章中,我們將討論微調(spinner)。Spinner 用
 淺談Android Content Provider的使用
Content Provider:一個組件,必須放在應用的主包或應用的子包之下; 組件的配置需要在清單文件中進行配置;content provider需要在app
 Android MediaPlayer(多媒體播放)
Android提供了許多方法來控制播放的音頻/視頻文件和流。其中該方法是通過一類稱為MediaPlayer。Android是提供MediaPlayer類訪問內置的媒體播放