本文乃是一位Android開發愛好者為大家奉獻的一個小人時鐘的Android開發實例,作者還簡單分享了自己的一些經歷和想法,和Android開發學習者門共勉。以下是原文:
【寫在前面】
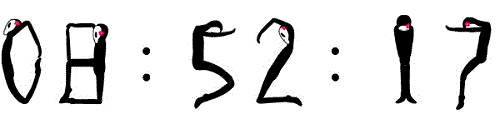
我開始關注Android也不過是大約一年前的事,可那時在安裝開發環境時遇到重挫,怎麼著也沒安裝成功,無奈之下只好作罷。今年五一放假在家抱著試一試的心態打算重拾Android,沒想到開發環境安裝得非常順利,這一下子就點燃了我一年前的熱情,於是趁熱打鐵,一邊找來幾本Android入門的電子書狂啃,一邊照葫蘆畫瓢就開始了我的Android應用程序開發之旅。幾番編碼下來,算是摸著點門道了,碰巧公司有個同事是個安卓控,在網上看到一款小人時鐘的網頁程序(如下截圖),覺得非常有意思,可是遍尋安卓市場,卻沒發現哪兒能夠下載,遂鼓動我開發一個。可怎麼說我也是剛開始踏上Android開發的漫漫征程,畢竟經驗不足,然而初生牛犢不怕虎,說干就開干了。
說實話,這個實例對於那些Android大蝦們來說,不值一提。這個實例與其說是寫給像我一樣的廣大菜鳥們,倒不如說是寫給歲月的一曲離歌---若干年後,就讓我們在記憶的塵埃裡去尋找那消逝但美麗的青春。
【開發進行時】
我的開發環境是Eclipse Classic 3.7.2+Android SDK 2.3.3,具體安裝過程在網上一搜一大堆,這兒就不多說了。
首先,打開Eclipse開發環境,新建一個工程,命名為“LittlePersonClock”。(Eclipse的使用,如怎麼建立工程,添加文件等操作,也不在這兒介紹了)。
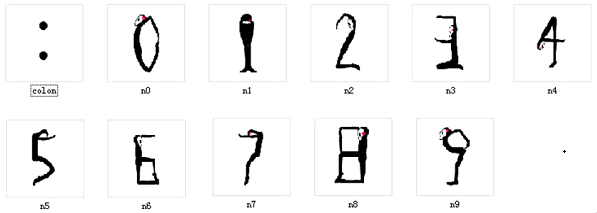
然後,將小人時鐘的各個數字和“:”截圖做成合適的大小(根據分辨率),如下圖所示,分別命名為colon.png、n0.png……n9.png,在項目的res下新建一文件夾drawable,之後將這11張圖片存放到這個drawable文件夾下面。
然後在main.xml布局文件中采用相對布局(RelativeLayout)方式,增加8個ImageView和一個Button,內容如下:
//以下是main.xml的內容
XML/HTML代碼
- <?xml version="1.0" encoding="UTF-8"?>
- <RelativeLayout xmlns:android="http://schemas.android.com/apk/res/android"
- android:layout_width="match_parent"
- android:layout_height="match_parent"
- android:orientation="horizontal"
- android:background="#FFFFFFFF" >
-
- <ImageView
- android:id="@+id/iHourHigh"
- android:layout_width="wrap_content"
- android:layout_height="wrap_content"
- android:layout_alignBottom="@+id/iHourLow"
- android:layout_marginTop="100dip"
- android:layout_marginLeft="10dip"
- android:src="@drawable/n0" >
-
- </ImageView>
-
- <ImageView
- android:id="@+id/iHourLow"
- android:layout_width="wrap_content"
- android:layout_height="wrap_content"
- android:layout_alignBottom="@+id/tColonHM"
- android:layout_marginLeft="1dip"
- android:layout_marginTop="100dip"
- android:layout_toRightOf="@id/iHourHigh"
- android:src="@drawable/n1" >
-
- </ImageView>
-
- <ImageView
- android:id="@+id/tColonHM"
- android:layout_marginTop="100dip"
- android:src="@drawable/colon"
- android:layout_width="wrap_content"
- android:layout_height="wrap_content"
- android:layout_toRightOf="@id/iHourLow"
- android:layout_marginLeft="1dip"/>
-
- <ImageView
- android:id="@+id/iMinuteHigh"
- android:layout_width="wrap_content"
- android:layout_height="wrap_content"
- android:layout_above="@+id/btnReturn"
- android:layout_marginLeft="1dip"
- android:layout_marginTop="100dip"
- android:layout_toRightOf="@id/tColonHM"
- android:src="@drawable/n2" >
-
- </ImageView>
- <ImageView
- android:id="@+id/iMinuteLow"
- android:src="@drawable/n3"
- android:layout_marginTop="100dip"
- android:layout_width="wrap_content"
- android:layout_height="wrap_content"
- android:layout_toRightOf="@id/iMinuteHigh"
- android:layout_marginLeft="1dip">
- </ImageView>
-
- <ImageView
- android:id="@+id/tColonMS"
- android:layout_marginTop="100dip"
- android:src="@drawable/colon"
- android:layout_width="wrap_content"
- android:layout_height="wrap_content"
- android:layout_toRightOf="@id/iMinuteLow"
- android:layout_marginLeft="1dip"/>
-
- <ImageView
- android:id="@+id/iSecondHigh"
- android:src="@drawable/n5"
- android:layout_marginTop="100dip"
- android:layout_width="wrap_content"
- android:layout_height="wrap_content"
- android:layout_toRightOf="@id/tColonMS"
- android:layout_marginLeft="1dip">
-
- </ImageView>
-
- <ImageView
- android:id="@+id/iSecondLow"
- android:src="@drawable/n6"
- android:layout_marginTop="100dip"
- android:layout_width="wrap_content"
- android:layout_height="wrap_content"
- android:layout_toRightOf="@id/iSecondHigh"
- android:layout_marginLeft="1dip">
- </ImageView>
-
- <Button
- android:id="@+id/btnExit"
- android:layout_width="wrap_content"
- android:layout_height="wrap_content"
- android:layout_below="@id/tColonMS"
- android:text="退出"
- android:layout_marginTop="50dip"
- android:layout_marginLeft="100dip"
- android:textSize="20dp"/>
-
- </RelativeLayout>
然後在代碼LittlePersonClock.java中具體實現小人時鐘。
//以下是源代碼
Java代碼
- package com.littlepersonclock.kernel;
-
- import java.util.Calendar;
- import java.util.Timer;
- import java.util.TimerTask;
- import android.app.Activity;
- import android.os.Bundle;
- import android.os.Handler;
- import android.os.Message;
- import android.view.View;
- import android.widget.Button;
- import android.widget.ImageView;
-
- public class LittlePersonClock extends Activity {
-
- private ImageView ivhh=null,ivhl=null;
- private ImageView ivmh=null,ivml=null;
- private ImageView ivsh=null,ivsl=null;
- private Button btnExit=null;
- private Timer timer=new Timer();
- int i=0,hour,minute,second;
- Calendar c=null;
- int amorpm=0;
- final int did[]={R.drawable.n0,R.drawable.n1,R.drawable.n2,R.drawable.n3,R.drawable.n4,
- R.drawable.n5,R.drawable.n6,R.drawable.n7,R.drawable.n8,R.drawable.n9};
- //實際上的用法應該通過配合Handler來實現timer功能,這跟Android的線程安全有關!
- Handler handler = new Handler(){
- public void handleMessage(Message msg) {
- switch (msg.what) {
- case 1:
- c=Calendar.getInstance();
- amorpm = c.get(Calendar.AM_PM);
- hour = c.get(Calendar.HOUR);
- if(amorpm==Calendar.PM)
- hour+=12;
- minute = c.get(Calendar.MINUTE);
- second = c.get(Calendar.SECOND);
-
- ivhh.setImageResource(did[(int)(hour/10)]); ivhl.setImageResource(did[hour%10]);
- ivmh.setImageResource(did[(int)(minute/10)]);
- ivml.setImageResource(did[minute%10]);
- ivsh.setImageResource(did[(int)(second/10)]);
- ivsl.setImageResource(did[second%10]);
- break;
- }
- super.handleMessage(msg);
- }
- };
-
- TimerTask task = new TimerTask() {
- @Override
- public void run() {
- Message message = new Message();
- message.what = 1;
- handler.sendMessage(message);
- }
- };
- protected void onDestroy()
- {
- if (timer != null) {
- timer.cancel();
- timer = null;
- }
- super.onDestroy();
- }
- public void onCreate(Bundle savedInstanceState) {
- super.onCreate(savedInstanceState);
- setContentView(R.layout.main);
-
- ivhh = (ImageView)findViewById(R.id.iHourHigh);
- ivhl = (ImageView)findViewById(R.id.iHourLow);
- ivmh = (ImageView)findViewById(R.id.iMinuteHigh);
- ivml = (ImageView)findViewById(R.id.iMinuteLow);
- ivsh = (ImageView)findViewById(R.id.iSecondHigh);
- ivsl = (ImageView)findViewById(R.id.iSecondLow);
- c=Calendar.getInstance();
- amorpm = c.get(Calendar.AM_PM);
- hour = c.get(Calendar.HOUR);
- if(amorpm==Calendar.PM)
- hour+=12;
- minute = c.get(Calendar.MINUTE);
- second = c.get(Calendar.SECOND);
-
- ivhh.setImageResource(did[(int)(hour/10)]);
- ivhl.setImageResource(did[hour%10]);
- ivmh.setImageResource(did[(int)(minute/10)]);
- ivml.setImageResource(did[minute%10]);
- ivsh.setImageResource(did[(int)(second/10)]);
- ivsl.setImageResource(did[second%10]);
-
- timer.schedule(task,1000,1000);
- btnExit = (Button)findViewById(R.id.btnExit);
- btnExit.setOnClickListener(new Button.OnClickListener(){
- public void onClick(View v)
- {
- LittlePersonClock.this.onDestroy();
- }
- });
- }
- }
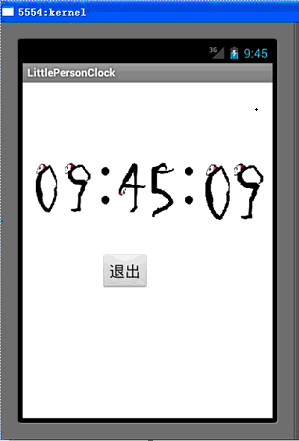
【測試效果】
編譯後打開模擬器,在模擬器上測試效果還行,以下是截圖(只是無法看動態的現實):
【寫在後面】
限於水平和經驗,這個實例肯定還有很多不完善的地方,況且我這個人一向懶於動筆,疏於總結,本文寫得也只能點到為止---要是看不懂,實在不是你的錯!
 android 9PNG圖片制作過程(圖文介紹)
 Android本地化
 帶你實現開發者頭條(一) 啟動頁實現
 Android本地化