編輯:中級開發
static void read(SocketChannel chan, byte[] data, int length, int timeout)
throws TimeoutException, IOException {
ByteBuffer buf = ByteBuffer.wrap(data, 0, length != -1 ? length : data.length); //從字節數組中實例化ByteBuffer
int numWaits = 0;
while (buf.position() != buf.limit()) { //循環接收數據
int count;
count = chan.read(buf);
if (count < 0) {
throw new IOException("EOF"); //讀到末尾
} else if (count == 0) {
if (timeout != 0 && numWaits * WAIT_TIME > timeout) {
throw new TimeoutException();
}
try {
Thread.sleep(WAIT_TIME);
} catch (InterruptedException IE) {
}
numWaits++;
} else {
numWaits = 0;
}
}
}
有關SocketChannel的寫操作,就是發送數據代碼如下:
static void write(SocketChannel chan, byte[] data, int length, int timeout)
throws TimeoutException, IOException {
ByteBuffer buf = ByteBuffer.wrap(data, 0, length != -1 ? length : data.length);
int numWaits = 0;
while (buf.position() != buf.limit()) {
int count;
count = chan.write(buf); //發送數據從ByteBuffer中
if (count < 0) {
throw new IOException("channel EOF");
} else if (count == 0) {
if (timeout != 0 && numWaits * WAIT_TIME > timeout) {
throw new TimeoutException();
}
try {
Thread.sleep(WAIT_TIME);
} catch (InterruptedException IE) {
}
numWaits++;
} else {
numWaits = 0;
}
}
}
有關ADB如何選擇一個具體的設備,可以使用 setDevice 方法,這樣當電腦中有模擬器或鏈接了多個手機,可以通過設備序列號,選擇需要通訊的設備。
static void setDevice(SocketChannel adbChan, IDevice device)
throws TimeoutException, AdbCommandRejectedException, IOException {
// if the device is not -1, then we first tell adb we're looking to talk
// to a specific device
if (device != null) {
String msg = "host:transport:" + device.getSerialNumber(); // 最後的獲取序列號,android123提示大家在adb命令中是adb get-serialno
byte[] device_query = formAdbRequest(msg);
write(adbChan, device_query);
AdbResponse resp = readAdbResponse(adbChan, false /* readDiagString */);
if (resp.okay == false) {
throw new AdbCommandRejectedException(resp.message,
true/*errorDuringDeviceSelection*/);
}
}
}
通過PC控制手機重啟的代碼,當然這裡需要Root權限才能執行
public static void reboot(String into, InetSocketAddress adbSockAddr,
Device device) throws TimeoutException, AdbCommandRejectedException, IOException {
byte[] request;
if (into == null) {
request = formAdbRequest("reboot:"); //$NON-NLS-1$
} else {
request = formAdbRequest("reboot:" + into); //$NON-NLS-1$
}
SocketChannel adbChan = null;
try {
adbChan = SocketChannel.open(adbSockAddr);
adbChan.configureBlocking(false);
// if the device is not -1, then we first tell adb we're looking to talk
// to a specific device
setDevice(adbChan, device);
write(adbChan, request);
} finally {
if (adbChan != null) {
adbChan.close();
}
}
}
我們可以看到基本上,每個命令的執行,都是用了單獨SocketChannel通過非阻塞方式執行,這樣大大加強了並發,所以DDMS可以一邊處理Logcat打印,顯示堆信息,處理文件管理等等,有關NIO服務器的內容,android開發網將著重分析MonitorThread.Java這個文件,一起說下NIO的框架。
 分析你的Android ANR錯誤
Android ANR這個錯誤大家並不陌生,但是從Android 2.2開始出錯的ANR信息會自動上傳給Google進行系統分析改進,當然了你的應用ANR錯誤其實保存在
 使用混合應用程序編程模型為 WebSphere Commerce 構建移動應用程序(2)
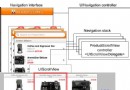
可翻頁的產品細節屏幕為增強產品細節屏幕的可用性,我們定義了一個自定義視圖控制器(ProductScrollVIEwController 類)來支持用戶通過翻頁
 Android開發調試工具TraceView多圖演示
有關android SDK自帶的性能分析調試工具TraceVIEw使用方法,我們在android.os.Debug調試工具使用方法 簡單的說過,有關實際使用如
 Android之讓跨浏覽器測試 Web 應用程序變得簡單
簡介: 一直以來,“對多個浏覽器進行測試” 像是一條難以解開的咒語,因為需要對大量浏覽器進行測試。對所有浏覽器進行測試(尤其是目前)幾乎是不可能的。但是這比您