編輯:關於android開發
用戶人機界面可分為視圖,視圖容器,布局等。一個復雜的Android界面設計往往需要不同的組件組合才能實現,別介將介紹Android主要組件的特點及其功能。
1.TextView控件
TextView控件的使用格式:
<TextView
android:屬性1="屬性值1"
android:屬性2="屬性值2" />
TextView控件的屬性
(1)android:id="@+id/當前控件的id"-----標示當前控件的id
(2)android:layout_width="屬性值"-----標示當前控件的寬度
(3)android:layout_height="屬性值"-----標示當前控件的高度
其中(2)(3)的屬性值分別都有3個:fill_parent,match_parent,wrap_content;
fill_parent:表示整個屏幕的寬度或高度
match_parent:標示高度或者寬度與父元素相同
wrap_content:表示控件的寬度或高度隨著控件內容的大小而改變
(4)android:text="@string/name"-----標示當前的TextView控件所要顯示的內容
(5)android:textSize="屬性值"-----標示當前的控件的文本內容的大小
(6)android:textColor="屬性值(一般采用RGB顏色#******)"-----標示當前的控件的文本的顏色
......其它屬性在之後再慢慢學習,再繼續補充完善該文章
2.EditText控件
EditText控件的使用格式參照TextView
EditText控件的屬性包含以上的TextView所列舉的所有的屬性,還有比較常用的特有屬性
(1)android:hint="屬性值"-----表示當前的輸入框中的提示字符,當你輸入新的字符時他會自動刪除
3.ImageView控件
ImageView使用格式(同上,以下不在贅述)
ImageView屬性(包含上述的大部分屬性,下面列舉特有的屬性,下同)
(1)android:src="屬性值(推薦以@drawable/name形式來設置屬性值)"-----表示當前要顯示的圖片
(2)android:background="屬性值(可以為圖片也可以為顏色)"-----表示當前控件的背景圖片或者背景顏色
4.Button與ImageButton控件
擁有ImageButton所不具有的屬性
(1)android:text="屬性值"-----用來顯示當前按鈕上的文本
還具有與ImageButton所共有的屬性
(2)android:backgroundColor="顏色值"-----標示當前的按鈕的背景顏色
ImageButton控件看還有特有的屬性
(3)android:src="屬性值"-----表示當前的控件上的圖片,因為該控件本身是圖片按鈕。
在使用的時候需要在Activity中設置監聽器OnClickListener
使用步驟:
step1:初始化控件
示例:Button bt = (Button)findViewById(R.id.button1);----findViewById返回的是一個View類,需要強制向下轉型為Button(下同)
step2:配置監聽器(方法後面介紹(共三種))
示例(匿名內部類):bt.setOnClickListener(new OnClickListener(){
public void onClick(){
//TODO
}
});
step3:在監聽器中實現要實現的操作(step2中以實現)
5.AutoCompleteTextView與MultiAutoCompleteTextview
共同點:兩個控件的功能都是實現輸入文本的自動匹配
不同點:AutoCompleteTextView是單個文本的匹配,也就是說只能在文本框內輸入一個內容
而MultiAutoCompleteTextView是多個輸入的匹配,就是說當你輸入一個字符串是可以進行匹配,輸入結束後會添加一個
分隔符,然後可以繼續接著輸入下一個字符串,而且同樣可以進行匹配.
需要設置的屬性
(1)android:completionThreshold="屬性值(int型)"-----表示在輸入了"屬性值"位個字符後開始匹配
在使用的時候需要設置適配器
使用步驟:
step1:初始化控件(同上)
step2:需要一個適配器,一般簡單的使用ArrayAdapter適配器
step3:初始化數據資源,即設置一個數組預存儲一些字符串用來和輸入的字符串匹配
step4:將當前的控件與該適配器綁定
step5:設置分隔符
示例:
acTextView = (AutoCompleteTextView)findViewById(R.id.autoCompleteTextView1);
ArrayAdapter<String> adapter = /*第二步*/new ArrayAdapter<String>(this, android.R.layout.simple_list_item_1,/*第三步*/ res);
/*第四步*/
acTextView.setAdapter(adapter);
/*第五步(僅僅MultiAutoCompleteTextView需要)*/ macTextView.setTokenizer(new MultiAutoCompleteTextView.CommaTokenizer());
6.ToggleButton
使用格式同上
屬性(包含以上的通有屬性)
(1)android:checked="true或false"-----標示當前控件是開還是關,具有開關兩種狀態,與其他Button的不同之處
(2)android:textOn="屬性值(一般寫為"開")"-----表示當前控件處於開(checked="true"時)所顯示的文本
(3)android:textOff="屬性值(一般寫為"關")"-----表示當前控件處於關(checked="false"時)所顯示的文本
使用時也需要監聽器
7.CheckBox
使用格式同上
屬性(包含以上的通有屬性)
(1)android:checked=""-----意義同上述的一樣,但只有選中或不選中一種狀態
(2)android:text=""-----標示當前控件後面所顯示的值
使用OnCheckedChangeListener監聽器
8.RadioGroup與RadioButton
幾乎同CheckBox類似
單不同的是Radio是單選框,也是使用OnCheckedChangeListener監聽器
一般不單獨使用RadioButton,而是將RadioButton放入RadioGroup中使用作為一組按鈕.
上述1,2,3,4的演示代碼,包含activity代碼和xml代碼
activity代碼
package com.example.helloworldtext;

import android.app.Activity;
import android.os.Bundle;
import android.util.Log;
import android.view.View;
import android.view.View.OnClickListener;
import android.widget.Button;
import android.widget.Toast;

public class MainActivity extends Activity implements OnClickListener{

	public Button loginButton;
	private Button button2,button3,button4;
    @Override
    protected void onCreate(Bundle savedInstanceState) {
        super.onCreate(savedInstanceState);
        setContentView(R.layout.activity_main);
        /*
         * 1.初始化當前所需要的控件
         * 通過findViewById()方法初始化當前控件
         * findViewById()方法返回的是View對象,需要向下轉型為Button對象
         *
         * 2.設置Button的監聽器
         */
        loginButton = (Button)findViewById(R.id.button1);

        loginButton.setOnClickListener(new OnClickListener() {

        	/*
        	 * 第一種方法:匿名內部類
        	 */
			@Override
			public void onClick(View arg0) {
				// TODO Auto-generated method stub
				System.out.println("我的Button被點擊了");
			}
		});
        button2 = (Button)findViewById(R.id.button2);
        button3 = (Button)findViewById(R.id.button3);
        button4 = (Button)findViewById(R.id.button4);

        button2.setOnClickListener(new MyOnClickListener(){
        	@Override
        	public void onClick(View arg0){
        		super.onClick(arg0);
        		Toast.makeText(MainActivity.this, "button2 要執行的邏輯", 1).show();
        	}
        });
        button3.setOnClickListener(new MyOnClickListener(){
        	@Override
        	public void onClick(View arg0){
        		super.onClick(arg0);
        		Toast.makeText(MainActivity.this, "button3 要執行的邏輯", 1).show();
        	}
        });
        button4.setOnClickListener(this);
    }
	@Override
	public void onClick(View arg0) {
		// TODO Auto-generated method stub
		Log.i("tag", "第四種方式");
	}
}
class MyOnClickListener implements OnClickListener{

	@Override
	public void onClick(View arg0) {
		// TODO Auto-generated method stub
		Log.i("tag", "父類的onclick事件");
	}

}

xml代碼
<RelativeLayout xmlns:android="http://schemas.android.com/apk/res/android"
    xmlns:tools="http://schemas.android.com/tools"
    android:layout_width="match_parent"
    android:layout_height="match_parent"
    android:paddingBottom="@dimen/activity_vertical_margin"
    android:paddingLeft="@dimen/activity_horizontal_margin"
    android:paddingRight="@dimen/activity_horizontal_margin"
    android:paddingTop="@dimen/activity_vertical_margin"
    tools:context=".MainActivity" >

    <TextView
        android:id="@+id/textView1"
        android:layout_width="wrap_content"
        android:layout_height="wrap_content"
        android:layout_alignParentLeft="true"
        android:layout_alignParentTop="true"
        android:text="@string/yourName"
        android:textColor="#00ff00"
        android:textSize="28sp" />

    <EditText
        android:id="@+id/editText1"
        android:layout_width="wrap_content"
        android:layout_height="wrap_content"
        android:layout_alignTop="@+id/textView1"
        android:layout_toRightOf="@+id/textView1"
        android:ems="10"
        android:hint="@string/hintName"
        android:inputType="textPersonName"
        android:textSize="24sp" >

        <requestFocus />
    </EditText>

    <Button
        android:id="@+id/button1"
        android:layout_width="match_parent"
        android:layout_height="wrap_content"
        android:layout_centerHorizontal="true"
        android:layout_centerVertical="true"
        android:text="@string/buttunName"
        android:background="#ff3300"/>

    <Button
        android:id="@+id/button3"
        android:layout_width="match_parent"
        android:layout_height="wrap_content"
        android:layout_alignLeft="@+id/button1"
        android:layout_alignParentBottom="true"
        android:text="按鈕3" />

    <Button
        android:id="@+id/button2"
        android:layout_width="match_parent"
        android:layout_height="wrap_content"
        android:layout_above="@+id/button3"
        android:layout_alignLeft="@+id/button3"
        android:text="按鈕2" />

    <Button
        android:id="@+id/button4"
        android:layout_width="match_parent"
        android:layout_height="wrap_content"
        android:layout_below="@+id/button1"
        android:layout_centerHorizontal="true"
        android:layout_marginTop="14dp"
        android:text="按鈕4" />

    <ImageView
        android:id="@+id/imageView1"
        android:layout_width="match_parent"
        android:layout_height="wrap_content"
        android:layout_alignRight="@+id/editText1"
        android:layout_below="@+id/editText1"
        android:background="@drawable/ic_launcher" />

 <!-- 實現文本的跑馬燈效果

 		android:ellipsize="marquee"
        android:focusable="true"
        android:focusableInTouchMode="true"
        android:singleLine="true"
 -->

    <com.example.helloworldtext.MarQueeTextView
        android:id="@+id/textView2"

        android:ellipsize="marquee"
        android:focusable="true"
        android:focusableInTouchMode="true"
        android:singleLine="true"

        android:layout_width="wrap_content"
        android:layout_height="wrap_content"
        android:layout_below="@+id/imageView1"
        android:layout_centerHorizontal="true"
        android:layout_marginTop="18dp"
        android:text="我是一個TextView,我是一個TextView,我是一個TextView" />

    <com.example.helloworldtext.MarQueeTextView
        android:id="@+id/textView3"
        android:ellipsize="marquee"
        android:focusable="true"
        android:focusableInTouchMode="true"
        android:singleLine="true"
        android:layout_width="wrap_content"
        android:layout_height="wrap_content"
        android:layout_alignLeft="@+id/textView2"
        android:layout_below="@+id/textView2"
        android:layout_marginTop="16dp"
        android:text="我是一個TextView,我是一個TextView,我是一個TextView" />

</RelativeLayout>


上述5的演示代碼,包含activity代碼和xml代碼
activity代碼
package com.example.demon1;

import android.os.Bundle;
import android.app.Activity;
import android.view.Menu;
import android.widget.ArrayAdapter;
import android.widget.AutoCompleteTextView;
import android.widget.MultiAutoCompleteTextView;

public class MainActivity extends Activity {

	private AutoCompleteTextView acTextView;
	private MultiAutoCompleteTextView macTextView;

	private String [] res = {"android1","android2","anroid3",
							"beijing1","beijing2","beijing3",
							"shanghai1","shanghai2","shnghai3"};
	/*
	 * 第一步:初始化控件
	 * 第二步:構造適配器
	 * 第三步:初始化數據源---用來與當前的輸入相匹配
	 * 第四步:將適配器與當前的控件相綁定
	 */
    @Override
    protected void onCreate(Bundle savedInstanceState) {
        super.onCreate(savedInstanceState);
        setContentView(R.layout.activity_main);
        /*第一步*/
        acTextView = (AutoCompleteTextView)findViewById(R.id.autoCompleteTextView1);
        ArrayAdapter<String> adapter  = /*第二步*/new ArrayAdapter<String>(this, android.R.layout.simple_list_item_1,/*第三步*/ res);
        /*第四步*/
        acTextView.setAdapter(adapter);
        /*
         * 第一步:初始化控件
         * 第二步:需要一個適配器
         * 第三步:初始化數據源與輸入的數據相匹配
         * 第四步:將當前控件與適配器綁定
         * 第五步:設置分隔符
         */
        macTextView = (MultiAutoCompleteTextView)findViewById(R.id.multiAutoCompleteTextView1);
        macTextView.setAdapter(adapter);
        macTextView.setTokenizer(new MultiAutoCompleteTextView.CommaTokenizer());


    }
}

xml代碼
<LinearLayout xmlns:android="http://schemas.android.com/apk/res/android"
    android:layout_width="fill_parent"
    android:layout_height="fill_parent"
    android:orientation="vertical" >

    <AutoCompleteTextView
        android:id="@+id/autoCompleteTextView1"
        android:completionThreshold="3"
        android:layout_width="match_parent"
        android:layout_height="wrap_content"
        android:hint="請輸入查詢單字符串" >
        <requestFocus />
    </AutoCompleteTextView>

    <MultiAutoCompleteTextView
        android:id="@+id/multiAutoCompleteTextView1"
        android:completionThreshold="2"
        android:layout_width="match_parent"
        android:layout_height="wrap_content"
        android:hint="輸入收件人" />

</LinearLayout>


上述6的演示代碼,包含activity代碼和xml代碼
activity代碼
package com.example.demo2;

import android.os.Bundle;
import android.app.Activity;
import android.view.Menu;
import android.widget.CompoundButton;
import android.widget.CompoundButton.OnCheckedChangeListener;
import android.widget.ImageButton;
import android.widget.ImageView;
import android.widget.ToggleButton;

public class MainActivity extends Activity implements OnCheckedChangeListener{

	private ToggleButton tb;
	private ImageView img;
    @Override
    protected void onCreate(Bundle savedInstanceState) {
        super.onCreate(savedInstanceState);
        setContentView(R.layout.activity_main);
        /*
         * 1.初始化控件
         * 2.設置監聽器
         */
        tb = (ToggleButton)findViewById(R.id.toggleButton1);
        img = (ImageView)findViewById(R.id.imageView1);

        tb.setOnCheckedChangeListener(this);

    }
	@Override
	public void onCheckedChanged(CompoundButton arg0, boolean arg1) {
		// TODO Auto-generated method stub
		img.setBackgroundResource(arg1?R.drawable.on:R.drawable.off);
	}
}


xml代碼
<LinearLayout xmlns:android="http://schemas.android.com/apk/res/android"
    android:layout_width="fill_parent"
    android:layout_height="fill_parent"
    android:orientation="vertical" >

    <ToggleButton
        android:id="@+id/toggleButton1"
        android:textOff="關"
        android:textOn="開"
        android:layout_width="match_parent"
        android:layout_height="wrap_content"
        />

    <ImageView
        android:id="@+id/imageView1"
        android:layout_width="match_parent"
        android:layout_height="match_parent"
        />

</LinearLayout>


上述7,8的演示代碼,包含activity代碼和xml代碼
activity代碼
package com.example.demon3;

import android.os.Bundle;
import android.app.Activity;
import android.util.Log;
import android.view.Menu;
import android.widget.CheckBox;
import android.widget.Checkable;
import android.widget.CompoundButton;
import android.widget.CompoundButton.OnCheckedChangeListener;
import android.widget.RadioButton;
import android.widget.RadioGroup;

public class MainActivity extends Activity implements android.widget.RadioGroup.OnCheckedChangeListener{
	private CheckBox check;
	private RadioGroup rg;
    @Override
    protected void onCreate(Bundle savedInstanceState) {
        super.onCreate(savedInstanceState);
        setContentView(R.layout.activity_main);

        check = (CheckBox)findViewById(R.id.checkBox1);
        check.setOnCheckedChangeListener(new OnCheckedChangeListener() {

			@Override
			public void onCheckedChanged(CompoundButton arg0, boolean arg1) {
				// TODO Auto-generated method stub
				if(arg1){
					Log.i("tag", "已婚");
				}
			}
		});

        rg = (RadioGroup)findViewById(R.id.radioGroup1);
        rg.setOnCheckedChangeListener(this);

    }
	@Override
	public void onCheckedChanged(RadioGroup arg0, int arg1) {
		// TODO Auto-generated method stub
		switch(arg1){
		case R.id.radio0:
			Log.i("tag", "男");
			break;
		case R.id.radio1:
			Log.i("tag","女");
			break;
		}
	}
}


xml代碼
<LinearLayout xmlns:android="http://schemas.android.com/apk/res/android"
    android:layout_width="fill_parent"
    android:layout_height="fill_parent"
    android:orientation="vertical" >

    <CheckBox
        android:id="@+id/checkBox1"
        android:layout_width="wrap_content"
        android:layout_height="wrap_content"
        android:checked="false"
        android:text="已婚" />

    <RadioGroup
        android:id="@+id/radioGroup1"
        android:orientation="horizontal"
        android:layout_width="wrap_content"
        android:layout_height="wrap_content" >

        <RadioButton
            android:id="@+id/radio0"
            android:layout_width="wrap_content"
            android:layout_height="wrap_content"
            android:checked="true"
            android:text="男" />

        <RadioButton
            android:id="@+id/radio1"
            android:layout_width="wrap_content"
            android:layout_height="wrap_content"
            android:text="女" />

    </RadioGroup>

</LinearLayout>
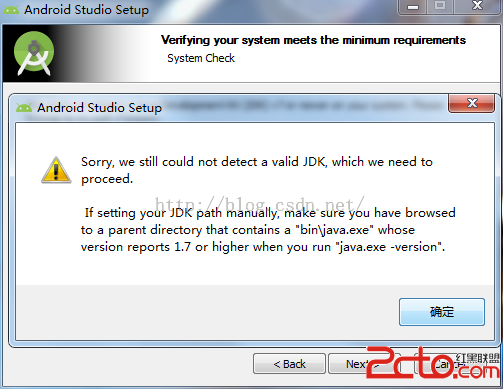 Android Studio安裝指南及genymotion配置
Android Studio安裝指南及genymotion配置 第一次安裝Java JDK ,要大於1.7版本,不安裝的話就會出現如下提示: 這時點擊上面的JDK鏈接,
 教你如何將小視頻轉發到自己的朋友圈,視頻轉發朋友圈
教你如何將小視頻轉發到自己的朋友圈,視頻轉發朋友圈1、首先,先在朋友圈中查看小視頻,點擊發送朋友,通過文件傳輸助手發送到電腦上, 2、打開電腦上的WeChat Files
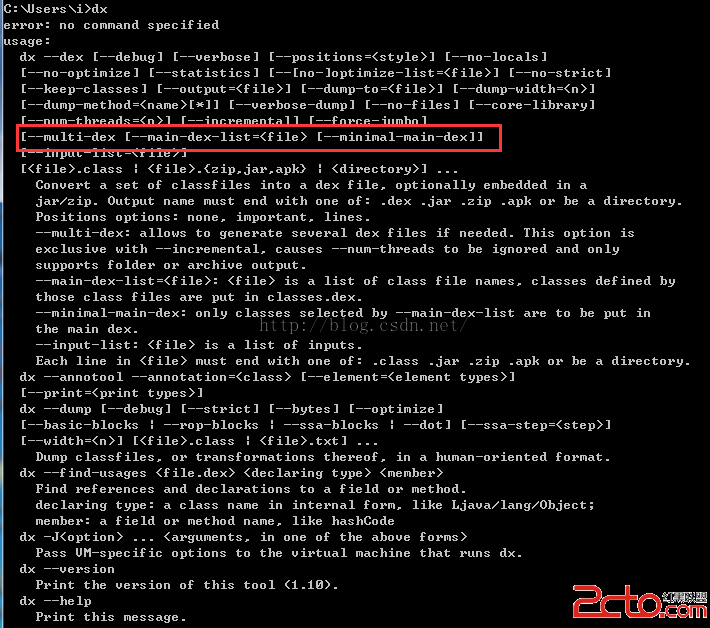 Android關於Dex拆分(MultiDex)技術的解析
Android關於Dex拆分(MultiDex)技術的解析 一、前言 關於Android中的分包技術,已經不是什麼新的技術了,網上也有很多解析了,但是他們都是給了理論
 Android學習指南之四十:Android WiFi開發入門
WiFi是一種無線聯網技術,比較常見的就是通過無線路由器來連接網絡。在無線路由
 Android移動APP開發筆記——Cordova(PhoneGap)通過CordovaPlugin插件調用 Activity 實例,phonegapcordova
Android移動APP開發筆記——Cordova(PhoneGap)通