編輯:關於android開發
---恢復內容開始---
Service的意義就在於當軟件停止之後還可以在背景中進行運行,換句話也就是說,比如一個音樂播放器,當我們退出音樂播放器的時候,還是希望它在背景中運行,也就是一直播放著音樂,這時候Service就派上了大的用途。
Service的生命周期和Activity的生命周期差不多。也有開啟和停止。onCreate()方法是初始化配置,onDestroy()是釋放所有剩余的資源。Service周期是發生在onCreate()和onDestroy()之間的。
startService()方法是啟動Service。
StopService()方法是停止Service。
bindService()方法是啟動Service的激活生命周期始於onBind()調用,在onUnbind()返回時結束。
當一個組件啟動Service時,是通過startService()進行啟動Service,當Service被啟動之後,onStartCommand()方法被調用,並且接收startService()方法中傳遞的Intent值。
onStartServiceCommand()方法必修返回一個整形值。這個整形值是說明了Service在系統中如何執行。其中三個比較常用的解釋如下:
START_NOT_STICKY:如果系統在onStartServiceCommand()返回後殺死Service,那麼不會重新創建Service,除非有等待的Intent要傳遞。
START_STICKY 如果系統在onStartServiceCommand()返回後殺死Service,重啟Service,並且重新調用onStartServiceCommand(),但不重新傳遞最新的Intent。
START_REDELIVER_INTENT 如果系統在onStartServiceCommand()返回後殺死Service,那麼重新創建Service,並且最近傳給Service的Intent調用onStartServiceCommand()。
創建一個Service啟動周期的實例
 1 public class MyService extends Service{
 2
 3     //必須實現的方法,作用是用來返回binder對象
 4
 5
 6     //重寫onBind()方法,返回Service實例,使Service支持綁定,實現onBind()方法,並且返回MyService實例
 7     @Override
 8     public IBinder onBind(Intent intent) {
 9         // TODO Auto-generated method stub
10         System.out.println("--onBind--");
11         return null;
12     }
13
14
15     //用於創建Service的方法,只能調用一次
16     public void onCreate(){
17         super.onCreate();
18         System.out.println("--onCreate--");
19
20     //每次啟動Service時都會調用這個方法
21     @Override
22     public int onStartCommand(Intent intent, int flags, int startId) {
23         // TODO Auto-generated method stub
24         System.out.println("--onStartCommand--");
25         return super.onStartCommand(intent, flags, startId);
26     }
27
28     //解綁的時候使用的這個方法
29     @Override
30     public boolean onUnbind(Intent intent) {
31         // TODO Auto-generated method stub
32         System.out.println("--onUnbind--");
33         return super.onUnbind(intent);
34     }
35
36     //退出或者銷毀的時候使用這個方法
37     @Override
38     public void onDestroy() {
39         // TODO Auto-generated method stub
40         serviceRunning = false;
41         System.out.println("--onDestroy--");
42         super.onDestroy();
43
44     }
45
46 }
注意:在測試的時候一定要在onCreate()方法中寫一個多線程,以便輸出,讓我們更加的明白。如下:
 1 //用於創建Service的方法,只能調用一次
 2     public void onCreate(){
 3         super.onCreate();
 4         System.out.println("--onCreate--");
 5         serviceRunning = true;
 6         new Thread(){
 7             public void run(){
 8                 while(serviceRunning){
 9                     System.out.println("--Service運行中--");
10                     try{
11                         sleep(1000);
12                     }catch(Exception e){
13                         e.printStackTrace();
14                     }
15                 }
16             }
17         }.start();
18     }
綁定Service
綁定Service的時候會比較的復雜,其中,看綁定方法bindService(Intent service, ServiceConnection conn, int flags)時大家就可以看出。其中Intent需要傳遞Intent的值,conn是ServiceConnection的實例,flags是所需要的一個標示。下面就為大家解析綁定Service所需要的三個步驟:
第一步:需要在Service中創建一個Binder接口,並且實現:
包含客戶端可以調用public方法
或返回當前Service的實例--也包含客戶端可以調用的Public方法
或返回Service持有的其他類型的實例--也包含客戶端可以調用的Public方法
代碼如下:
public class MyBinder extends Binder{
		MyService getService(){
			return MyService.this;
		}
	}
第二步:在onBind()中返回Binder實例。
代碼如下:
1 //必須實現的方法,作用是用來返回binder對象
2 //重寫onBind()方法,返回Service實例,使Service支持綁定,實現onBind()方法,並且返回MyService實例
3     @Override
4     public IBinder onBind(Intent intent) {
5         // TODO Auto-generated method stub
6         System.out.println("--onBind--");
7         return null;
8     }
第三步:在客戶端中,從onServiceConnected()回調方法中接收這個Binder,並且使用Binder包含的Service提供的方法。
比如:
 1 public class MyServiceConn implements ServiceConnection{
 2
 3     MyService.MyBinder binder = null;
 4
 5     @Override
 6     public void onServiceConnected(ComponentName name, IBinder service) {
 7         // TODO Auto-generated method stub
 8         binder = (MyService.MyBinder)service;
 9     }
10
11     @Override
12     public void onServiceDisconnected(ComponentName name) {
13         // TODO Auto-generated method stub
14         binder = null;
15     }
16
17 }
注意:一定要在客戶端中聲明這個實例:
1 final MyServiceConn myserviceconn = new MyServiceConn();
客戶端在合適的時候也可以進行解綁:
1 //解除綁定的Service
2         unbind.setOnClickListener(new OnClickListener() {
3
4             @Override
5             public void onClick(View v) {
6                 // TODO Auto-generated method stub
7                 unbindService(myserviceconn);
8             }
9         });
上述就把Service的啟動、停止、綁定、解綁就完成了,下面的則是客戶端的一些的代碼:
 1 import android.app.Activity;
 2 import android.content.ComponentName;
 3 import android.content.Context;
 4 import android.content.Intent;
 5 import android.content.ServiceConnection;
 6 import android.os.Bundle;
 7 import android.os.IBinder;
 8 import android.view.View;
 9 import android.view.View.OnClickListener;
10 import android.widget.Button;
11
12 public class MainActivity extends Activity {
13
14     private Button start;
15     private Button stop;
16     private Button bind;
17     private Button unbind;
18     private Intent intent;
19
20     @Override
21     protected void onCreate(Bundle savedInstanceState) {
22         super.onCreate(savedInstanceState);
23         setContentView(R.layout.activity_main);
24         start = (Button)findViewById(R.id.btn1);
25         stop = (Button)findViewById(R.id.btn2);
26         bind = (Button)findViewById(R.id.btn3);
27         unbind = (Button)findViewById(R.id.btn4);
28
29         final MyServiceConn myserviceconn = new MyServiceConn();
30
31         //給按鈕設置事件,以便監聽Service中的變化
32         //開啟service
33         start.setOnClickListener(new OnClickListener() {
34
35             @Override
36             public void onClick(View v) {
37                 // TODO Auto-generated method stub
38                 intent = new Intent(getApplicationContext(),MyService.class);
39                 startService(intent);
40             }
41         });
42
43         //結束Service
44         stop.setOnClickListener(new OnClickListener() {
45
46             @Override
47             public void onClick(View v) {
48                 // TODO Auto-generated method stub
49                 stopService(intent);
50             }
51         });
52
53         //綁定service服務
54         bind.setOnClickListener(new OnClickListener() {
55
56             @Override
57             public void onClick(View v) {
58                 // TODO Auto-generated method stub
59                 bindService(intent,myserviceconn,Context.BIND_AUTO_CREATE);
60             }
61         });
62
63         //解除綁定的Service
64         unbind.setOnClickListener(new OnClickListener() {
65
66             @Override
67             public void onClick(View v) {
68                 // TODO Auto-generated method stub
69                 unbindService(myserviceconn);
70             }
71         });
72     }
73
74
75 }
XML文件的代碼(只是一些簡單的按鈕,就不解釋了):
 1 <LinearLayout xmlns:android="http://schemas.android.com/apk/res/android"
 2     xmlns:tools="http://schemas.android.com/tools"
 3     android:id="@+id/LinearLayout1"
 4     android:layout_width="match_parent"
 5     android:layout_height="match_parent"
 6     android:orientation="vertical"
 7     tools:context=".MainActivity" >
 8
 9     <TextView
10         android:layout_width="wrap_content"
11         android:layout_height="wrap_content"
12         android:text="@string/service" />
13
14     <Button
15         android:id="@+id/btn1"
16         android:layout_width="wrap_content"
17         android:layout_height="wrap_content"
18         android:text="StartService" />
19
20     <Button
21         android:id="@+id/btn2"
22         android:layout_width="wrap_content"
23         android:layout_height="wrap_content"
24         android:text="StopService" />
25
26     <Button
27         android:id="@+id/btn3"
28         android:layout_width="wrap_content"
29         android:layout_height="wrap_content"
30         android:text="bindService" />
31
32     <Button
33         android:id="@+id/btn4"
34         android:layout_width="wrap_content"

35         android:layout_height="wrap_content"
36         android:text="unBindService" />
37
38 </LinearLayout>
一定要注意在AndroidManifest.xml文件中加上權限:
1 <service            android:name="com.example.servicetest.MyService">
2  </service>
到這裡就完了,有什麼不懂或者不對的地方可以留言,至於截圖,上述的代碼比較詳細,我這裡就不貼出了。
---恢復內容結束---
 Activity啟動過程源碼分析
Activity啟動過程源碼分析 其實寫分析源碼文章總會顯得很復雜很乏味,但是梳理自己看源碼時的一些總結也是一種提高。這篇博客分析下Activity啟動過程源碼,我會盡量
 安卓系統設置選項的框架。,安卓系統設置框架
安卓系統設置選項的框架。,安卓系統設置框架首先在res文件中創建一個xml文件夾,創建preference.xml文件,然後寫布局: 1 <?xml versi
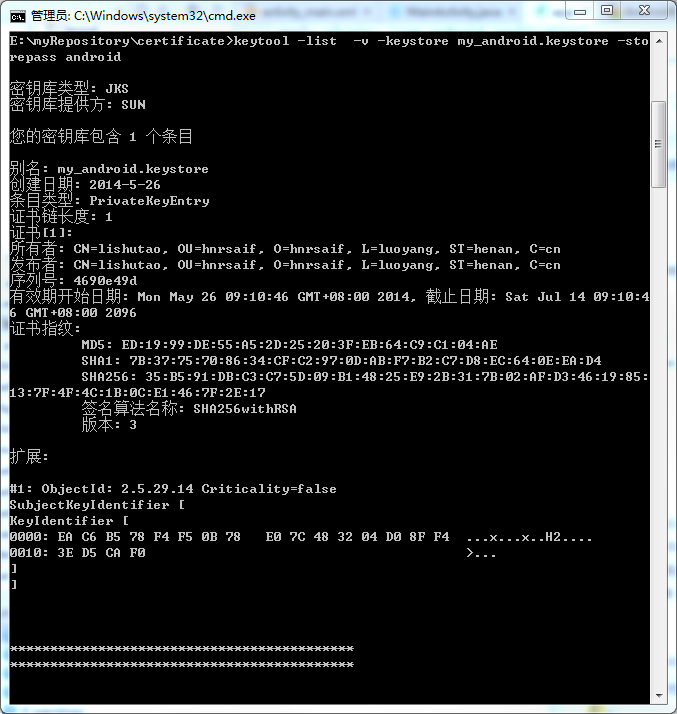 Android 查看自己的keystore的別名及相關信息,androidkeystore
Android 查看自己的keystore的別名及相關信息,androidkeystore1.在DOS窗口下進入自己的keystore所在位置,輸入 &nb
 (Android Studio實用指南)8.16 提煉參數對象
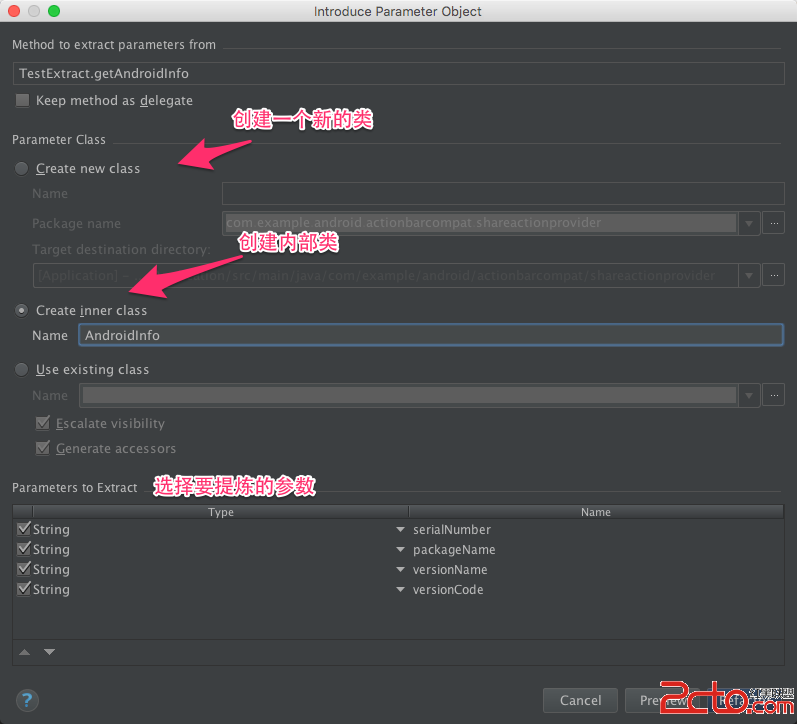
(Android Studio實用指南)8.16 提煉參數對象 某些參數總是同時出現,可能好幾個方法都使用這樣一組參數,為了避免參數列表過長,同時也為了避免重復代碼,
 [轉]File Descriptor洩漏導致Crash: Too many open files,descriptorcrash
[轉]File Descriptor洩漏導致Crash: Too man