編輯:關於android開發
從啟動界面到主界面之後的效果如圖所示,采用的是v4包下的DrawerLayout, activity_main.xml文件如下:
<!-- A DrawerLayout is intended to be used as the top-level content view using match_parent for both width and height to consume the full space available. --><android.support.v4.widget.DrawerLayoutandroid:id="@+id/drawer_layout"xmlns:android="http://schemas.android.com/apk/res/android"xmlns:tools="http://schemas.android.com/tools"android:layout_width="match_parent"android:layout_height="match_parent"tools:context="net.oschina.app.ui.MainActivity"><LinearLayoutandroid:layout_width="match_parent"android:layout_height="match_parent"android:orientation="vertical"><FrameLayoutandroid:id="@+id/realtabcontent"android:layout_width="match_parent"android:layout_height="0dip"android:layout_weight="1"/><FrameLayoutandroid:layout_width="match_parent"android:layout_height="wrap_content"android:background="?attr/windows_bg"><RelativeLayoutandroid:layout_width="match_parent"android:layout_height="wrap_content"android:layout_marginBottom="4dip"><net.oschina.app.widget.MyFragmentTabHostandroid:id="@android:id/tabhost"android:layout_width="match_parent"android:layout_height="wrap_content"android:layout_marginTop="4dip"/><Viewandroid:layout_width="match_parent"android:layout_height="1px"android:background="?attr/lineColor"/></RelativeLayout><!-- 快速操作按鈕 --><ImageViewandroid:id="@+id/quick_option_iv"android:layout_width="wrap_content"android:layout_height="wrap_content"android:layout_gravity="center"android:contentDescription="@null"android:src="@drawable/btn_quickoption_selector"/></FrameLayout></LinearLayout><!-- 左側側滑菜單 --><fragmentandroid:id="@+id/navigation_drawer"android:name="net.oschina.app.ui.NavigationDrawerFragment"android:layout_width="@dimen/navigation_drawer_width"android:layout_height="match_parent"android:layout_gravity="start"tools:layout="@layout/fragment_navigation_drawer"/></android.support.v4.widget.DrawerLayout>
側邊欄布局fragment_navigation_drawer.xml的定義:
<LinearLayout xmlns:android="http://schemas.android.com/apk/res/android"android:layout_width="match_parent"android:layout_height="match_parent"android:orientation="vertical"android:background="?attr/layout_bg_normal" ><net.oschina.app.widget.CustomerScrollViewandroid:layout_width="match_parent"android:layout_height="0dip"android:layout_weight="1"><include layout="@layout/fragment_navigation_drawer_items"/></net.oschina.app.widget.CustomerScrollView ><include layout="@layout/fragment_navigation_drawer_foot"/></LinearLayout>
fragment_navigation_drawer_items.xml和fragment_navigation_drawer_foot.xml的布局比較簡單,不再贅述。
主要介紹自定義控件CustomerScollView,繼承了ScrollView:
package net.oschina.app.widget;import android.annotation.SuppressLint;import android.content.Context;import android.graphics.Rect;import android.util.AttributeSet;import android.view.MotionEvent;import android.view.View;import android.view.animation.TranslateAnimation;import android.widget.ScrollView;/*** 可以拖動的ScrollView**/public class CustomerScrollView extends ScrollView {private static final int size = 4;private View inner;private float y;private Rect normal = new Rect();public CustomerScrollView(Context context) {super(context);}public CustomerScrollView(Context context, AttributeSet attrs) {super(context, attrs);}@Overrideprotected void onFinishInflate() {if (getChildCount() > 0) {inner = getChildAt(0);}}@SuppressLint("ClickableViewAccessibility")@Overridepublic boolean onTouchEvent(MotionEvent ev) {if (inner == null) {return super.onTouchEvent(ev);} else {commOnTouchEvent(ev);}return super.onTouchEvent(ev);}public void commOnTouchEvent(MotionEvent ev) {int action = ev.getAction();switch (action) {case MotionEvent.ACTION_DOWN:y = ev.getY();break;case MotionEvent.ACTION_UP:if (isNeedAnimation()) {// Log.v("mlguitar", "will up and animation");animation();}break;case MotionEvent.ACTION_MOVE:final float preY = y;float nowY = ev.getY();/*** size=4 表示 拖動的距離為屏幕的高度的1/4*/int deltaY = (int) (preY - nowY) / size;// 滾動// scrollBy(0, deltaY);y = nowY;if (isNeedMove()) {if (normal.isEmpty()) {normal.set(inner.getLeft(), inner.getTop(),inner.getRight(), inner.getBottom());return;}int yy = inner.getTop() - deltaY;// 移動布局inner.layout(inner.getLeft(), yy, inner.getRight(),inner.getBottom() - deltaY);}break;default:break;}}public void animation() {TranslateAnimation ta = new TranslateAnimation(0, 0, inner.getTop(),normal.top);ta.setDuration(200);inner.startAnimation(ta);inner.layout(normal.left, normal.top, normal.right, normal.bottom);normal.setEmpty();}public boolean isNeedAnimation() {return !normal.isEmpty();}public boolean isNeedMove() {int offset = inner.getMeasuredHeight() - getHeight();int scrollY = getScrollY();if (scrollY == 0 || scrollY == offset) {return true;}return false;}}
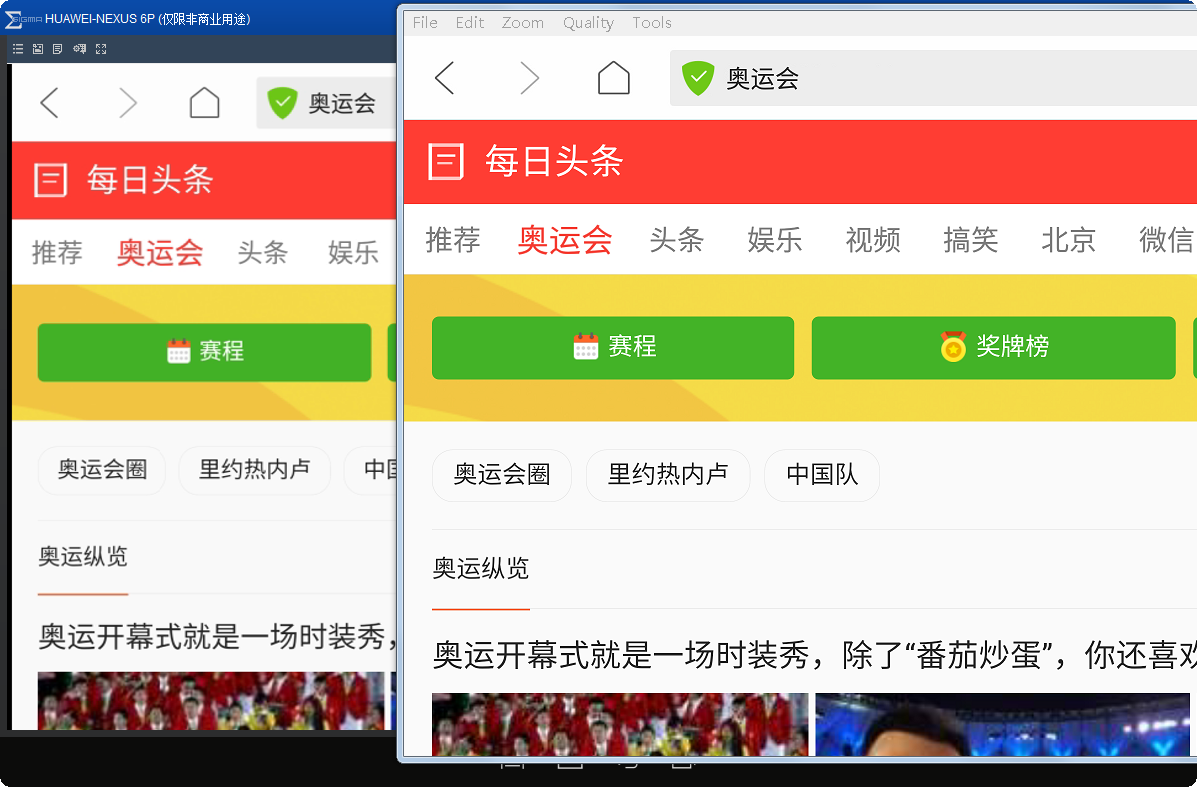
再來看看效果:
可以看到向上滑動的時候,會有明顯回彈的效果。
oschina客戶端滑動菜單的View的布局使用了可以拖拽的ScrollView,類文件為CustomerScrollView。
//是否需要移動public boolean isNeedMove() {int offset = inner.getMeasuredHeight() - getHeight();int scrollY = getScrollY();if (scrollY == 0 || scrollY == offset) {return true;}return false;}
 電腦控制Android設備的軟件——Total Control,androidtotal
電腦控制Android設備的軟件——Total Control,androidtotal 最早開始搞Android開發時,為了調試方便,想找一個
 主流MySQL集群實現架構優劣勢與適用場景分析
主流MySQL集群實現架構優劣勢與適用場景分析本文主要分析總結了目前主流的幾種MySQL集群架構實現方法及優缺點,現發出來以供大家參考學習、共同進步,如有不妥之處,請不吝
 android 動畫詳解(二)
android 動畫詳解(二) 下面就開始學習屬性動畫的基本用法,我們來看屬性動畫的繼承關系,如下如所示: 顯然關注的焦點應該是Va
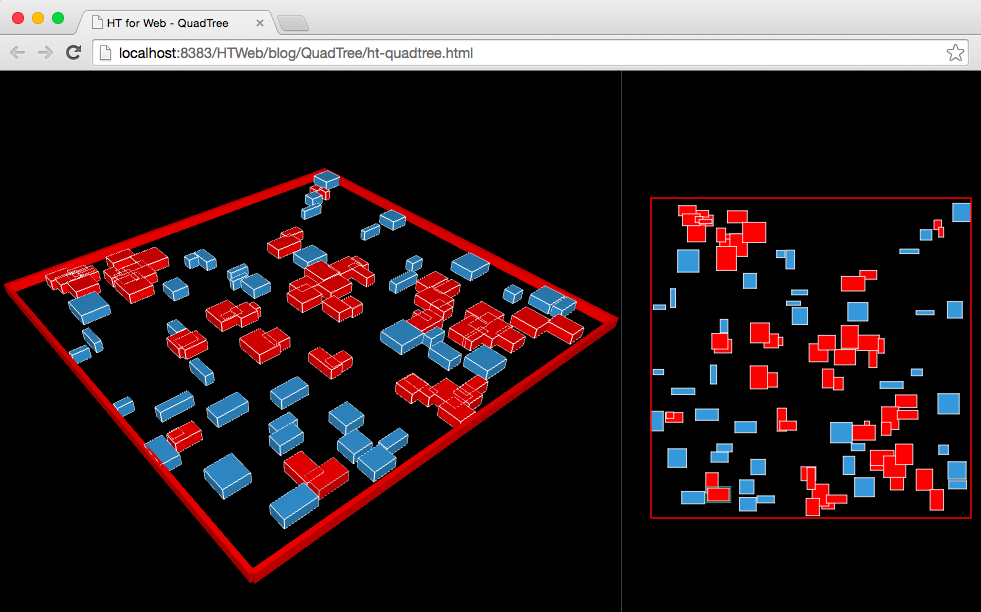 HTML5實現3D和2D可視化QuadTree四叉樹碰撞檢測
HTML5實現3D和2D可視化QuadTree四叉樹碰撞檢測QuadTree四叉樹顧名思義就是樹狀的數據結構,其每個節點有四個孩子節點,可將二維平面遞歸分割子區域。Qua