編輯:關於android開發
單機搭建安卓開發環境,前三篇主要是磨刀霍霍,這一篇將重點介紹JDK、REPO、GIT及編譯工具的安裝,下載項目代碼並編譯。特別說明,以下操作基於64位12.04 Server版Ubuntu。若采用其他版本系統,請參考Google官方操作步驟。訪問不了的同學,請找大師(藍燈),他能助你一臂之力。
1)安裝OpenJDK 7
sudo apt-get install openjdk-7-jdk --force-yes –y
查看java的版本
java –version
java version "1.7.0_95"
OpenJDK Runtime Environment (IcedTea 2.6.4) (7u95-2.6.4-0ubuntu0.12.04.1)
OpenJDK 64-Bit Server VM (build 24.95-b01, mixed mode)
設置環境變量
vim ~/.profile
在末尾添加如下配置,保存並退出
export JAVA_HOME=/usr/lib/jvm/java-7-openjdk-amd64
export CLASSPATH=.:$JAVA_HOME/lib:$JAVA_HOME/jre/lib:$CLASSPATH
export PATH=$JAVA_HOME/bin:$JAVA_HOME/jre/bin:$PATH
終端輸入如下命令使配置生效
source ~/.profile
2)安裝google推薦的編譯工具
sudo apt-get install gnupg flex bison gperf build-essential --force-yes -y
sudo apt-get install zip curl libc6-dev libncurses5-dev:i386 x11proto-core-dev --force-yes -y
sudo apt-get install libx11-dev:i386 libreadline6-dev:i386 --force-yes -y
sudo apt-get install libgl1-mesa-dev g++-multilib mingw32 tofrodos --force-yes -y
sudo apt-get install python-markdown libxml2-utils xsltproc zlib1g-dev:i386 --force-yes -y
sudo apt-get install libgl1-mesa-dri:i386 dpkg-dev --force-yes –y
3)安裝repo
下載repo V1.22國內定制版,已處理原版在國內使用時出現如下錯誤提示:
fatal: Cannot get https://gerrit.googlesource.com/git-repo/clone.bundle
fatal: error [Errno 101] Network is unreachable
將repo拷貝到/bin目錄下,並修改其屬性
sudo cp /home/repo /bin/
sudo chmod a+x /bin/repo
4)安裝git
sudo apt-get install git --force-yes –y
配置用戶郵箱及用戶名
git config --global user.email "[email protected]"
git config --global user.name "hjb"
5)創建密鑰,並添加到服務器端
ssh-keygen -t rsa -C [email protected]
拷貝id_rsa.pub並重命名,然後復制到服務器
cp /home/hjb/.ssh/id_rsa.pub /home/hjb/id_rsa.pub.hjb113
在git服務器端登錄bnv用戶,並執行如下命令,
cat /home/hjbang/id_rsa.pub.hjb113 >> /home/bnv/.ssh/authorized_keys
6)本地創建project目錄mt8735,准備下載代碼
cd ~
mkdir mt8735
cd mt8735
7)同步代碼
repo init -u [email protected]:/home/git/MTK/lp5.1-mt8735m-mirror/bonovo/platform/manifests.git -b default
repo sync
repo forall -c git checkout lp5.1-mt6735m
repo forall -c git checkout mt8735-avn401
repo forall -c git pull
8)安裝ccache,並配置ccache
sudo apt-get install -y ccache
配置.bashrc
sudo vim ~/.bashrc
末尾添加
export USE_CCACHE=1
使配置及時生效
source ~/.bashrc
查看設置狀態:
echo $USE_CCACHE
9)編譯project
cd ~/mt8735
prebuilts/misc/linux-x86/ccache/ccache -M 50G
. build/envsetup.sh
launch 25
make update-api
make update-api,大概需要花18分鐘,詳細信息如下,

編譯Android5.1系統
make –j24
編譯過程非常漫長,可以通過如下命令查看cahe使用情況,
watch -n1 -d prebuilts/misc/linux-x86/ccache/ccache -s
  cache directory /home/hjb/.ccache

  cache hit (direct) 0

  cache hit (preprocessed) 0

  cache miss 43927

  called for link 1209

  preprocessor error 732

  unsupported source language 968

  unsupported compiler option 2

  files in cache 138583

  cache size 18.0 Gbytes

  max cache size 50.0 Gbytes
可以看到cache大概有18GB,故使用ccache,第一次編譯的時間會比不用cache更長,但之後編譯速度將會有很大提升。
經過4個半小時,第一次編譯終於成功了,詳細信息如下,
修改內核模塊代碼,重新編譯系統鏡像大概需要13分鐘,詳細信息如下,
雖然在SSD上編譯,這個時間會縮短到5分鐘左右,但還是比較長。所以在調試內核驅動模塊時,最好使用動態加載模塊的方式,以提高工作效率。
至此,Android系統編譯的環境基本搭建完成,後一篇將介紹如何搭建Android應用開發的環境。
 Andriod DiskLruCache的使用案例
Andriod DiskLruCache的使用案例 DiskLruCache是谷歌推薦的用來實現硬盤緩存的類,本案例將對DiskLruCache的基本用法做一個總結,
 Android開發:優化ListView實踐解析
Android開發:優化ListView實踐解析 在看了一些vogella的文章之後,發現關於android listview性能優化這一段很有意思,於是實踐了
 圓形頭像CircleImageView和Cardview使用,circleimageview
圓形頭像CircleImageView和Cardview使用,circleimageview效果: 圓形頭像在我們的日常使用的
 Android 天氣預報(2)
Android 天氣預報(2) 之前實現過了天氣預報的功能 但是真的好丑 真的只是實現功能 所以上一篇博客也沒有貼出圖片 這次 相對於第一個 首先是界面做了調整 其次
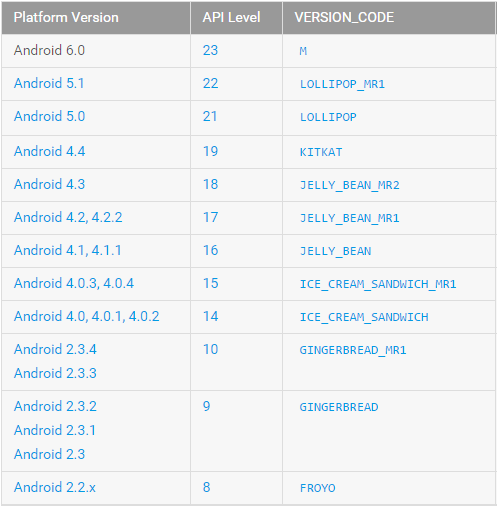 minSdkVersion maxSdkVersion targetSdkVersion target 的區別,targetsdkversion
minSdkVersion maxSdkVersion targetSd