編輯:關於android開發
Android基礎01 快速入門 & 布局
01.01 手機制式
第一代模擬制式手機(1G):1G就是大哥大,手機類似於簡單的無線電雙工電台,通話是鎖定在一定頻率,所以使用可調頻電台就可以竊聽通話。
第二代GSM、CDMA等數字手機(2G):手機使用PHS,GSM或者CDMA這些十分成熟的標准,具有穩定的通話質量和合適的待機時間,支持彩信業務的GPRS和上網業務的WAP服務,以及各式各樣的Java程序等。
第三代移動通信技術(3G):3G,是英文3rd Generation的縮寫,指第三代移動通信技術。指將無線通信與國際互聯網等多媒體通信結合的新一代移動通信系統。它能夠處理圖像、音樂、視頻流等多種媒體形式,提供包括網頁浏覽、電話會議、電子商務等多種信息服務。
第四代移動電話行動通信(4G):該技術包括TD-LTE和FDD-LTE兩種制式。4G是集3G與WLAN於一體,並能夠傳輸高質量視頻圖像,它的圖像傳輸質量與高清晰度電視不相上下。4G系統能夠以100Mbps的速度下載,比目前的撥號上網快200倍,並能夠滿足幾乎所有用戶對於無線服務的要求。此外,4G可以在DSL和有限電視調制解調器沒有覆蓋的地方部署,然後再擴展到整個地區。
網絡制式
2G制式:[GSM:移動/聯通、CDMA:電信]
3G制式:[WCDMA:聯通、TD-SCDMA:移動、CDMA2000:電信]
4G制式:[FDD-LTE:電信/聯通、TD-LTE:移動/電信/聯通]
1G制式:徹底退出歷史舞台……
2G/3G/4G的區別
2G 撥號上網,帶寬12.2k每用戶
3G 寬帶上網,帶寬384k~2M每用戶
4G 光纖到戶,帶寬可以達到100M每用戶

安卓之父:安迪·魯賓
1. 2003年10月,安迪·魯賓牽頭創建了一家公司,名為Android,開始開發一款針對手機端的操作系統。
2. 2005年8月谷歌低調收購了這家公司及其團隊,安迪魯賓成為Google公司工程部副總裁,繼續負責Android項目。
3. 2007年11月,谷歌公司正式向外界展示了這款名為Android的操作系統,並宣布建立一個全球性的聯盟組織,該組織由34家手機制造商、軟件開發商、電信運營商以及芯片制造商共同組成,他們共同搭建起了Android系統最早的生態圈
4. 2011年,Android在全球的市場份額首次超過塞班系統,躍居第一,目前的主要競爭對手是IOS
Android進化史
1.5 Cupcake(紙杯蛋糕)
1.6 Donut(甜甜圈)
2.1 Eclair(閃電泡芙)
2.2 Froyo(凍酸奶)
2.3 Gingerbread(姜餅)
3.0 Honeycomb(蜂巢)
4.0 Ice cream SandWich(冰激凌三明治)
4.1 Jelly Bean (果凍豆)
4.2 Jelly Bean (果凍豆)
4.3 Jelly Bean (果凍豆)
4.4 Kitkat (雀巢的一款巧克力)
5.0 Lollipop (棒棒糖)
6.0 Marshmallow (棉花糖)
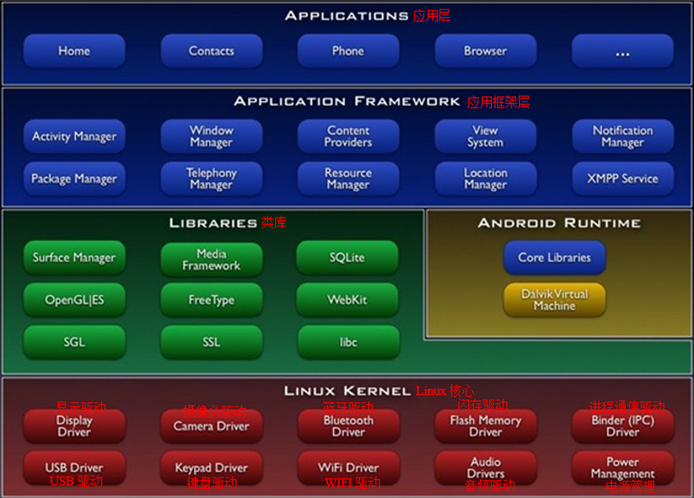
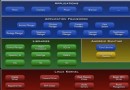
LINUX KERNEL:Linux核心,Android系統是基於Linux系統修改過來的,Android底層都是Linux的東西,大多都是操作硬件的一些驅動,如Display Driver、Audio Drivers等等。
LIBRARIES:用C語言編寫的完成Android核心功能的一些類庫,如:OpenGL|ES(圖形圖像引擎簡化版)、WebKit(浏覽器內核)、SQLite(輕量級數據庫)、Surface Manager(界面管理器)、Media Framework(多媒體框架)、FreeType(字體類庫)、SGL(另一個圖形圖像引擎)、SSL(基於TCP的安全協議)、libc(零散的類庫)。
APPLICATION FRAMEWORK:應用框架層,全部是用Java語言編寫的,供開發人員調用。
APPLICATIONS:應用層,我們安裝的所有應用都屬於這一層,如,微信,植物大戰僵屍。
ANDROID RUNTIME
jvm: .java->.class->.jar
dvm: .java->.class->.dex->.apk
DVM執行的是.dex格式文件,JVM執行的是.class格式文件。
Android程序編譯完之後生成.class文件,然後,dex工具會把.class文件處理成.dex文件,然後把資源文件和.dex文件等打包成.apk文件,apk就是android package的意思。
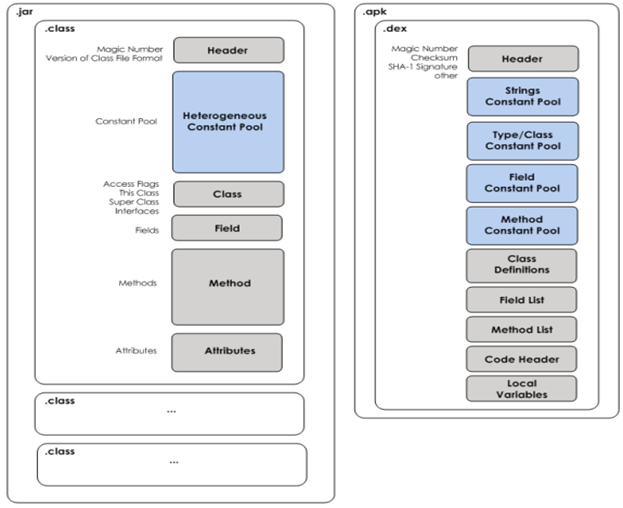
DVM相比JVM運行效率更高,原因有:
1.每個jar包中都會有很多的class文件,每個class文件都有一個Header,Header中保存了class文件的初始信息,如,生成該class的jdk版本。而在apk文件中的dex文件,只有一個Header,所有class文件的初始信息都保存在其中,效率更高。
2.每個class文件中有常量、字節碼、方法、域等保存自己的對應的信息。dex文件中把所有class文件中的常量放在常量池中,所有class文件中的字節碼放到一個字節碼常量池中,等等。雖然這樣打包慢一點,但是讀取的時候會很快。
3.class文件存在很多的冗余信息,dex工具會去除冗余信息,並把所有的.class文件整合到.dex文件中,減少了I/O操作,提高了類的查找速度。
Android的新虛擬機ART
Android 5.0以上版本的手機正式開始使用ART。
DVM和ART虛擬機的區別:
Dalvik:應用程序每次運行的時候,字節碼都需要通過即時編譯器轉換為機器碼,這會拖慢應用的運行效率。
ART:應用在第一次安裝的時候,字節碼就會預先編譯成機器碼(java語言翻譯成C指令),使其成為真正的本地應用,應用的啟動和執行速度都會顯著提升。弊端就是ART需要存儲java和C兩份指令,有些耗內存。
SDK (Software Development Kits軟件開發工具包)工具包
下載地址:http://www.android-studio.org/
谷歌官方的地址需FQ才能訪問,上面的地址是ANDROID STUDIO中文社區的官網。可在上面下載開發工具
工具包包含以下內容:
1. Eclipse + ADT 插件
2. Android SDK
3. Android Platform-tools
4. 最新的Android 開發平台
5. 最新的模擬器鏡像
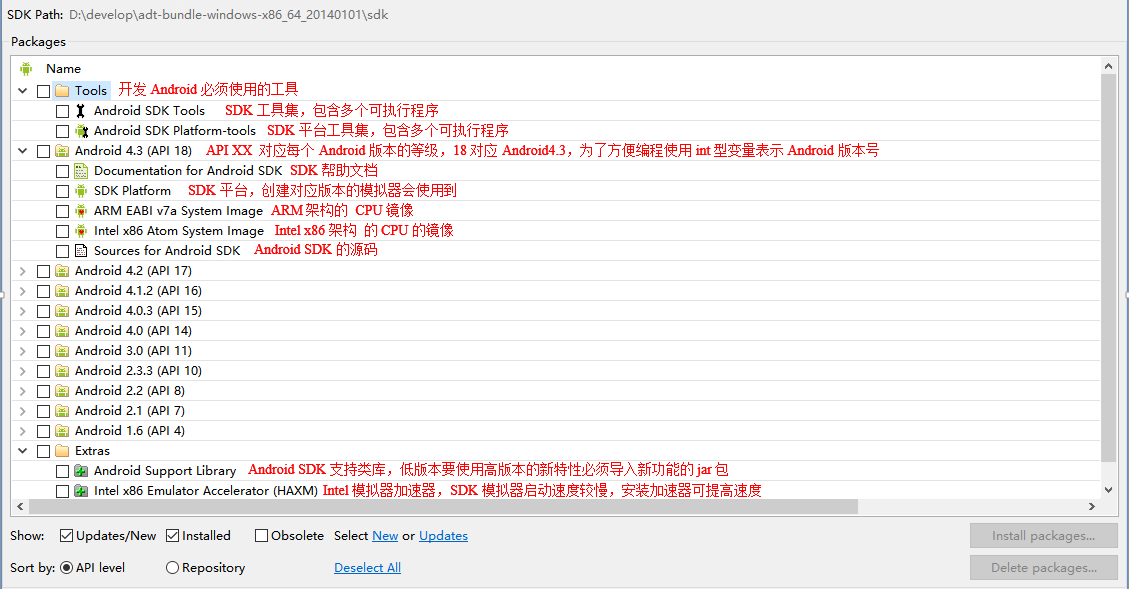
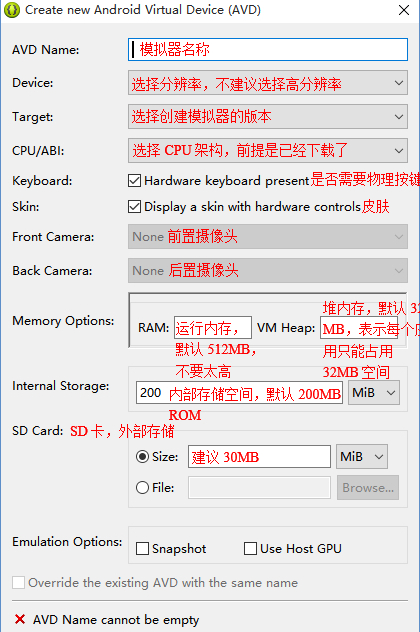
SDK Manager
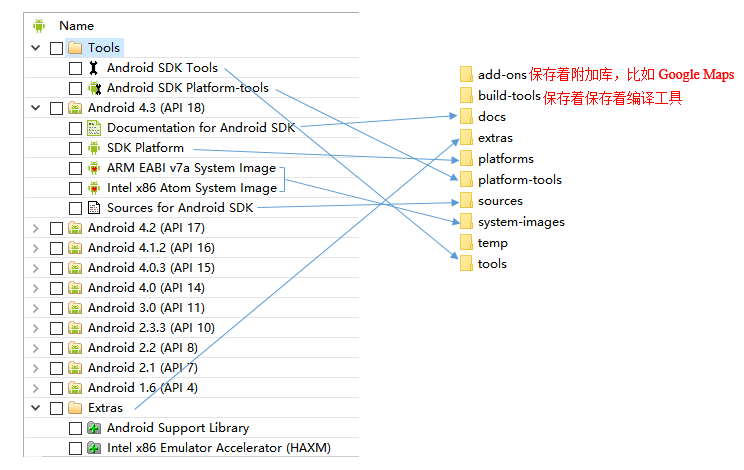
SDK文件夾目錄結構
點擊 圖標,出現下面的窗口,點擊New...
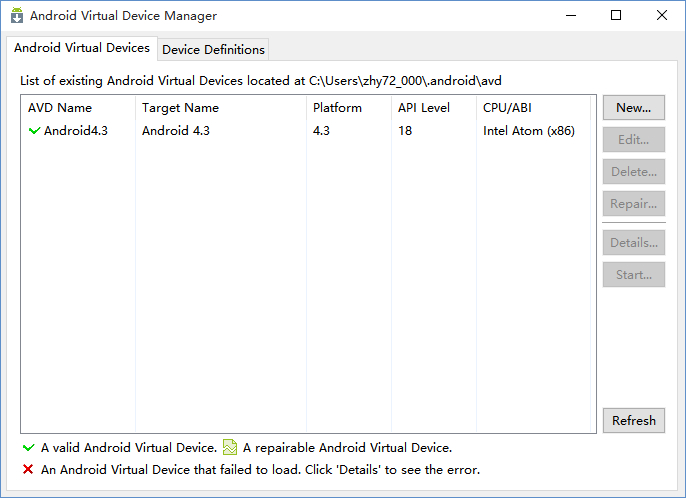
彈出以下窗口
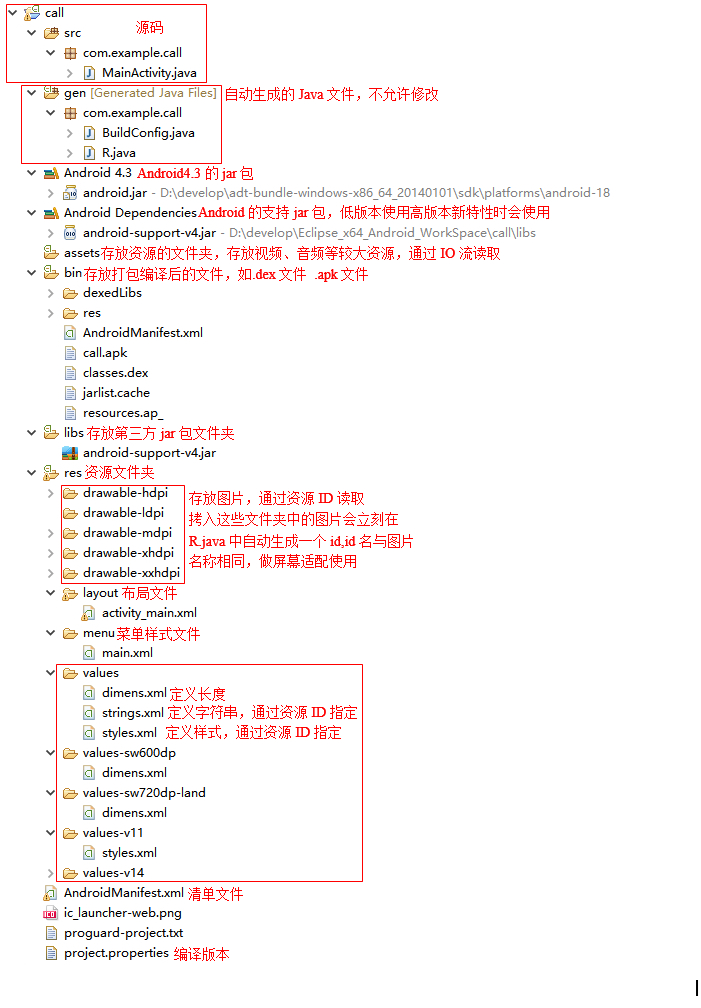
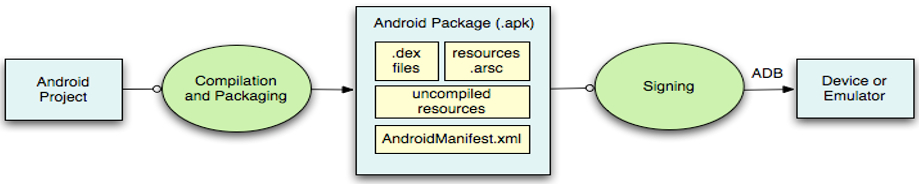
1、Android項目編譯、打包成apk
apk中包含
被編譯的只有.java代碼
2、簽名(給apk包打個數字簽名)
然後再通過ADB運行到Devices emulator上,Devices指的是手機,Emulator指的是模擬器。系統判斷兩個應用是否屬於同一款應用,首先先確認清單文件中Manifest標簽的package屬性值(應用程序在系統中的唯一標識)是否相同,其次判斷簽名是否相同。只有兩個都相同,才會存在高版本覆蓋低版本的情況。也就是說,只有簽名相同或者包名相同,是無法覆蓋的。簽名是屬於企業商業機密,是不能被他人獲取的。簽名是用一個key文件(相當於是秘鑰)計算出來的一個字符串,不同的秘鑰生成的字符串肯定不同,不同公司的簽名也是不同的。所以,一般是無法山寨另一個公司的應用程序的。
DDMS(dalvik debug moniter service)是 Android 開發環境中的Dalvik虛擬機調試監控服務。
它為我們提供例如:為測試設備截屏,針對特定的進程查看正在運行的線程以及堆信息、Logcat、廣播狀態信息、模擬電話呼叫、接收SMS、虛擬地理坐標等等。
ADB(Android debug bridge Android調試橋)指令
ADB用於建立Android設備與開發環境的連接。模擬器中的操作日志原本是不可能在Windows平台上輸出的。但是,正是由於有了ADB,所以LogCat中才可以輸出模擬器中的操作日志
ADB是一個可執行的指令,在CMD中使用,使用前首先配置環境變量
例:將D:\develop\adt-bundle-windows-x86_64_20140101\sdk\platform-tools配置到path路徑即可
ADB指令
1. adb install xxx(絕對路徑).apk:安裝指定apk到模擬器中
2. adb uninstall com.yingyonghui.market(包名):從模擬器中刪除指定應
3. adb start-server:開啟adb進程
4. adb kill-server:結束adb進程
5. adb devices:列出與開發環境建立連接的Android設備的列表
6. adb shell:進入Linux命令行
ls:列出當前目錄結構
ps:列出當前設備的所有進程
7. netstat -ano:查看端口占用情況
注意: adb同時也是個進程,如果這個進程結束了,Android設備和開發環境連接就會中斷,此時控制台會經過11秒嘗試連接後,ADB連接重新恢復
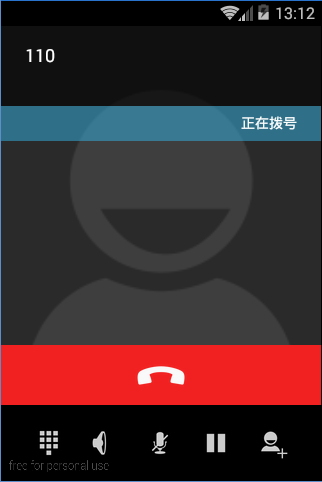
1.創建項目
2.寫布局文件,打開res\layout\activity_main.xml進行編輯
<LinearLayout
    xmlns:android="http://schemas.android.com/apk/res/android"
    android:layout_width="match_parent"(定義文本的寬,匹配父元素)
    android:layout_height="match_parent"(定義文本的高,匹配父元素)
    android:orientation="vertical"(垂直排列)>

    <EditText(輸入框)
        android:id="@+id/et_number"
        android:layout_width="match_parent"
        android:layout_height="wrap_content"
        android:hint="請輸入號碼"(如果文本框中有內容,就不顯示提示內容;如果文本框沒有內容,就會顯示提示內容)/>

    <Button
        android:layout_width="wrap_content"
        android:layout_height="wrap_content"
        android:layout_marginTop="10dp"
        android:layout_gravity="center_horizontal"
        android:text="撥號"
        android:onClick="call"(給按鈕添加click事件)/>
</LinearLayout>
3. 寫java代碼,打開MainActivity.java編輯
package com.example.codedemo;

import android.content.Intent;
import android.net.Uri;
import android.os.Bundle;
import android.support.v7.app.AppCompatActivity;
import android.text.TextUtils;
import android.view.View;
import android.widget.EditText;
import android.widget.Toast;

public class MainActivity extends AppCompatActivity
{
    private EditText mEtNumber;

    @Override
    protected void onCreate(Bundle savedInstanceState)
    {
        super.onCreate(savedInstanceState);
        setContentView(R.layout.activity_main);

        mEtNumber = (EditText) findViewById(R.id.et_number);//獲取輸入框對象
    }

    public void call(View view)
    {
        String number = mEtNumber.getText().toString();//獲取號碼
        if(TextUtils.isEmpty(number))
        {
            Toast.makeText(this, "號碼不能為空號", Toast.LENGTH_SHORT).show();
            return;
        }
        else
        {
            Intent in = new Intent();//創建意圖對象
            in.setAction(Intent.ACTION_CALL);//設置撥號動作
            in.setData(Uri.parse("tel:"+number));//設置號碼,通過Uri轉
            startActivity(in);//開啟打電話應用的Activity
        }
    }
}
4. 添加權限
<uses-permission android:name="android.permission.CALL_PHONE"/>
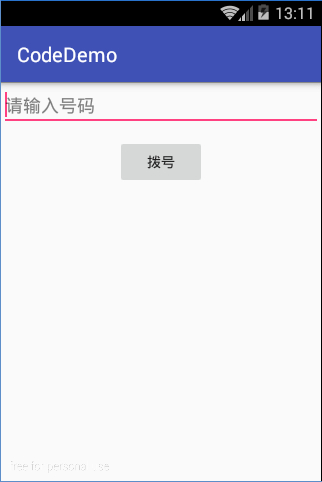
運行界面
布局文件
<LinearLayout xmlns:android="http://schemas.android.com/apk/res/android"
    android:layout_width="match_parent"
    android:layout_height="match_parent"
    android:orientation="vertical">

    <!-- android:inputType="phone"表示只能輸入電話號碼 -->
    <EditText
        android:id="@+id/et_phone"
        android:layout_width="match_parent"
        android:layout_height="wrap_content"
        android:hint="請輸入號碼"
        android:inputType="phone" />

    <!-- android:lines="5"表示只能輸入5行 -->
    <EditText
        android:id="@+id/et_content"
        android:layout_width="match_parent"
        android:layout_height="wrap_content"
        android:hint="請輸入內容"
        android:lines="5" />

    <Button
        android:layout_width="wrap_content"
        android:layout_height="wrap_content"
        android:layout_gravity="right"
        android:onClick="send"
        android:text="發送" />
</LinearLayout>
MainActivity.java文件
package com.example.codedemo;

import android.os.Bundle;
import android.support.v7.app.AppCompatActivity;
import android.telephony.SmsManager;
import android.view.View;
import android.widget.EditText;
import java.util.ArrayList;

public class MainActivity extends AppCompatActivity
{
    private EditText mEtPhone;
    private EditText mEtContent;

    @Override
    protected void onCreate(Bundle savedInstanceState)
    {
        super.onCreate(savedInstanceState);
        setContentView(R.layout.activity_main);

        //找到控件
        mEtPhone = (EditText) findViewById(R.id.et_phone);
        mEtContent = (EditText) findViewById(R.id.et_content);
    }

    public void send(View view)
    {
        String phone = mEtPhone.getText().toString();
        String content = mEtContent.getText().toString();

        //獲取發送短信的API
        //SmsManager要使用android.telephony包內的,不要使用android.telephony.gsm包內的,已過時。
        SmsManager sm = SmsManager.getDefault();

        //如果短信過長,發布出去,可以把長短信拆分成若干條短短信。
        ArrayList<String> smss = sm.divideMessage(content);

        for(String str : smss)
        {
            /**
             * String destinationAddress 對方號碼
             * String scAddress 短信服務中心的號碼,可以傳null,表示使用默認的短信服務中心地址
             * String text 短信內容
             * PendingIntent sentIntent 表示廣播,如果不傳null,短信發送成功或失敗時,會給予回執信息
             * PendingIntent deliveryIntent 如果對方成功接收信息了,會給予回執信息
             */
            sm.sendTextMessage(phone, null, str, null, null);
        }
    }
}
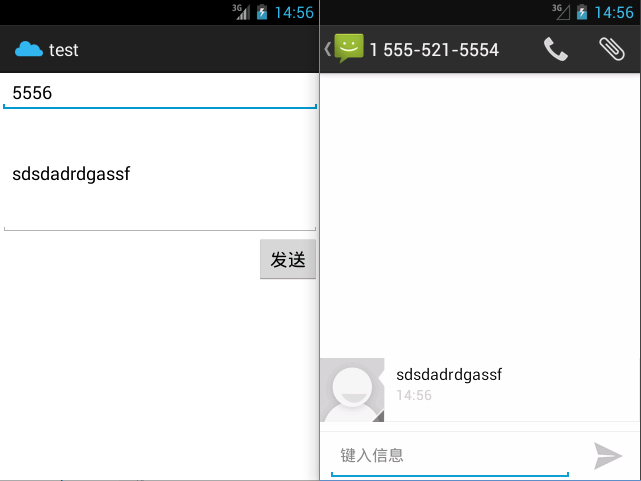
添加權限
<uses-permission android:name="android.permission.SEND_SMS"/>
運行結果:
方式1:在布局文件中,給按鈕添加一個id,在代碼中根據ID找到按鈕對象,給按鈕添加一個單擊事件的監聽器,這個方法中接收的參數是監聽器的內部類,實現了其中onClick方法
示例代碼
<Button
    android:id="@+id/btCall"
    android:layout_width="wrap_content"
    android:layout_height="wrap_content"
    android:layout_gravity="right"
    android:text="點擊" />
Button mBtCall = (Button) findViewById(R.id.btCall);
if(mBtCall != null)
{
    mBtCall.setOnClickListener(new View.OnClickListener()
    {
        @Override
        public void onClick(View v)
        {
            //點擊事件需要實現的功能
        }
    });
}
方式2:在布局文件中,給按鈕添加一個id,在代碼中根據ID找到按鈕對象,給按鈕添加了一個單擊事件的監聽器,這個方法中接收的參數是自定義的內部類的對象;
<Button
    android:id="@+id/btCall"
    android:layout_width="wrap_content"
    android:layout_height="wrap_content"
    android:layout_gravity="right"
    android:text="發送" />
Button mBtCall = (Button) findViewById(R.id.btCall);
MyListener ml = new MyListener();
if(mBtCall != null)
    mBtCall.setOnClickListener(ml);

public class MyListener implements View.OnClickListener
{
    @Override
    public void onClick(View v)
    {
        //點擊事件需要實現的功能
    }
方式3:在布局文件中,給按鈕添加一個id,在代碼中根據ID找到按鈕對象,讓activity實現了OnClickLinstener 接口,實現接口的onClick方法;給按鈕添加了一個單擊事件的監聽器,方法中接收的參數是this;
<Button
    android:id="@+id/btCall"
    android:layout_width="wrap_content"
    android:layout_height="wrap_content"
    android:layout_gravity="right"
    android:text="發送" />
public class MainActivity extends AppCompatActivity implements View.OnClickListener {
    @Override
    protected void onCreate(Bundle savedInstanceState)
    {
        super.onCreate(savedInstanceState);
        setContentView(R.layout.activity_main);

        //找到控件
        Button mBtCall = (Button) findViewById(R.id.btCall);
        if(mBtCall != null)
            mBtCall.setOnClickListener(this);
    }

    @Override
    public void onClick(View v)
    {
        //點擊事件需要實現的功能
    }
  }
方式4:在布局文件中,給按鈕添加一個onClick的屬性="send",在代碼中按鈕的單擊事件的方法必須這麼寫:
public void send(View view){}
<Button
    android:layout_width="wrap_content"
    android:layout_height="wrap_content"
    android:layout_gravity="right"
    android:onClick="send"
    android:text="發送" />
public void send(View view)
{
    //點擊事件需要實現的功能
}
多個按鈕Button的onClick屬性值可以相同,點擊任何一個按鈕都會調用相同的方法。通過id可以判斷用戶按下的是哪一個按鈕
dp最終顯示長度多少是根據屏幕密度來換算的,屏幕越大,1dp就能顯示更長的像素。
320x480屏幕上,1dp=1px,160dp=160px,正好是屏幕寬度的一半。
480x800屏幕上,1dp=1.5px,160dp=240px,正好是屏幕寬度的一半。
sp與dp類似,只是sp用於字體大小,dp用於長度大小。
為適應各種界面風格,滿足開發的需要,Android提供了5種布局方式。
1. LinearLayout(線性布局)
2. RelativeLayout(相對布局)
3. FrameLayout(幀布局)
4. TableLayout(表格布局)
5. AbsoluteLayout(絕對布局)
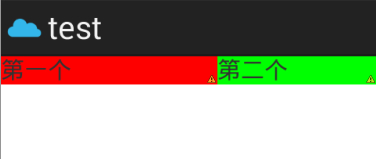
權重案例:
<LinearLayout xmlns:android="http://schemas.android.com/apk/res/android"
    xmlns:tools="http://schemas.android.com/tools"
    android:layout_width="match_parent"
    android:layout_height="match_parent"
    tools:context=".MainActivity"
    android:orientation="horizontal"
    android:weightSum="2"
    >
    <TextView
        android:layout_weight="1"
        android:layout_width="100dp"
        android:layout_height="wrap_content"
        android:background="#ff0000"
        android:text="第一個"
        android:layout_gravity="right"
        android:textSize="20sp" />

    <TextView
        android:layout_weight="1"
        android:layout_width="50dp"
        android:layout_height="wrap_content"
        android:text="第二個"
        android:textSize="20sp"
        android:background="#00ff00"
        />
</LinearLayout>
權重指的是把線性布局中剩余空間分成N份,上例中表示在水平方向上將權重分為2分,2個TextView各占一份
第一個TextView先占屏幕的100dp, 第二個TextView占屏幕的50dp,然後將屏幕的剩余部分分為2份平均分配給兩個TextView
運行結果如下:
當將權重分為3份,2個TextView(android:layout_width="0dp")權重各占一份時,結果如下
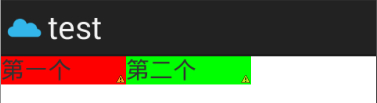
所以當排列為水平排列(horizontal),利用權重進行分配的時候,一定要搭配將android:layout_width屬性值設置為0dp來使用,這樣很容易計算。同理,當排列為垂直排列(vertical),在利用權重進行分配的時候,一定要搭配將android:layout_height屬性值設置為0dp來使用。
注意:
1、android:weightSum是可以不寫的,上例中,如果第一個TextView的android:weight屬性值設置為1,第二個TextView的android:weight屬性值設置為2,那麼weightSum即為3,兩個TextView按照1:2分配。
但是,如果weightSum設置為4,相當於把寬度切成四份,前面3份兩個TextView按照1:2分配,第4塊不分配。
2、TextView的android:weight屬性如果不寫,相當於android:weight的屬性值為0,也就是不會分配到剩余空間任何部分。
此時,如果android:layout_width屬性值設置為0dp,那麼就會報錯。因為,此TextView已經無法顯示出來了。
注意:
豎直排列(vertical)時左右對齊有效、水平居中對齊有效、頂部底部對齊無效、豎直居中無效
水平排列(horizontal)時左右對齊無效,水平居中對齊無效、頂部底部對齊有效、豎直居中有效
線性布局中的所有元素永遠都不會重疊
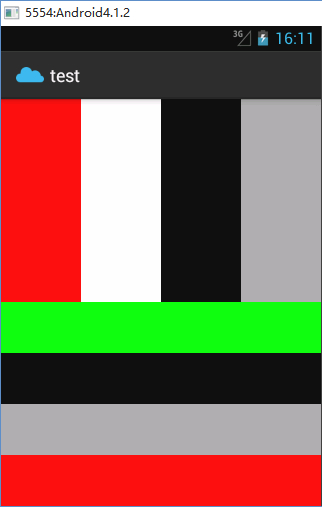
布局文件
<?xml version="1.0" encoding="utf-8"?>
<LinearLayout xmlns:android="http://schemas.android.com/apk/res/android"
    android:layout_width="match_parent"
    android:layout_height="match_parent"
    android:orientation="vertical" >


    <LinearLayout
        android:layout_weight="1"
        android:layout_width="match_parent"
        android:layout_height="0dp"
        android:orientation="horizontal"
        >
        <TextView
            android:layout_weight="1"
            android:layout_width="0dp"
            android:layout_height="match_parent"
            android:background="#ff0000"
            />
        <TextView
            android:layout_weight="1"
            android:layout_width="0dp"
            android:layout_height="match_parent"
            android:background="#ffffff"
            />
        <TextView
            android:layout_weight="1"
            android:layout_width="0dp"
            android:layout_height="match_parent"
            android:background="#000000"
            />
        <TextView
            android:layout_weight="1"
            android:layout_width="0dp"
            android:layout_height="match_parent"
            android:background="@android:color/darker_gray"
            />

    </LinearLayout>
    <LinearLayout
        android:layout_weight="1"
        android:layout_width="match_parent"
        android:layout_height="0dp"
        android:orientation="vertical"
        >
        <TextView
            android:layout_weight="1"
            android:layout_width="match_parent"
            android:layout_height="0dp"
            android:background="#00ff00"
            />
        <TextView
            android:layout_weight="1"
            android:layout_width="match_parent"
            android:layout_height="0dp"
            android:background="#000000"
            />
        <TextView
            android:layout_weight="1"
            android:layout_width="match_parent"
            android:layout_height="0dp"
            android:background="#aaa"
            />
        <TextView
            android:layout_weight="1"
            android:layout_width="match_parent"
            android:layout_height="0dp"
            android:background="#ff0000"
            />
    </LinearLayout>
</LinearLayout>
運行結果
特點:相對布局所有組件可以疊加在一起;各個組件的布局是獨立的,互不影響;所有組件的默認位置都是在左上角(頂部、左部對齊)。
屬性:
android:layout_toRightOf 在指定控件的右邊
android:layout_toLeftOf 在指定控件的左邊
android:layout_above 在指定控件的上邊
android:layout_below 在指定控件的下邊
android:layout_alignBaseline 跟指定控件水平對齊
android:layout_alignLeft 跟指定控件左對齊
android:layout_alignRight 跟指定控件右對齊
android:layout_alignTop 跟指定控件頂部對齊
android:layout_alignBottom 跟指定控件底部對齊
android:layout_alignParentLeft 是否跟父元素左對齊
android:layout_alignParentTop 是否跟父元素頂部對齊
android:layout_alignParentRight 是否跟父元素右對齊
android:layout_alignParentBottom 是否跟父元素底部對齊
android:layout_centerVertical 在父元素中垂直居中
android:layout_centerHorizontal 在父元素中水平居中
android:layout_centerInParent 在父元素中居中
布局文件
<?xml version="1.0" encoding="utf-8"?>
<RelativeLayout xmlns:android="http://schemas.android.com/apk/res/android"
    android:layout_width="match_parent"
    android:layout_height="match_parent" >

    <Button
        android:id="@+id/center"
        android:layout_width="100dp"
        android:layout_height="wrap_content"
        android:text="中間"
        android:layout_centerInParent="true"
        />
    <Button
        android:layout_width="wrap_content"
        android:layout_height="wrap_content"
        android:text="上面"
        android:layout_above="@id/center"
        android:layout_alignLeft="@id/center"
        android:layout_alignRight="@id/center"
        />
    <Button
        android:layout_width="wrap_content"
        android:layout_height="wrap_content"
        android:text="下面"
        android:layout_below="@id/center"
        android:layout_alignLeft="@id/center"
        android:layout_alignRight="@id/center"
        />

    <Button
        android:layout_width="wrap_content"
        android:layout_height="wrap_content"
        android:text="左邊"
        android:layout_toLeftOf="@id/center"
        android:layout_alignTop="@id/center"
        android:layout_alignBottom="@id/center"
        android:layout_alignParentLeft="true"
        />
    <Button
        android:layout_width="wrap_content"
        android:layout_height="wrap_content"
        android:text="右邊"
        android:layout_toRightOf="@id/center"
        android:layout_alignTop="@id/center"
        android:layout_alignBottom="@id/center"
        android:layout_alignParentRight="true"
        />

     <Button
        android:layout_width="wrap_content"
        android:layout_height="wrap_content"
        android:text="左上"
        android:layout_toLeftOf="@id/center"
        android:layout_above="@id/center"
        android:layout_alignParentLeft="true"
        />
     <Button
        android:layout_width="wrap_content"
        android:layout_height="wrap_content"
        android:text="左下"
        android:layout_toLeftOf="@id/center"
        android:layout_below="@id/center"
        android:layout_alignParentLeft="true"
        />
     <Button
        android:layout_width="wrap_content"
        android:layout_height="wrap_content"
        android:text="右上"
        android:layout_toRightOf="@id/center"
        android:layout_above="@id/center"
        android:layout_alignParentRight="true"
        />
     <Button
        android:layout_width="wrap_content"
        android:layout_height="wrap_content"
        android:text="右下"
        android:layout_toRightOf="@id/center"
        android:layout_below="@id/center"
        android:layout_alignParentRight="true"
        />
</RelativeLayout>
運行結果
組件可以重疊,所有組件默認位置:左對齊,頂部對齊
布局方式的屬性與線性布局一致
<?xml version="1.0" encoding="utf-8"?>
<FrameLayout xmlns:android="http://schemas.android.com/apk/res/android"
    android:layout_width="match_parent"
    android:layout_height="match_parent" >

    <TextView
        android:layout_width="240dp"
        android:layout_height="240dp"
        android:background="#ff0000"
        android:layout_gravity="center"
        />
    <TextView
        android:layout_width="200dp"
        android:layout_height="200dp"
        android:background="#00ff00"
        android:layout_gravity="center"
        />
    <TextView
        android:layout_width="160dp"
        android:layout_height="160dp"
        android:background="#0000ff"
        android:layout_gravity="center"
        />
    <TextView
        android:layout_width="120dp"
        android:layout_height="120dp"
        android:background="#ffff00"
        android:layout_gravity="center"
        />
    <TextView
        android:layout_width="80dp"
        android:layout_height="80dp"
        android:background="#8000EE"
        android:layout_gravity="center"
        />
    <TextView
        android:layout_width="40dp"
        android:layout_height="40dp"
        android:background="#ffffff"
        android:layout_gravity="center"
        />
</FrameLayout>
運行結果
01.23 TableLayout(表格布局)
根節點<TableLayout/>的子節點寬為匹配父元素,高為包裹內容
<TableRow/>節點的子節點寬為包裹內容,高為包裹內容,每個<TableRow/>節點是一行,它的每個子節點是一列
表格布局中的節點可以不設置寬高,因為設置了也無效,以上默認屬性無法修改
根節點中可以設置以下屬性,表示讓第1列拉伸填滿屏幕寬度的剩余空間
android:stretchColumns="1"
直接指定組件的x、y坐標(基本不適用)
android:layout_x="144dp"
android:layout_y="154dp
 Android學習指南之二十三:Drawable及其相關類的使用
對於任何軟件來說,美觀的界面都是用戶體驗的重要組成部分,它能提高整個軟件的品質
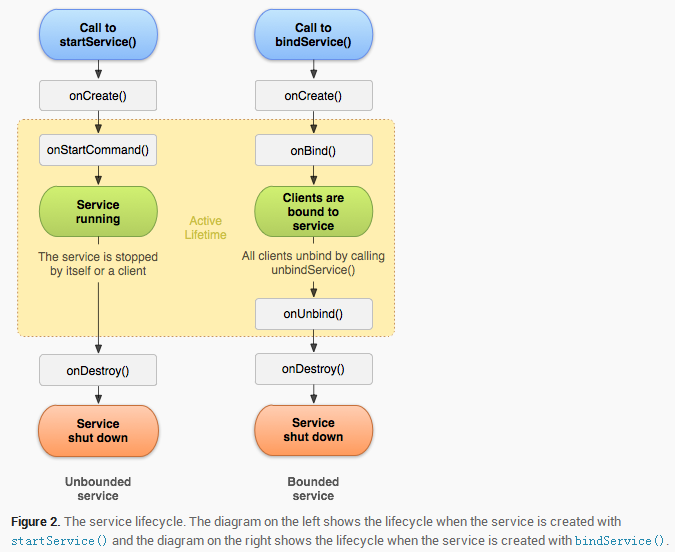 Android 面試題--Service,android--service
Android 面試題--Service,android--service1、Service 是否在 main thread 中執行, service 裡面是否能執行耗時
 git版本控制工具(二)----本地版本庫的常用操作,git----
git版本控制工具(二)----本地版本庫的常用操作,git----【正文】 在上一章節中,我們學習了關於Git最基本的用法,包括安裝Git、創建版本庫,以及提交本地代碼
 Android的系統體系結構,android體系結構
Android的系統體系結構,android體系結構目錄: Android的系統體系結構 在入門了一個簡單的Android的Hello World以後,我