編輯:關於android開發
Android開發過程中,經常遇到一個項目需要重復的定義相同樣式的標題欄,Android相繼推出了actionBar, toolBar, 相信有用到的朋友也會遇到一些不如意的時候,比如標題欄居中時,需要自定義xml文件給toolBar等,不了解actionBar,toolBar的可以去找相應的文章了解,這裡介紹自定義titleBar滿足國內主題風格樣式的情況。
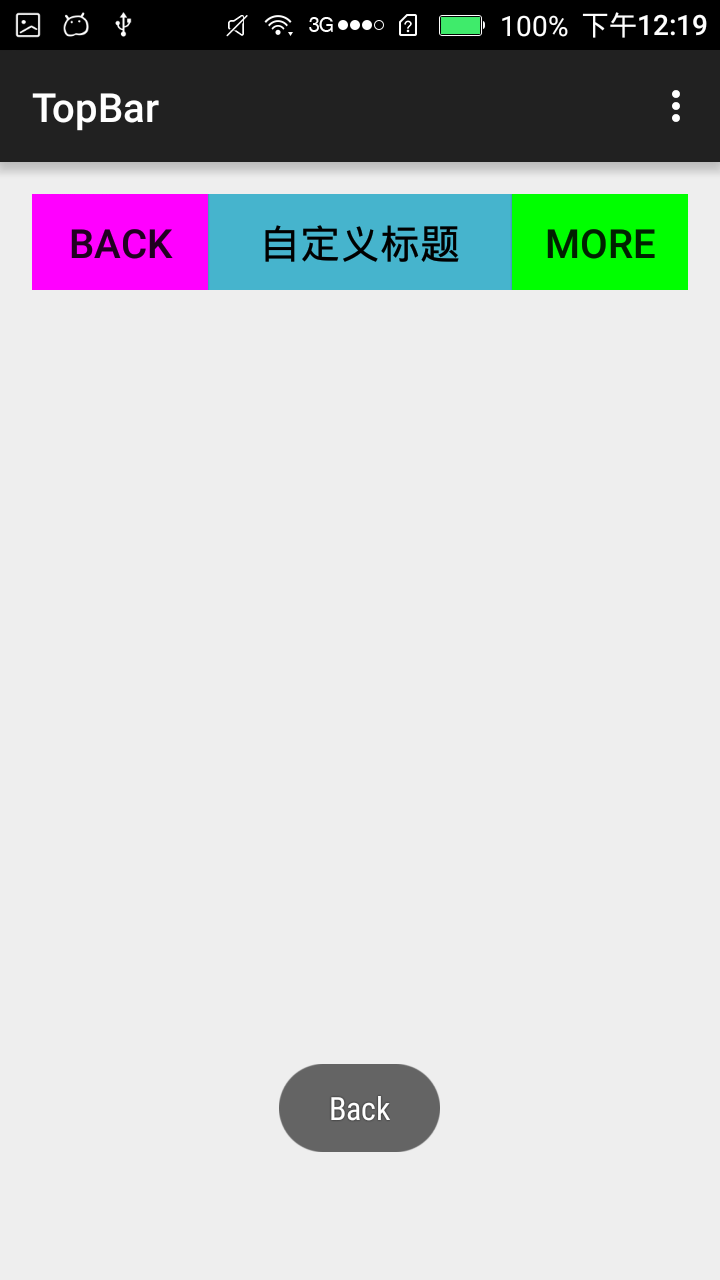
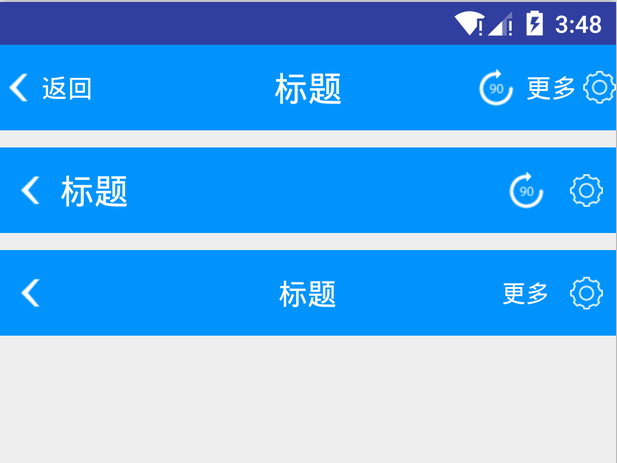
為了提前看到效果,先上效果圖:
前期准備
1.為標題欄titleView預定義id,在values下的ids.xml中
 1 <?xml version="1.0" encoding="utf-8"?>
 2 <resources>
 3
 4     <item name="tv_title_name" type="id"/>
 5     <item name="tv_left_text" type="id"/>
 6     <item name="iv_left_image" type="id"/>
 7     <item name="iv_right_image" type="id"/>
 8     <item name="iv_right_image_two" type="id"/>
 9     <item name="tv_right_text" type="id"/>
10     <item name="tv_right_text_two" type="id"/>
11
12 </resources>
這裡可以看到定義了左側返回按鈕id,標題id,後側按鈕id,左側分兩種情況:ImageView/TextView,右側可以同時存在兩個按鈕,圖片按鈕、文字按鈕組合。
2.自定義標題欄屬性,在valuse下的attr.xml中
 1 <?xml version="1.0" encoding="utf-8"?>
 2 <resources>
 3     <!-- 標題屬性 -->
 4     <declare-styleable name="TitleAttr">
 5         <attr name="title_name" format="reference|string"/>
 6         <attr name="title_text_color" format="reference|color"/>
 7         <attr name="title_drawable_right" format="reference"/>
 8         <attr name="title_drawable_left" format="reference"/>
 9         <attr name="title_text_size" format="reference|dimension"/>
10         <attr name="left_text" format="reference|string"/>
11         <attr name="left_image" format="reference"/>
12         <attr name="small_text_size" format="reference|dimension"/>
13         <attr name="title_gravity">
14             <enum name="left" value="3"/>
15             <enum name="center" value="17"/>
16             <enum name="right" value="5"/>
17         </attr>
18         <attr name="right_image" format="reference"/>
19         <attr name="right_text" format="reference|string"/>
20         <attr name="right_image_two" format="reference"/>
21         <attr name="right_text_two" format="reference|string"/>
22         <attr name="title_height" format="dimension"/>
23         <attr name="right_text_drawable_right" format="reference"/>
24         <attr name="right_text_drawable_left" format="reference"/>
25         <attr name="right_text_two_drawable_right" format="reference"/>
26         <attr name="right_text_two_drawable_left" format="reference"/>
27         <attr name="left_text_drawable_right" format="reference"/>
28         <attr name="left_text_drawable_left" format="reference"/>
29     </declare-styleable>
30 </resources>
 1     <com.jarek.library.TitleView
 2         android:id="@+id/title_main"
 3         android:layout_width="match_parent"
 4         android:background="#0093fe"
 5         title:title_name="標題"
 6         title:right_text="@string/more"
 7         title:title_text_color="@android:color/white"
 8         title:right_image_two="@mipmap/icon_crop_rotate"
 9         title:title_text_size="20sp"
10         title:small_text_size="15sp"
11         title:left_text="返回"
12         title:left_text_drawable_left="@mipmap/back_normal"
13         title:right_text_drawable_right="@mipmap/bar_button_right"
14         android:layout_height="50dp"/>
這裡的title標簽就是我們自定義,首先創建一個類繼承自RelativeLayout,這裡選擇RelativeLayout作為父類容器,目的在於RelativeLayout便於控制相對位置。
首先我們要獲得TypedArray對象,所有自定義屬性的值通過它來獲取:
TypedArray typeArray = context.obtainStyledAttributes(attrs, R.styleable.TitleAttr);
得到了typedArray對象後,就可以開始添加按鈕到容器中了,首先看看左邊第一個返回按鈕如果添加上去,先看代碼:
 int leftText =  typeArray.getResourceId(R.styleable.TitleAttr_left_text, 0);
  CharSequence charSequence =  leftText > 0 ? typeArray.getResources().getText(leftText) : typeArray.getString(R.styleable.TitleAttr_left_text);
這裡left_text就是自定義屬性,表明是左側TextView顯示的文字,文字可以是應用資源文件裡的預定義string,也可以是直接輸入文字,取到對應的styleable後,首先判斷是否大於0,大於0表示是定義在string中的,通過typeArray.getResources().getText()獲取值,等於0就直接取值,表示可能是通過直接賦值的方式給值的。取到值後怎麼賦值給TextView,這裡需要首先給他寬高,這是所有控件都需要的
/**
 * layout params of RelativeLayout
 * @return LayoutParams
 */
private LayoutParams initLayoutParams () {
        return new LayoutParams(LayoutParams.WRAP_CONTENT,   LayoutParams.MATCH_PARENT);
    }
我們單獨寫一個方法,後續就可以直接通過
LayoutParams params = initLayoutParams();
來獲取預設寬高值了,這裡可以看到都是高度填充父控件,寬度是自適應。然後就是new一個TextView了:
/**
     * create TextView
     * @param context Context
     * @param id the id of TextView
     * @param charSequence text to show
     * @param params relative params
     * @return the TextView which is inited
     */
    @NonNull
    private TextView createTextView(Context context, int id, CharSequence charSequence, LayoutParams params) {
        TextView textView = new TextView(context);
        textView.setLayoutParams(params);
        textView.setGravity(Gravity.CENTER);
        textView.setId(id);
        textView.setMinWidth((int)getPixelSizeByDp(minViewWidth));
        textView.setText(charSequence);
        return textView;
    }
這裡可以看到我們傳入了預設的id值,需要顯示的內容,以及上面給定的LayoutParams 。創建好TextView後還可以設置TextView的Drawable,通過自定義屬性left_text_drawable_right,left_text_drawable_left設置,這裡是設置了左右,上下對應的可以設置:
    /**
     * drawable of TextView
     * @param typeArray TypedArray
     * @param leftDrawableStyleable leftDrawableStyleable
     * @param rightDrawableStyleable rightDrawableStyleable
     * @param textView which TextView to set
     */
    private void setTextViewDrawable(TypedArray typeArray, int leftDrawableStyleable, int rightDrawableStyleable, TextView textView) {
        int leftDrawable = typeArray.getResourceId(leftDrawableStyleable, 0);
        int rightDrawable = typeArray.getResourceId(rightDrawableStyleable, 0);
        textView.setCompoundDrawablePadding((int)getPixelSizeByDp(drawablePadding));
        textView.setCompoundDrawablesWithIntrinsicBounds(leftDrawable, 0, rightDrawable, 0);

    }
這裡也是抽取了一個方法出來,然後通過:
setTextViewDrawable(typeArray, R.styleable.TitleAttr_left_text_drawable_left, R.styleable.TitleAttr_left_text_drawable_right, mLeftBackTextTv);
即可給指定的TextView設置drawable了。創建好TextView後,前面提到我們用的是相對布局,需要指定位置規則:
params.addRule(RelativeLayout.ALIGN_PARENT_LEFT);
這裡居左顯示。同時還可以設置字體大小,通過自定義屬性:small_text_size(兩側文字大小),title_text_size(標題文字大小)來設置字體:
    /**
     * get the dimension pixel size from typeArray which is defined in attr
     * @param typeArray TypedArray
     * @param stylable stylable
     * @param defaultSize defaultSize
     * @return the dimension pixel size
     */
    private float getDimensionPixelSize(TypedArray typeArray, int stylable, int defaultSize) {
        int sizeStyleable = typeArray.getResourceId(stylable, 0);
        return sizeStyleable > 0 ? typeArray.getResources().getDimensionPixelSize(sizeStyleable) : typeArray.getDimensionPixelSize(stylable, (int)getPiselSizeBySp(defaultSize));
    }
一樣,這裡也是單獨寫一個方法來做,TypedArray的用法就不多講了,可以查看其它文章了解。然後通過如下設置字體大小:
     float textSize = getDimensionPixelSize(typeArray, R.styleable.TitleAttr_small_text_size, defaultSmallTextSize);
        mLeftBackTextTv.setTextSize(TypedValue.COMPLEX_UNIT_PX, textSize);
文字顏色,同樣的道理:
    /**
     * get textColor
     * @param typeArray TypedArray
     * @return textColor
     */
    private int getTextColorFromAttr (TypedArray typeArray) {
        int textColorStyleable = typeArray.getResourceId(R.styleable.TitleAttr_title_text_color, 0);
        if (textColorStyleable > 0) {
            return typeArray.getResources().getColor(textColorStyleable);
        } else {
            return typeArray.getColor(R.styleable.TitleAttr_title_text_color, textColor);
        }

    }
然後調用方法設置顏色:
mLeftBackTextTv.setTextColor(getTextColorFromAttr(typeArray));
到這裡為止,左側的第一個文字按鈕。或者文字帶圖片的按鈕就創建好了,最後就差一步了:
mLeftBackTextTv.setTextColor(getTextColorFromAttr(typeArray));
其它按鈕,同樣的道理,可以依次添加到容器中,就不多講了,到此為止我們需要的titleView就創建好了,以後使用就可以直接調用了,不需要每個地方去重復的coding
項目地址:github源碼下載
 Android 手機衛士--自定義控件(獲取焦點的TextView),androidtextview
Android 手機衛士--自定義控件(獲取焦點的TextView),androidtextview本文地址:http://www.cnblogs.com/wuyudon
 全新的手勢,側滑返回、全局右滑返回都OUT啦!,全局out
全新的手勢,側滑返回、全局右滑返回都OUT啦!,全局out前言 Android快速開發框架-ZBLibrary 最近將以前的 全局右滑返回 手勢功能改成了 底部左右滑動手
 手機安全衛士——閃屏頁相關處理,手機安全衛士
手機安全衛士——閃屏頁相關處理,手機安全衛士根據功能模塊劃分(Android開發推薦此方法) - Activity mo
 Android中Service的一個Demo例子
Android中Service的一個Demo例子 Android中Service的一個Demo例子 Service組件是Android系統重要的一部分,網上看了代碼,很簡