編輯:關於android開發
一 概念
SharedPreferences存儲方式是Android中存儲輕量級數據的一種方式。SharedPreferences存儲主要用來存儲一些簡單的配置信息,內部以Map方式進行存儲,因此需要使用鍵值對提交和保存數據,保存的數據以xml格式存放在本地的/data/data/<package name>/shares_prefs文件夾下。
二 特點
1, 使用簡單,便於存儲輕量級的數據;
2, 只支持Java基本數據類型,不支持自定義數據類型;
3, SharedPreferences是單例對象,在整個應用內數據共享,無法在其他應用內共享數據;
三 注意事項
1, SharedPreferences創建的時候使用的文件名不同,得到的對象不同,在存儲位置會創建多個xml文件,不同文件名的SharedPreferences的數據不會共享;創建時采用相同的文件名,得到多個SharedPreferences引用,此時這多個引用共享同一個xml文件,它們操作的數據為相同的數據;
2, 針對數據的增刪改查操作只有在提交後操作才能生效,此步驟最容易被忽略,當執行了對數據的操作後得不到需要的效果時,請查看是否沒有提交操作。
3, 三種創建模式中最好采用MODE_PRIVATE,使用其他兩種模式創建容易引起安全問題,就算采用MODE_PRIVATE,當別人活得root權限後也可能洩露用戶的重要信息,因此建議使用SharedPreferences時,如果要存儲用戶名和密碼時,不要明文存儲,應該使用加密存儲,防止重要隱私洩露,引起損失。
四 使用
1, 獲得SharedPreferences對象
SharedPreferences對象必須使用上下文獲得,使用時注意先要獲得上下文。獲得SharedPreferences對象方法為:
SharedPreferences sharedPreferences = getSharedPreferences(參數一, 參數二);
參數一為要保存的xml文件名,不同的文件名產生的對象不同,但同一文件名可以產生多個引用,從而可以保證數據共享。此處注意指定參數一時,不用加xml後綴,由系統自動添加。
參數二為創建模式,共有三個值:
MODE_PRIVATE
MODE_WORLD_READABLE
MODE_WORLD_WRITEABLE
第一個值使得SharedPreferences存儲的數據只能在本應用內獲得,第二個和第三個值分別使得其他應用可以讀和讀寫本應用SharedPreferences存儲的數據。由此可能帶來安全問題,請參考本文二(3)部分。
2, 獲得editor對象
使用以上獲得的SharedPreferences對象產生editor,方法為:
Editor editor = sharedPreferences.edit();
3, 對數據實現增刪改查
添加數據使用以下方法:
editor.putString(key, value);
可以實現數據的更新只需添加同鍵的鍵值對,和操作Map集合一樣。
刪除數據:
editor.remove(key);
刪除參數部分鍵的鍵值對。
查詢數據:
String result = sharedPreferences.getString(key1, key2);
Key1是要查詢的鍵,返回對應的值,當鍵不存在時,返回key2作為結果。
清空數據
editor.clear();
注意:無論是否同一個sharedPreferences對象,若是產生多個editor,不同的editor之間對數據的操作不會相互影響,此處容易犯錯誤,例如,以下的程序:
sharedPreferences.edit().putString(key1, value1);
sharedPreferences.edit().putString(key2, value2);
sharedPreferences.edit().putString(key3, value3);
sharedPreferences.edit().commit();
執行後這種方式無法存儲,因為sp.edit()每次都會返回一個新的Editor對象,Editor的實現類EditorImpl裡面會有一個緩存的Map,最後commit的時候先將緩存裡面的Map寫入內存中的Map,然後將內存中的Map寫進XML文件中。使用上面的方式commit,由於sp.edit()又重新返回了一個新的Editor對象,緩存中的Map是空的,所以導致數據無法被存儲。這裡即需要注意,只有提交時,不同的editor無法完成既定的任務。而增加,刪除,更新,查詢,若是同一個sharedPreferences產生的editor,則對共享的數據有效,會按照既定的順序工作。而不同sharedPreferences產生的editor則因為處理的xml文件不同而不能共享數據。
再次強調:所有使用editor操作的數據,必須經過同一個editor提交即commit後才能生效。
五 Android實例
以下使用Android實例完成以上內容的驗證:
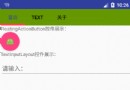
1, Activity界面和功能
(以下描述控件的順序是布局中的由上到下)
保存數據功能:在第一個EditText中寫入要保存的鍵,在第二個EditText中寫入要保存對應鍵的值,點擊第一個按鈕則保存數據;
查詢數據功能:在第三個EditText中寫入要查詢的鍵,點擊第二個按鈕查詢數據,查詢出的值顯示在第一個TextView中;
刪除數據功能:在第四個EditText中寫入要刪除的鍵,點擊第三個按鈕則刪除鍵和值;
清空數據功能:點擊第四個按鈕則清空與editor對應的xml文件中的所有數據,但不會影響其他xml文件。
2, 主要代碼
①MainActivity.java
package com.example.sharedpreferences;

import android.os.Bundle;
import android.app.Activity;
import android.content.SharedPreferences;
import android.content.SharedPreferences.Editor;
import android.text.Editable;
import android.view.Menu;
import android.view.View;
import android.widget.EditText;
import android.widget.TextView;

public class MainActivity extends Activity {

    private EditText et_key;
    private EditText et_value;
    private EditText et_query;
    private SharedPreferences sharedPreferences;
    private TextView tv_query;
    private EditText et_delete;
    private Editor editor;

    @Override
    protected void onCreate(Bundle savedInstanceState) {
        super.onCreate(savedInstanceState);
        setContentView(R.layout.activity_main);

        sharedPreferences = getSharedPreferences("info2", MODE_PRIVATE);
        editor = sharedPreferences.edit();

        et_key = (EditText) findViewById(R.id.et_key);
        et_value = (EditText) findViewById(R.id.et_value);
        et_query = (EditText) findViewById(R.id.et_query);
        tv_query = (TextView) findViewById(R.id.tv_content);
        et_delete = (EditText) findViewById(R.id.et_delete);
    }

    public void insert(View v) {
        //獲取鍵值數據
        String key = et_key.getText().toString().trim();
        String value = et_value.getText().toString().trim();

        //使用editor保存數據
        editor.putString(key, value);

        //注意一定要提交數據,此步驟容易忘記
        editor.commit();

    }
    public void query(View v) {

        //獲得查詢的鍵
        String query_text = et_query.getText().toString().trim();

        //使用SharedPreferences查詢數據
        String result = sharedPreferences.getString(query_text, null);

        if(result == null) {
            tv_query.setText("您查詢的數據不存在");
        }else {
            tv_query.setText(result);
        }
    }

    public void delete(View v) {

        //獲得刪除的鍵
        String delete = et_delete.getText().toString().trim();
        //使用editor刪除數據
        editor.remove(delete);
        //一定要提交,該步驟非常容易忽略
        editor.commit();
    }

    public void clear(View v) {

        //使用editor清空數據
        editor.clear();
        //一定要提交,該步驟非常容易忽略
        editor.commit();
    }

}
②activity_main.xml
<LinearLayout xmlns:android="http://schemas.android.com/apk/res/android"
    xmlns:tools="http://schemas.android.com/tools"
    android:layout_width="match_parent"
    android:layout_height="match_parent"
    android:paddingBottom="@dimen/activity_vertical_margin"
    android:paddingLeft="@dimen/activity_horizontal_margin"
    android:paddingRight="@dimen/activity_horizontal_margin"
    android:paddingTop="@dimen/activity_vertical_margin"
    android:orientation="vertical"
    tools:context=".MainActivity" >

    <EditText
        android:id="@+id/et_key"
        android:layout_width="match_parent"
        android:layout_height="wrap_content"
        android:hint="@string/text_key" />

    <EditText
        android:id="@+id/et_value"
        android:layout_width="match_parent"
        android:layout_height="wrap_content"
        android:hint="@string/text_value" />


    <Button
       android:id="@+id/bt_insert"
       android:layout_width="wrap_content"
       android:layout_height="wrap_content"
       android:layout_gravity="right"
       android:onClick="insert"
       android:text="@string/text_insert" />

    <EditText
       android:id="@+id/et_query"
       android:layout_width="match_parent"
       android:layout_height="wrap_content"
       android:hint="@string/text_et_value" />

    <Button
       android:id="@+id/bt_query"
       android:layout_width="wrap_content"
       android:layout_height="wrap_content"
       android:layout_gravity="right"
       android:onClick="query"
       android:layout_marginLeft="88dp"
       android:text="@string/text_bt_query" />

    <TextView
        android:id="@+id/tv_content"
        android:layout_width="match_parent"
        android:layout_height="wrap_content"
        android:hint="@string/text_tv_query"
        android:textSize="20sp"
        />

    <Button
        android:id="@+id/bt_delete"
        android:layout_width="wrap_content"
        android:layout_height="wrap_content"
        android:text="@string/text_bt_delete"
        android:layout_gravity="right"
        android:onClick="delete"
        />

    <EditText
        android:id="@+id/et_delete"
        android:layout_width="match_parent"
        android:layout_height="wrap_content"
        android:hint="@string/text_et_delete" />

    <Button
        android:id="@+id/bt_clear"
        android:layout_width="wrap_content"
        android:layout_height="wrap_content"
        android:text="@string/text_bt_clear"
        android:layout_gravity="right"
        android:onClick="clear"
        />

</LinearLayout>
 ViewPager之Fragment頁面切換,viewpager頁面切換
ViewPager之Fragment頁面切換,viewpager頁面切換一、概述 ViewPager是android-support-v4中提供的類,它是一個容器類,常用
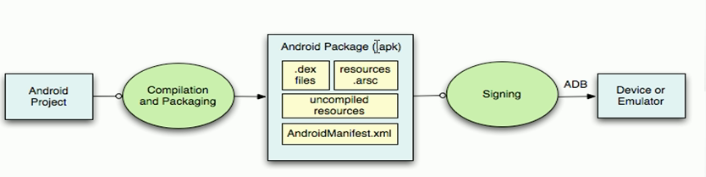 Android開發學習——應用安裝過程,android開發
Android開發學習——應用安裝過程,android開發 首先一個android項目,然後編譯和打包,將.java文件編譯為.class,.class編譯為.dex,將
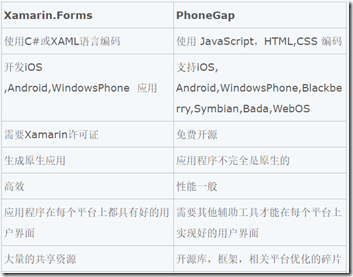 跨平台開發的兩種方法及其對比,兩種方法
跨平台開發的兩種方法及其對比,兩種方法為什麼移動應用開發對很多開發人員來說,都是一件令人頭痛的事?這是因為,每種流行的移動平台都具有自身的開發語言、開發工具及其特征。 這
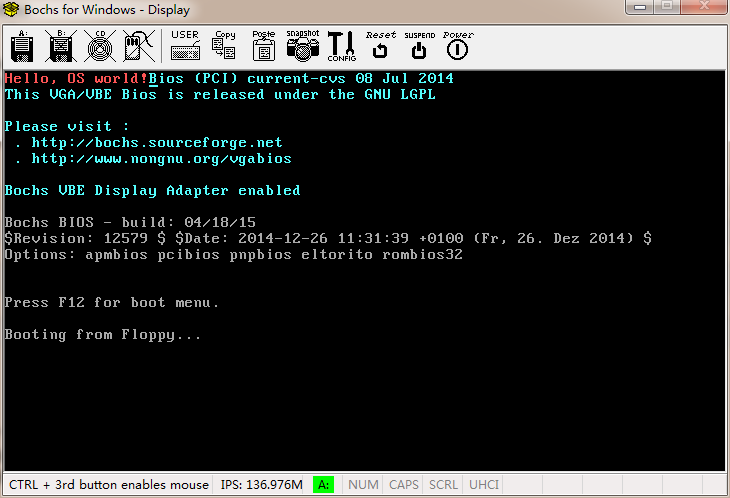 Linux內核系列—操作系統開發之HelloWorld,linuxhelloworld
Linux內核系列—操作系統開發之HelloWorld,linuxhelloworld org 07c00h ;偽指令,告訴編譯器程序會被加載到7c00處