編輯:關於android開發
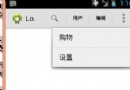
概覽屏幕(也稱為最新動態屏幕、最近任務列表或最近使用的應用)是一個系統級別 UI,其中列出了最近訪問過的 Activity 和任務。 用戶可以浏覽該列表並選擇要恢復的任務,也可以通過滑動清除任務將其從列表中移除。 對於 Android 5.0 版本(API 級別 21),包含不同文檔的同一 Activity 的多個實例可能會以任務的形式顯示在概覽屏幕中。前邊是文檔中說的,比較虛,下面來一個gif你就懂啦。

可以看到左邊的任務視圖是兩個重疊在一塊的,這也就是概覽屏幕。
通常,您應該允許系統定義任務和 Activity 在概覽屏幕中的顯示方法,並且無需修改此行為。不過,應用可以確定 Activity 在概覽屏幕中的顯示方式和時間。 您可以使用 ActivityManager.AppTask 類來管理任務,使用 Intent 類的 Activity 標志來指定某 Activity 添加到概覽屏幕或從中移除的時間。 此外,您也可以使用 <activity> 屬性在清單文件中設置該行為。
通過使用 Intent 類的標志添加任務,您可以更好地控制某文檔在概覽屏幕中打開或重新打開的時間和方式。 使用 <activity> 屬性時,您可以選擇始終在新任務中打開文檔,或選擇對文檔重復使用現有任務。
為 Activity 創建新文檔時,可調用 ActivityManager.AppTask 類的 startActivity() 方法,以向其傳遞啟動 Activity 的 Intent。 要插入邏輯換行符以便系統將 Activity 視為新任務顯示在概覽屏幕中,可在啟動 Activity 的 Intent 的 addFlags() 方法中傳遞 FLAG_ACTIVITY_NEW_DOCUMENT 標志。
注:FLAG_ACTIVITY_NEW_DOCUMENT 標志取代了 FLAG_ACTIVITY_CLEAR_WHEN_TASK_RESET 標志,後者自 Android 5.0(API 級別 21)起已棄用。
如果在創建新文檔時設置 FLAG_ACTIVITY_MULTIPLE_TASK 標志,則系統始終會以目標 Activity 作為根創建新任務。此設置允許同一文檔在多個任務中打開。以下代碼演示了主 Activity 如何執行此操作:
public void createNewDocument(View view) {
      final Intent newDocumentIntent = newDocumentIntent();
      if (useMultipleTasks) {
          newDocumentIntent.addFlags(Intent.FLAG_ACTIVITY_MULTIPLE_TASK);
      }
      startActivity(newDocumentIntent);
  }

  private Intent newDocumentIntent() {
      boolean useMultipleTasks = mCheckbox.isChecked();
      final Intent newDocumentIntent = new Intent(this, NewDocumentActivity.class);
      newDocumentIntent.addFlags(Intent.FLAG_ACTIVITY_NEW_DOCUMENT);
      newDocumentIntent.putExtra(KEY_EXTRA_NEW_DOCUMENT_COUNTER, incrementAndGet());
      return newDocumentIntent;
  }

  private static int incrementAndGet() {
      Log.d(TAG, "incrementAndGet(): " + mDocumentCounter);
      return mDocumentCounter++;
  }
}
注:使用 FLAG_ACTIVITY_NEW_DOCUMENT 標志啟動的 Activity 必須具有在清單文件中設置的 android:launchMode="standard" 屬性值(默認)。
當主 Activity 啟動新 Activity 時,系統會搜遍現有任務,看看是否有任務的 Intent 與 Activity 的 Intent 組件名稱和 Intent 數據相匹配。 如果未找到任務或者 Intent 包含 FLAG_ACTIVITY_MULTIPLE_TASK 標志,則會以該 Activity 作為其根創建新任務。如果找到的話,則會將該任務轉到前台並將新 Intent 傳遞給 onNewIntent()。新 Activity 將獲得 Intent 並在概覽屏幕中創建新文檔,如下例所示:
@Override
protected void onCreate(Bundle savedInstanceState) {
    super.onCreate(savedInstanceState);
    setContentView(R.layout.activity_new_document);
    mDocumentCount = getIntent()
            .getIntExtra(DocumentCentricActivity.KEY_EXTRA_NEW_DOCUMENT_COUNTER, 0);
    mDocumentCounterTextView = (TextView) findViewById(
            R.id.hello_new_document_text_view);
    setDocumentCounterText(R.string.hello_new_document_counter);
}

@Override
protected void onNewIntent(Intent intent) {
    super.onNewIntent(intent);
    /* If FLAG_ACTIVITY_MULTIPLE_TASK has not been used, this activity
    is reused to create a new document.
     */
    setDocumentCounterText(R.string.reusing_document_counter);
}
此外,Activity 還可以在其清單文件中指定始終通過使用 <activity> 屬性 android:documentLaunchMode 進入新任務。 此屬性有四個值,會在用戶使用該應用打開文檔時產生以下效果:
intoExisting"FLAG_ACTIVITY_MULTIPLE_TASK 標志、但設置 FLAG_ACTIVITY_NEW_DOCUMENT 標志所產生的效果相同,如上文的使用 Intent 標志添加任務中所述。always"FLAG_ACTIVITY_NEW_DOCUMENT 和 FLAG_ACTIVITY_MULTIPLE_TASK標志所產生的效果相同。none”"never"FLAG_ACTIVITY_NEW_DOCUMENT 和 FLAG_ACTIVITY_MULTIPLE_TASK 標志的行為(如果在 Intent 中設置了其中一個標志),並且概覽屏幕將為應用顯示單個任務,該任務將從用戶上次調用的任意 Activity 開始繼續執行。注:對於除 none 和 never 以外的值,必須使用 launchMode="standard" 定義 Activity。如果未指定此屬性,則使用 documentLaunchMode="none"。
默認情況下,在 Activity 結束後,文檔任務會從概覽屏幕中自動移除。 您可以使用 ActivityManager.AppTask 類、Intent 標志或 <activity> 屬性替代此行為。
通過將 <activity> 屬性 android:excludeFromRecents 設置為 true,您可以始終將任務從概覽屏幕中完全排除。
您可以通過將 <activity> 屬性 android:maxRecents 設置為整型值,設置應用能夠包括在概覽屏幕中的最大任務數。默認值為 16。達到最大任務數後,最近最少使用的任務將從概覽屏幕中移除。 android:maxRecents 的最大值為 50(內存不足的設備上為 25);小於 1 的值無效。
在於概覽屏幕創建新任務的 Activity 中,您可以通過調用 finishAndRemoveTask() 方法指定何時移除該任務以及結束所有與之相關的 Activity。
private Intent newDocumentIntent() {
    final Intent newDocumentIntent = new Intent(this, NewDocumentActivity.class);
    newDocumentIntent.addFlags(Intent.FLAG_ACTIVITY_NEW_DOCUMENT |
      android.content.Intent.FLAG_ACTIVITY_RETAIN_IN_RECENTS);
    newDocumentIntent.putExtra(KEY_EXTRA_NEW_DOCUMENT_COUNTER, incrementAndGet());
    return newDocumentIntent;
}
要達到同樣的效果,請將 <activity> 屬性 android:autoRemoveFromRecents 設置為 false。文檔 Activity 的默認值為 true,常規 Activity 的默認值為 false。如前所述,使用此屬性替代 FLAG_ACTIVITY_RETAIN_IN_RECENTS 標志。
1.DocumentCentricActivity.java:
package com.example.documentcentricapps;

import android.app.Activity;
import android.content.Intent;
import android.os.Build;
import android.os.Bundle;
import android.os.PersistableBundle;
import android.util.Log;
import android.view.View;
import android.widget.CheckBox;

public class DocumentCentricActivity extends Activity {

    private final static String TAG = "DocumentCentricActivity";

    public final static String KEY_EXTRA_NEW_DOCUMENT_COUNTER = "KEY_EXTRA_NEW_DOCUMENT_COUNTER";

    private static int mDocumentCounter = 0;

    private CheckBox mCheckbox;

    @Override
    protected void onCreate(Bundle savedInstanceState) {
        super.onCreate(savedInstanceState);
        setContentView(R.layout.activity_document_centric_main);
        mCheckbox = (CheckBox) findViewById(R.id.multiple_task_checkbox);
    }

    @Override
    public void onPostCreate(Bundle savedInstanceState, PersistableBundle persistentState) {
        super.onPostCreate(savedInstanceState, persistentState);
        // Restore state from PersistableBundle
        if (persistentState != null) {
            if (Build.VERSION.SDK_INT >= Build.VERSION_CODES.LOLLIPOP) {
                mDocumentCounter = persistentState.getInt(KEY_EXTRA_NEW_DOCUMENT_COUNTER);
            }
        }
    }

    @Override
    public void onSaveInstanceState(Bundle outState, PersistableBundle outPersistentState) {
        /*
        To maintain activity state across reboots the system saves and restore critical information for
        all tasks and their activities. Information known by the system includes the activity stack order,
        each task’s thumbnails and each activity’s and task's Intents. For Information that cannot be retained
        because they contain Bundles which can’t be persisted a new constrained version of Bundle,
        PersistableBundle is added. PersistableBundle can store only basic data types. To use it
        in your Activities you must declare the new activity:persistableMode attribute in the manifest.
         */
        if (Build.VERSION.SDK_INT >= Build.VERSION_CODES.LOLLIPOP) {
            outPersistentState.putInt(KEY_EXTRA_NEW_DOCUMENT_COUNTER, mDocumentCounter);
        }
        super.onSaveInstanceState(outState, outPersistentState);
    }

    public void createNewDocument(View view) {
        boolean useMultipleTasks = mCheckbox.isChecked();
        final Intent newDocumentIntent = newDocumentIntent();
        if (useMultipleTasks) {
            /*
            When {@linkIntent#FLAG_ACTIVITY_NEW_DOCUMENT} is used with {@link Intent#FLAG_ACTIVITY_MULTIPLE_TASK}
            the system will always create a new task with the target activity as the root. This allows the same
            document to be opened in more than one task.
             */
            newDocumentIntent.addFlags(Intent.FLAG_ACTIVITY_MULTIPLE_TASK);
        }
        startActivity(newDocumentIntent);
    }


    /**
     * Returns an new {@link Intent} to start {@link NewDocumentActivity} as a new document in
     * overview menu.
     *
     * To start a new document task {@link Intent#FLAG_ACTIVITY_NEW_DOCUMENT} must be used. The
     * system will search through existing tasks for one whose Intent matches the Intent component
     * name and the Intent data. If it finds one then that task will be brought to the front and the
     * new Intent will be passed to onNewIntent().
     *
     * Activities launched with the NEW_DOCUMENT flag must be created with launchMode="standard".
     */
    private Intent newDocumentIntent() {
        final Intent newDocumentIntent = new Intent(this, NewDocumentActivity.class);
        newDocumentIntent.addFlags(Intent.FLAG_ACTIVITY_NEW_DOCUMENT);
        newDocumentIntent.putExtra(KEY_EXTRA_NEW_DOCUMENT_COUNTER, incrementAndGet());
        return newDocumentIntent;
    }

    private static int incrementAndGet() {
        Log.d(TAG, "incrementAndGet(): " + mDocumentCounter);
        return mDocumentCounter++;
    }

}
2.NewDocumentActivity.java:
public class NewDocumentActivity extends Activity {

    private TextView mDocumentCounterTextView;
    private int mDocumentCount;

    @Override
    protected void onCreate(Bundle savedInstanceState) {
        super.onCreate(savedInstanceState);
        setContentView(R.layout.activity_new_document);
        mDocumentCount = getIntent()
                .getIntExtra(DocumentCentricActivity.KEY_EXTRA_NEW_DOCUMENT_COUNTER, 0);
        mDocumentCounterTextView = (TextView) findViewById(
                R.id.hello_new_document_text_view);
        setDocumentCounterText(R.string.hello_new_document_counter);
    }

    @Override
    protected void onNewIntent(Intent intent) {
        super.onNewIntent(intent);
        /* If {@link Intent#FLAG_ACTIVITY_MULTIPLE_TASK} has not been used this Activity
        will be reused.
         */
        setDocumentCounterText(R.string.reusing_document_counter);
    }

    public void onRemoveFromOverview(View view) {
        // It is good pratice to remove a document from the overview stack if not needed anymore.
        if (Build.VERSION.SDK_INT >= Build.VERSION_CODES.LOLLIPOP) {
            finishAndRemoveTask();
        }
    }

    public void setDocumentCounterText(int resId) {
        mDocumentCounterTextView
                .setText(String.format(getString(resId), String.valueOf(mDocumentCount)));
    }

}
上邊只是主要的代碼,完整的demo下載:http://download.csdn.net/detail/jycboy/9715602
轉發請注明出處:http://www.cnblogs.com/jycboy/p/overview_screen.html
 SlidePictures,男同網pictures
SlidePictures,男同網pictures package com.example.SlidePictures; import java.util
 神彩彩票系統門戶版安卓手機端客戶端源碼,安卓源碼
神彩彩票系統門戶版安卓手機端客戶端源碼,安卓源碼 軟件版本:V2.0軟件大小:25MB軟件類型:簡體中文/國產軟件/免費版軟件分類:源碼、java&nb
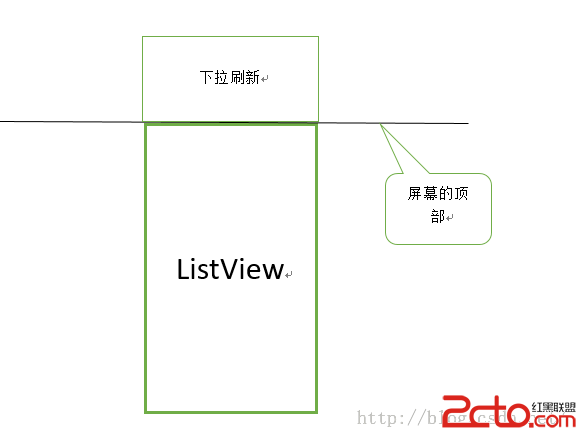 Android下拉刷新上拉加載更多的擴展ListView
Android下拉刷新上拉加載更多的擴展ListView 下拉刷新上拉加載更多的擴展ListView 在很多APP我們都能看到,在一個列表上面,將手指往屏幕下面滑動,
 [android] 標題部分管理,android標題
[android] 標題部分管理,android標題 1.1 普通標題 1.1.1 標題內容管理 1.1.2 幫助和返回的按鈕 1.2 未登錄的標題 1.3