上一節講了Fragment與Activity的通信,本節將給大家演示Fragment的實例。
把條目添加到動作欄
你的fragment們可以向activity的菜單(按Manu鍵時出現的東西)添加項,同時也可向動作欄(界面中頂部的那個區域)添加條目,這都需通過實現方法onCreateOptionManu()來完成。
你從fragment添加到菜單的任何條目,都會出現在現有菜單項之後。Fragment之後可以通過方法onOptionsItemSelected()來響應自己的菜單項被選擇的事件。
你也可以在fragemnt中注冊一個view來提供快捷菜單(上下文菜單)。當用戶要打開快捷菜單時,fragment的onCreateContextMenu()方法會被調用。當用戶選擇其中一項時,fragemnt的onContextItemSelected()方法會被調用。
注:盡管你的fragment可以分別收到它所添加的菜單項的選中事件,但是activity才是第一個接收這些事件的家伙,只有當activity對某個事件置之不理時,fragment才能接收到這個事件,對於菜單和快捷菜單都是這樣。
下例中實驗了之前所講的所有內容。此例有一個activity,其含有兩個fragment。一個顯示莎士比亞劇的播放曲目,另一個顯示選中曲目的摘要。此例還演示了如何跟據屏幕大小配置fragment。
MainActivity:
Java代碼
- @Override
- protectedvoid onCreate(Bundle savedInstanceState) {
- super.onCreate(savedInstanceState);
-
- setContentView(R.layout.fragment_layout);
- }
Layout.xml:
XML/HTML代碼
- <LinearLayout xmlns:android="http://schemas.android.com/apk/res/android"
- android:orientation="horizontal"
- android:layout_width="match_parent" android:layout_height="match_parent">
- <fragment class="com.example.android.apis.app.FragmentLayout$TitlesFragment"
- android:id="@+id/titles" android:layout_weight="1"
- android:layout_width="0px" android:layout_height="match_parent" />
- <FrameLayout android:id="@+id/details" android:layout_weight="1"
- android:layout_width="0px" android:layout_height="match_parent"
- android:background="?android:attr/detailsElementBackground" />
- </LinearLayout>
系統在activity加載此layout時初始化TitlesFragment(用於顯示標題列表),TitlesFragment的右邊是一個FrameLayout,用於存放顯示摘要的fragment,但是現在它還是空的,fragment只有當用戶選擇了一項標題後,摘要fragment才會被放到FrameLayout中。
然而,並不是所有的屏幕都有足夠的寬度來容納標題列表和摘要。所以,上述layout只用於橫屏,現把它存放於ret/layout-land/fragment_layout.xml。
之外,當用於豎屏時,系統使用下面的layout,它存放於ret/layout/fragment_layout.xml:
XML/HTML代碼
- <FrameLayout xmlns:android="http://schemas.android.com/apk/res/android"
- android:layout_width="match_parent" android:layout_height="match_parent">
- <fragment class="com.example.android.apis.app.FragmentLayout$TitlesFragment"
- android:id="@+id/titles"
- android:layout_width="match_parent" android:layout_height="match_parent" />
- </FrameLayout>
這個layout只包含TitlesFragment。這表示當使用豎屏時,只顯示標題列表。當用戶選中一項時,程序會啟動一個新的activity去顯示摘要,而不是加載第二個fragment。
下一步,你會看到Fragment類的實現。第一個是TitlesFragment,它從ListFragment派生,大部分列表的功能由ListFragment提供。
當用戶選擇一個Title時,代碼需要做出兩種行為,一種是在同一個activity中顯示創建並顯示摘要fragment,另一種是啟動一個新的activity。
Java代碼
- public static class TitlesFragment extends ListFragment {
- boolean mDualPane;
- int mCurCheckPosition = 0;
-
- @Override
- public void onActivityCreated(Bundle savedInstanceState) {
- super.onActivityCreated(savedInstanceState);
-
- // Populate list with our static array of titles.
- setListAdapter(new ArrayAdapter<String>(getActivity(),
- android.R.layout.simple_list_item_activated_1, Shakespeare.TITLES));
-
- // Check to see if we have a frame in which to embed the details
- // fragment directly in the containing UI.
- View detailsFrame = getActivity().findViewById(R.id.details);
- mDualPane = detailsFrame != null && detailsFrame.getVisibility() == View.VISIBLE;
-
- if (savedInstanceState != null) {
- // Restore last state for checked position.
- mCurCheckPosition = savedInstanceState.getInt("curChoice", 0);
- }
-
- if (mDualPane) {
- // In dual-pane mode, the list view highlights the selected item.
- getListView().setChoiceMode(ListView.CHOICE_MODE_SINGLE);
- // Make sure our UI is in the correct state.
- showDetails(mCurCheckPosition);
- }
- }
-
- @Override
- public void onSaveInstanceState(Bundle outState) {
- super.onSaveInstanceState(outState);
- outState.putInt("curChoice", mCurCheckPosition);
- }
-
- @Override
- public void onListItemClick(ListView l, View v, int position, long id) {
- showDetails(position);
- }
-
- /**
- * Helper function to show the details of a selected item, either by
- * displaying a fragment in-place in the current UI, or starting a
- * whole new activity in which it is displayed.
- */
- void showDetails(int index) {
- mCurCheckPosition = index;
-
- if (mDualPane) {
- // We can display everything in-place with fragments, so update
- // the list to highlight the selected item and show the data.
- getListView().setItemChecked(index, true);
-
- // Check what fragment is currently shown, replace if needed.
- DetailsFragment details = (DetailsFragment)
- getFragmentManager().findFragmentById(R.id.details);
- if (details == null || details.getShownIndex() != index) {
- // Make new fragment to show this selection.
- details = DetailsFragment.newInstance(index);
-
- // Execute a transaction, replacing any existing fragment
- // with this one inside the frame.
- FragmentTransaction ft = getFragmentManager().beginTransaction();
- ft.replace(R.id.details, details);
- ft.setTransition(FragmentTransaction.TRANSIT_FRAGMENT_FADE);
- ft.commit();
- }
-
- } else {
- // Otherwise we need to launch a new activity to display
- // the dialog fragment with selected text.
- Intent intent = new Intent();
- intent.setClass(getActivity(), DetailsActivity.class);
- intent.putExtra("index", index);
- startActivity(intent);
- }
- }
第二個fragment,DetailsFragment顯示被選擇的Title的摘要:
Java代碼
- public static class DetailsFragment extends Fragment {
- /**
- * Create a new instance of DetailsFragment, initialized to
- * show the text at 'index'.
- */
- public static DetailsFragment newInstance(int index) {
- DetailsFragment f = new DetailsFragment();
-
- // Supply index input as an argument.
- Bundle args = new Bundle();
- args.putInt("index", index);
- f.setArguments(args);
-
- return f;
- }
-
- public int getShownIndex() {
- return getArguments().getInt("index", 0);
- }
-
- @Override
- public View onCreateView(LayoutInflater inflater, ViewGroup container,
- Bundle savedInstanceState) {
- if (container == null) {
- // We have different layouts, and in one of them this
- // fragment's containing frame doesn't exist. The fragment
- // may still be created from its saved state, but there is
- // no reason to try to create its view hierarchy because it
- // won't be displayed. Note this is not needed -- we could
- // just run the code below, where we would create and return
- // the view hierarchy; it would just never be used.
- return null;
- }
-
- ScrollView scroller = new ScrollView(getActivity());
- TextView text = new TextView(getActivity());
- int padding = (int)TypedValue.applyDimension(TypedValue.COMPLEX_UNIT_DIP,
- 4, getActivity().getResources().getDisplayMetrics());
- text.setPadding(padding, padding, padding, padding);
- scroller.addView(text);
- text.setText(Shakespeare.DIALOGUE[getShownIndex()]);
- return scroller;
- }
- }
如果當前的layout沒有R.id.detailsView(它被用於DetailsFragment的容器),那麼程序就啟動DetailsActivity來顯示摘要。
下面是DetailsActivity,它只是簡單地嵌入DetailsFragment來顯示摘要。
Java代碼
- public static class DetailsActivity extends Activity {
-
- @Override
- protected void onCreate(Bundle savedInstanceState) {
- super.onCreate(savedInstanceState);
-
- if (getResources().getConfiguration().orientation
- == Configuration.ORIENTATION_LANDSCAPE) {
- // If the screen is now in landscape mode, we can show the
- // dialog in-line with the list so we don't need this activity.
- finish();
- return;
- }
-
- if (savedInstanceState == null) {
- // During initial setup, plug in the details fragment.
- DetailsFragment details = new DetailsFragment();
- details.setArguments(getIntent().getExtras());
- getFragmentManager().beginTransaction().add(android.R.id.content, details).commit();
- }
- }
- }
注意這個activity在檢測到是豎屏時會結束自己,於是主activity會接管它並顯示出TitlesFragment和DetailsFragment。這可以在用戶在豎屏時顯示在TitleFragment,但用戶旋轉了屏幕,使顯示變成了橫屏。
 Apache的詳細安裝教程和遇到的問題解決方案,apache解決方案
 Hybrid app開發歷程分享
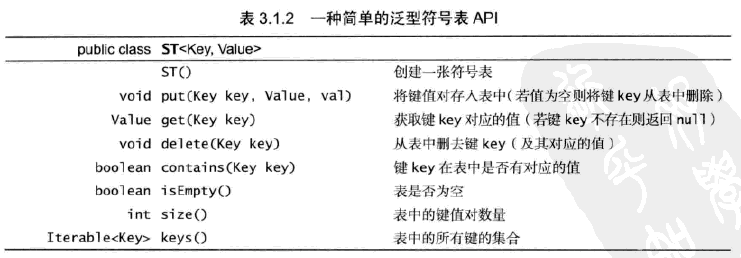 算法—符號表,算法符號
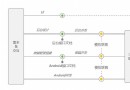
 Android的基本世界觀——系統簡介,組件邏輯及其他
 Android 主頁面頂部欄的通知Notification ,可以自定義通知消息欄的風格,並且點擊通知欄進人本程序。,android自定義消息欄