Android教程網
  1. 首頁
  2. Android 技術
  3. Android 手機
  4. Android 系統教程
  5. Android 游戲
 Android教程網 >> Android游戲 >> Android游戲開發 >> Android游戲開發教程之十八:AnimationDrawble動畫

Android游戲開發教程之十八:AnimationDrawble動畫

編輯:Android游戲開發

Android游戲開發教程之十八:AnimationDrawble動畫

  Android開發中在制作2D幀動畫中提供了使用XML配置動畫文件的方式繪制,也就是說Android底層提供了動畫播放的接口,那麼我們分析一下如何調用它的接口來繪制動畫。首先在工程res資源文件夾下創建anim動畫文件夾,在這個文件夾中建立一個animation.xml文件, 這樣它的路徑就為re/anim/animation.xml。

  看看內容應該是很好理解的,<animation-list>為動畫的總標簽,這裡面放著幀動畫 <item>標簽,也就是說若干<item>標簽的幀 組合在一起就是幀動畫了。<animation-list > 標簽中android:oneshot=”false” 這是一個非常重要的屬性,默認為false 表示 動畫循環播放, 如果這裡寫true 則表示動畫只播發一次。 <item>標簽中記錄著每一幀的信息android:drawable=”@drawable/a”表示這一幀用的圖片為”a”,下面以此類推。  android:duration=”100″ 表示這一幀持續100毫秒,可以根據這個值來調節動畫播放的速度。
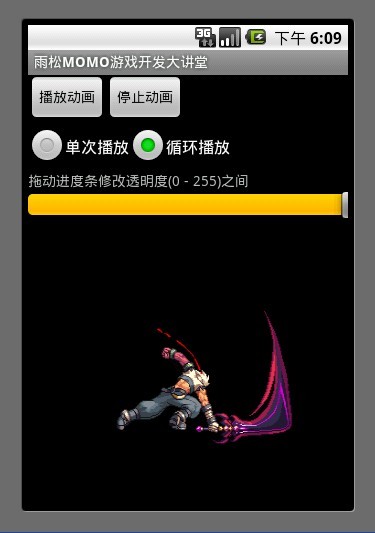
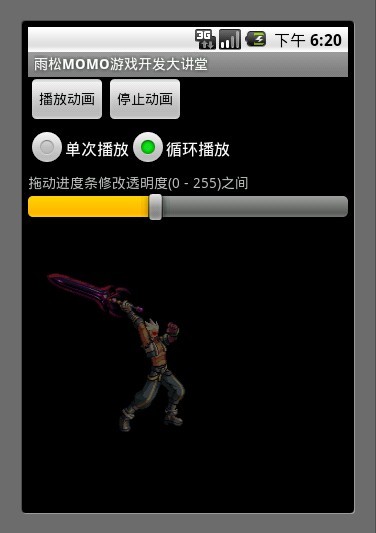
XML/HTML代碼
  1. <animation-list xmlns:android="http://schemas.android.com/apk/res/android" android:oneshot="false">  
  2.   <item android:drawable="@drawable/a" android:duration="100" />  
  3.   <item android:drawable="@drawable/b" android:duration="100" />  
  4.   <item android:drawable="@drawable/c" android:duration="100" />  
  5.   <item android:drawable="@drawable/d" android:duration="100" />  
  6.   <item android:drawable="@drawable/e" android:duration="100" />  
  7.   <item android:drawable="@drawable/f" android:duration="100" />  
  8.   <item android:drawable="@drawable/g" android:duration="100" />  
  9.   <item android:drawable="@drawable/h" android:duration="100" />  
  10.   <item android:drawable="@drawable/i" android:duration="100" />  
  11.   <item android:drawable="@drawable/j" android:duration="100" />  
  12.   </animation-list>  

  下面這個例子的內容為 播放動畫 與關閉動畫 、設置播放類型 單次還是循環、拖動進度條修改動畫的透明度,廢話不多說直接進正題~~

Android游戲開發教程之十八:AnimationDrawble動畫

XML/HTML代碼
  1. <?xml version="1.0" encoding="utf-8"?>  
  2. <LinearLayout xmlns:android="http://schemas.android.com/apk/res/android"  
  3.     android:orientation="vertical"  
  4.     android:layout_width="fill_parent"  
  5.     android:layout_height="fill_parent"  
  6.     >  
  7. <LinearLayout  
  8.     android:orientation="horizontal"  
  9.     android:layout_width="wrap_content"  
  10.     android:layout_height="wrap_content"  
  11.     >  
  12.  <Button  
  13.    android:id="@+id/button0"  
  14.    android:layout_width="wrap_content"  
  15.    android:layout_height="wrap_content"  
  16.    android:text="播放動畫"  
  17.  />  
  18.    
  19.   <Button  
  20.    android:id="@+id/button1"  
  21.    android:layout_width="wrap_content"  
  22.    android:layout_height="wrap_content"  
  23.    android:text="停止動畫"  
  24.  />  
  25.  </LinearLayout>  
  26.    
  27.  <RadioGroup android:id="@+id/radiogroup"  
  28.      android:layout_width="wrap_content"  
  29.      android:layout_height="wrap_content"  
  30.      android:orientation="horizontal">  
  31.    <RadioButton  
  32.      android:id="@+id/checkbox0"  
  33.      android:layout_width="wrap_content"  
  34.      android:layout_height="wrap_content"  
  35.      android:checked="true"  
  36.      android:text="單次播放"  
  37.    />  
  38.   <RadioButton  
  39.     android:id="@+id/checkbox1"  
  40.     android:layout_width="wrap_content"  
  41.     android:layout_height="wrap_content"  
  42.     android:text="循環播放"  
  43.    />  
  44.    </RadioGroup>  
  45.    
  46.     <TextView  
  47.     android:layout_width="wrap_content"  
  48.     android:layout_height="wrap_content"  
  49.     android:text="拖動進度條修改透明度(0 - 255)之間"  
  50.     />  
  51.   <SeekBar  
  52.     android:id="@+id/seekBar"  
  53.     android:layout_width="fill_parent"  
  54.     android:layout_height="wrap_content"  
  55.     android:max="256"  
  56.     android:progress="256"/>  
  57.   <ImageView  
  58.    android:id="@+id/imageView"  
  59.    android:background="@anim/animation"  
  60.    android:layout_width="wrap_content"  
  61.    android:layout_height="wrap_content"  
  62.  />  
  63. </LinearLayout>  

  這是一個比較簡單的布局文件,應該都能看懂吧。  我主要說一下 最後的這個 ImageView, 它就是用來顯示我們的動畫。 這裡使用android:background=”@anim/animation”設置這個ImageView現實的背景為一個動畫,動畫資源的路徑為res/anim/animation.xml   ,當然 設置background同樣也可以在代碼中設置。

Java代碼
  1. imageView.setBackgroundResource(R.anim.animation);  

  通過getBackground方法就可以拿到這個animationDrawable對象。

Java代碼
  1. /**拿到ImageView對象**/  
  2. imageView = (ImageView)findViewById(R.id.imageView);  
  3. /**通過ImageView對象拿到背景顯示的AnimationDrawable**/  
  4. animationDrawable = (AnimationDrawable) imageView.getBackground();

  AnimationDrawable 就是用來控制這個幀動畫,這個類中提供了很多方法。

  animationDrawable.start(); 開始這個動畫

  animationDrawable.stop(); 結束這個動畫

  animationDrawable.setAlpha(100);設置動畫的透明度, 取值范圍(0 – 255)

  animationDrawable.setOneShot(true); 設置單次播放

  animationDrawable.setOneShot(false); 設置循環播放

  animationDrawable.isRunning(); 判斷動畫是否正在播放

  animationDrawable.getNumberOfFrames(); 得到動畫的幀數。

  將這個例子的完整代碼貼上

Java代碼
  1. import android.app.Activity;  
  2. import android.graphics.drawable.AnimationDrawable;  
  3. import android.os.Bundle;  
  4. import android.util.Log;  
  5. import android.view.View;  
  6. import android.view.View.OnClickListener;  
  7. import android.widget.Button;  
  8. import android.widget.ImageView;  
  9. import android.widget.RadioButton;  
  10. import android.widget.RadioGroup;  
  11. import android.widget.SeekBar;  
  12. import android.widget.SeekBar.OnSeekBarChangeListener;  
  13.    
  14. public class SimpleActivity extends Activity {  
  15.    
  16.     /**播放動畫按鈕**/  
  17.     Button button0 = null;  
  18.    
  19.     /**停止動畫按鈕**/  
  20.     Button button1 = null;  
  21.    
  22.     /**設置動畫循環選擇框**/  
  23.     RadioButton radioButton0= null;  
  24.     RadioButton radioButton1= null;  
  25.     RadioGroup  radioGroup = null;  
  26.    
  27.     /**拖動圖片修改Alpha值**/  
  28.     SeekBar seekbar = null;  
  29.    
  30.     /**繪制動畫View**/  
  31.     ImageView imageView = null;  
  32.    
  33.     /**繪制動畫對象**/  
  34.     AnimationDrawable animationDrawable = null;  
  35.     @Override  
  36.     public void onCreate(Bundle savedInstanceState) {  
  37.     super.onCreate(savedInstanceState);  
  38.     setContentView(R.layout.simple);  
  39.    
  40.     /**拿到ImageView對象**/  
  41.     imageView = (ImageView)findViewById(R.id.imageView);  
  42.     /**通過ImageView對象拿到背景顯示的AnimationDrawable**/  
  43.     animationDrawable = (AnimationDrawable) imageView.getBackground();  
  44.    
  45.     /**開始播放動畫**/  
  46.     button0 = (Button)findViewById(R.id.button0);  
  47.     button0.setOnClickListener(new OnClickListener() {  
  48.    
  49.         @Override  
  50.         public void onClick(View arg0) {  
  51.         /**播放動畫**/  
  52.         if(!animationDrawable.isRunning()) {  
  53.             animationDrawable.start();  
  54.         }  
  55.         }  
  56.     });  
  57.    
  58.     /**停止播放動畫**/  
  59.     button1 = (Button)findViewById(R.id.button1);  
  60.     button1.setOnClickListener(new OnClickListener() {  
  61.    
  62.         @Override  
  63.         public void onClick(View arg0) {  
  64.         /**停止動畫**/  
  65.         if(animationDrawable.isRunning()) {  
  66.             animationDrawable.stop();  
  67.         }  
  68.         }  
  69.     });  
  70.     /**單次播放**/  
  71.     radioButton0 = (RadioButton)findViewById(R.id.checkbox0);  
  72.     /**循環播放**/  
  73.     radioButton1 = (RadioButton)findViewById(R.id.checkbox1);  
  74.     /**單選列表組**/  
  75.     radioGroup = (RadioGroup)findViewById(R.id.radiogroup);  
  76.     radioGroup.setOnCheckedChangeListener(new RadioGroup.OnCheckedChangeListener() {  
  77.    
  78.         @Override  
  79.         public void onCheckedChanged(RadioGroup radioGroup, int checkID) {  
  80.         if(checkID == radioButton0.getId()) {  
  81.             //設置單次播放  
  82.             animationDrawable.setOneShot(true);  
  83.         }else if (checkID == radioButton1.getId()) {  
  84.             //設置循環播放  
  85.             animationDrawable.setOneShot(false);  
  86.         }  
  87.    
  88.         //發生改變後讓動畫重新播放  
  89.         animationDrawable.stop();  
  90.         animationDrawable.start();  
  91.         }  
  92.     });  
  93.    
  94.     /**監聽的進度條修改透明度**/  
  95.     seekbar = (SeekBar)findViewById(R.id.seekBar);  
  96.     seekbar.setOnSeekBarChangeListener(new OnSeekBarChangeListener() {  
  97.         @Override  
  98.         public void onStopTrackingTouch(SeekBar seekBar) {  
  99.    
  100.         }  
  101.         @Override  
  102.         public void onStartTrackingTouch(SeekBar seekBar) {  
  103.    
  104.         }  
  105.         @Override  
  106.         public void onProgressChanged(SeekBar seekBar, int progress, boolean frameTouch) {  
  107.         /**設置動畫Alpha值**/  
  108.         animationDrawable.setAlpha(progress);  
  109.         /**通知imageView 刷新屏幕**/  
  110.         imageView.postInvalidate();  
  111.         }  
  112.     });  
  113.    
  114.     }  
  115. }  

  拖動進度條設置Alpha值的時候 一定要使用     imageView.postInvalidate(); 方法來通知UI線程重繪屏幕中的imageView  否則會看不到透明的效果 。這裡切記切記~~

Android游戲開發教程之十八:AnimationDrawble動畫

  下載地址:http://vdisk.weibo.com/s/aalv0

  1. 上一頁:
  2. 下一頁:
熱門文章
閱讀排行版
Copyright © Android教程網 All Rights Reserved