編輯:Android開發教程
在上一篇文章中,我和大家一起實現了類似於Android系統聯系人的分組導航和擠壓動畫功能,不過既然 文章名叫做《Android系統聯系人全特效實現》,那麼沒有快速滾動功能顯然是稱不上"全"的。 因此本篇文章我將帶領大家在上篇文章的代碼基礎上改進,加入快速滾動功能。
如果還沒有看過我 上一篇文章,請抓緊去閱讀一下 Android系統聯系人全特效實現(上),分組導航和擠壓動畫 。
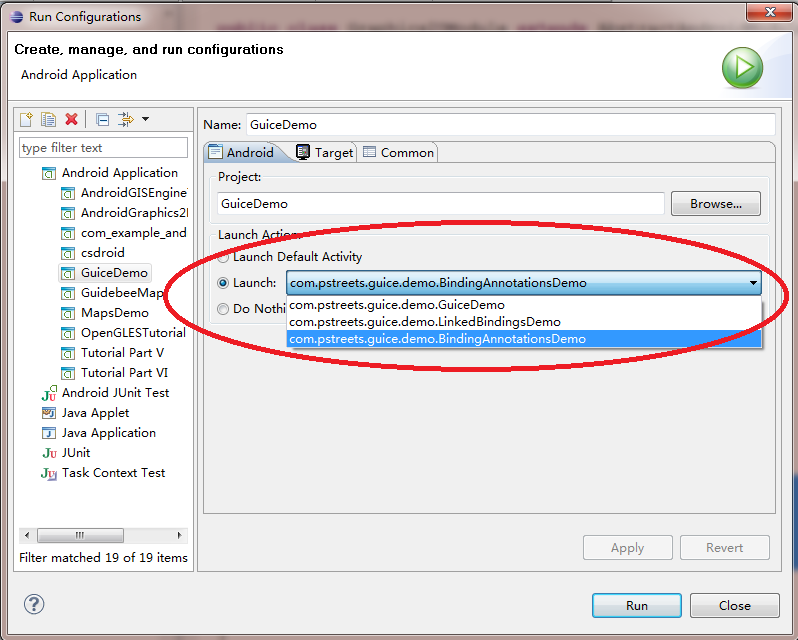
其實 ListView本身是有一個快速滾動屬性的,可以通過在XML中設置 android:fastScrollEnabled="true"來啟用。包括以前老版本的Android聯系人中都是使用這種 方式來進行快速滾動的。效果如下圖所示:
不過這種快速滾動方式比較 丑陋,到後來很多手機廠商在定制自己ROM的時候都將默認快速滾動改成了類似iPhone上A-Z字母表快速滾動 的方式。這裡我們怎麼能落後於時代的潮流呢!我們的快速滾動也要使用A-Z字母表的方式!
下面就 來開始實現,首先打開上次的ContactsDemo工程,修改activity_main.xml布局文件。由於我們要在界面上 加入字母表,因此我們需要一個Button,將這個Button的背景設為一張A-Z排序的圖片,然後居右對齊。另 外還需要一個TextView,用於在彈出式分組布局上顯示當前的分組,默認是gone掉的,只有手指在字母表上 滑動時才讓它顯示出來。修改後的布局文件代碼如下:
<RelativeLayout

xmlns:android="http://schemas.android.com/apk/res/android"
    xmlns:tools="http://schemas.android.com/tools"
    android:layout_width="match_parent"
    android:layout_height="match_parent"
    android:orientation="vertical" >

    <ListView
        android:id="@+id/contacts_list_view"
        android:layout_width="fill_parent"
        android:layout_height="wrap_content"
        android:layout_alignParentTop="true"
        android:scrollbars="none"
        android:fadingEdge="none" >
    </ListView>

    <LinearLayout
        android:id="@+id/title_layout"
        android:layout_width="fill_parent"
        android:layout_height="18dip"
        android:layout_alignParentTop="true"
        android:background="#303030" >

        <TextView
            android:id="@+id/title"
            android:layout_width="wrap_content"
            android:layout_height="wrap_content"
            android:layout_gravity="center_horizontal"
            android:layout_marginLeft="10dip"
            android:textColor="#ffffff"
            android:textSize="13sp" />
    </LinearLayout>

    <Button
        android:id="@+id/alphabetButton"
        android:layout_width="wrap_content"
        android:layout_height="fill_parent"
        android:layout_alignParentRight="true"
        android:background="@drawable/a_z"
        />

    <RelativeLayout
        android:id="@+id/section_toast_layout"
        android:layout_width="70dip"
        android:layout_height="70dip"
        android:layout_centerInParent="true"
        android:background="@drawable/section_toast"
        android:visibility="gone"
        >
        <TextView
            android:id="@+id/section_toast_text"
            android:layout_width="wrap_content"
            android:layout_height="wrap_content"
            android:layout_centerInParent="true"
            android:textColor="#fff"
            android:textSize="30sp"
            />
    </RelativeLayout>

</RelativeLayout>
 Android的資源(resource)簡介
Android的應用程序(app)資源存儲在項目層次中的res文件夾下;資源的類型包括值(value),Drawable,顏色(color),布局(layout), 動畫
 Android Eclipse無法運行應用的問題
周一,集團中高層例會臨時取消,真好。把上周沒搞定的小事搞定,繼續學學游戲開發這塊,打開Eclipse運行游戲小例子,報錯! Android基於Openfire開發即時通訊工具(1)搭建openfire服務器
采用openfire作為服務器,這樣不需要再寫一個服務器,會節省不少事情,openfire經過簡單的配置就可以實現一個通信服務器的基本功能,Openfire采用Java開
 android SQLite數據庫用法圖文詳解(附源碼)
1.背景SQLite是嵌入式設備使用的一種輕量型數據庫。可以通過執行sql語句對數據庫進行操作,android也為其提供了完善的函數接口支持。下面就來實現一個簡單的數據庫