編輯:Android開發教程
記得在前面的文章中,我帶大家一起從源碼的角度分析了Android中View的事件分發機制,相信閱讀過的 朋友對View的事件分發已經有比較深刻的理解了。
還未閱讀過的朋友,請先參考 Android事件分發機 制完全解析,帶你從源碼的角度徹底理解(上) 。
那麼今天我們將繼續上次未完成的話題,從源碼的 角度分析ViewGruop的事件分發。
首先我們來探討一下,什麼是ViewGroup?它和普通的View有什麼區 別?
顧名思義,ViewGroup就是一組View的集合,它包含很多的子View和子VewGroup,是Android中所 有布局的父類或間接父類,像LinearLayout、RelativeLayout等都是繼承自ViewGroup的。但ViewGroup實際 上也是一個View,只不過比起View,它多了可以包含子View和定義布局參數的功能。ViewGroup繼承結構示意 圖如下所示:

可以看到,我們平時項目裡經常用到 的各種布局,全都屬於ViewGroup的子類。
簡單介紹完了ViewGroup,我們現在通過一個Demo來演示一下Android中VewGroup的事件分發流程吧。
首先我們來自定義一個布局,命名為MyLayout,繼承自LinearLayout,如下所示:
public

class MyLayout extends LinearLayout {

    public MyLayout(Context context, AttributeSet attrs) {
        super(context, attrs);
    }

}
然後,打開主布局文件activity_main.xml,在其中加入我們自定義的布局:
<com.example.viewgrouptouchevent.MyLayout

xmlns:android="http://schemas.android.com/apk/res/android"
    xmlns:tools="http://schemas.android.com/tools"
    android:id="@+id/my_layout"
    android:layout_width="match_parent"
    android:layout_height="match_parent"
    android:orientation="vertical" >

    <Button
        android:id="@+id/button1"
        android:layout_width="match_parent"
        android:layout_height="wrap_content"
        android:text="Button1" />

    <Button
        android:id="@+id/button2"
        android:layout_width="match_parent"
        android:layout_height="wrap_content"
        android:text="Button2" />

</com.example.viewgrouptouchevent.MyLayout>
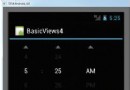
可以看到,我們在MyLayout中添加了兩個 按鈕,接著在MainActivity中為這兩個按鈕和MyLayout都注冊了監聽事件:
myLayout.setOnTouchListener(new OnTouchListener() {
    @Override
    public boolean onTouch(View v, MotionEvent event) {
        Log.d("TAG", "myLayout on touch");
        return false;
    }
});
button1.setOnClickListener(new OnClickListener() {
    @Override
    public void onClick(View v) {
        Log.d("TAG", "You clicked button1");
    }
});
button2.setOnClickListener(new OnClickListener() {
    @Override
    public void onClick(View v) {
        Log.d("TAG", "You clicked button2");
    }
});
 Android的Activity和Task
Task的概念A task is a stack of activities. Task 就是一個棧,這個棧裡面存放了 很多 Activity ,它遵循著後進先出的原則。
 Android開發入門(十七)首選項 17.3 修改首選項文件的默認名字
在我的設備上面,默認的首選項名字是net.manoel.UsingPreferences_preferences.xml,這個名字是使 用包名作為前綴的。然而,給首選項定
 Android GUI系統之SurfaceFlinger(5) BufferQueue內部原理
1.1 BufferQueue詳解上一小節我們已經看到了BufferQueue,它是SurfaceTextureClient實現本地窗口的關鍵。從邏輯上來推斷,Buffe
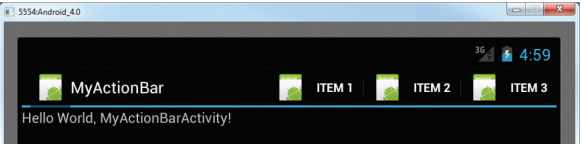 Android開發入門(八)使用活動欄 8.3 自定義ActionBar
在上一節中,菜單選項是沒有文字的。如果想要同時顯示圖標和文字,可以一起使用“|”和 MenuItem.SHOW_AS_ACTION_WITH_TE