編輯:關於Android編程
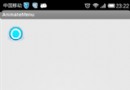
根據網上資料,在android4.0上實現一個簡單的鎖屏程序。
先貼上布局文件
android:layout_width="match_parent"
android:layout_height="match_parent"
android:orientation="vertical"
tools:context=".MainActivity" >
android:layout_width="match_parent"
android:layout_height="63dip"
android:layout_marginTop="200dip"
android:background="@drawable/step2_tip_2">
android:layout_width="wrap_content"
android:layout_height="wrap_content"
android:layout_marginRight="10dip"
android:layout_alignParentRight="true"
android:layout_centerVertical="true"
android:background="@drawable/slider_ico_alarm"
android:contentDescription="@string/app_name"/>
android:layout_width="wrap_content"
android:layout_height="wrap_content"
android:layout_marginRight="20dip"
android:layout_toLeftOf="@id/getup_finish_ico"
android:layout_alignTop="@id/getup_finish_ico"
android:src="@drawable/slider_tip_anim"
android:contentDescription="@string/app_name"
/>
android:layout_height="wrap_content"
android:textColor="#ff0000"
android:layout_marginRight="20dip"
android:layout_toLeftOf="@id/getup_arrow"
android:layout_alignTop="@id/getup_finish_ico"
android:text="@string/hint_unlock"/>
android:layout_height="wrap_content"
android:layout_marginRight="5dip"
android:src="@drawable/getup_slider_ico_normal"
android:contentDescription="@string/app_name"/>
布局文件中用了一個自定義的ViewGroup :SliderRelativeLayout,滑動解鎖的主要功能就是在這個class文件中實現的。
下邊先看下這個class文件
package com.wind.dragimg;
import java.lang.ref.WeakReference;
import android.content.Context;
import android.graphics.Bitmap;
import android.graphics.BitmapFactory;
import android.graphics.Canvas;
import android.graphics.Rect;
import android.os.Handler;
import android.os.Message;
import android.os.Vibrator;
import android.util.AttributeSet;
import android.view.MotionEvent;
import android.view.View;
import android.widget.ImageView;
import android.widget.RelativeLayout;
import android.widget.Toast;
public class SliderRelativeLayout extends RelativeLayout{
private Context mContext;
private ImageView tv_slider_icon;
private Bitmap dragBitmap;
private int mLastMoveX;
private Handler mainHandler;
private Handler mHandler;
private static final int MSG_BACK_SLIDER_IMG = 1;
private static final int DELAY_TIME = 5;
public SliderRelativeLayout(Context context) {
super(context);
mContext = context;
mHandler = new MyHandler(this);
initDragBitmap();
}
private void initDragBitmap() {
if (dragBitmap == null) {
dragBitmap = BitmapFactory.decodeResource(mContext.getResources(),
R.drawable.getup_slider_ico_pressed);
}
}
public SliderRelativeLayout(Context context, AttributeSet attrs,
int defStyle) {
super(context, attrs, defStyle);
mContext = context;
mHandler = new MyHandler(this);
initDragBitmap();
}
public SliderRelativeLayout(Context context, AttributeSet attrs) {
super(context, attrs);
mContext = context;
mHandler = new MyHandler(this);
initDragBitmap();
}
@Override
protected void onFinishInflate() {
// TODO Auto-generated method stub
super.onFinishInflate();
tv_slider_icon = (ImageView)findViewById(R.id.slider_icon);
}
@Override
public boolean onTouchEvent(MotionEvent event) {
switch (event.getAction()) {
case MotionEvent.ACTION_DOWN:
mLastMoveX = (int)event.getX();
return handleActionDownEvent(event);
case MotionEvent.ACTION_MOVE:
mLastMoveX = (int)event.getX();
invalidate();
return true;
case MotionEvent.ACTION_UP:
handleActionUpEvent(event);
return true;
default:
break;
}
return super.onTouchEvent(event);
}
@Override
protected void onDraw(Canvas canvas) {
super.onDraw(canvas);
invalidateDragImg(canvas);
}
private void invalidateDragImg(Canvas canvas) {
int drawX = mLastMoveX - dragBitmap.getWidth();
int drawY = tv_slider_icon.getTop();
canvas.drawBitmap(dragBitmap, drawX < 0 ? 5 : drawX, drawY, null);
}
private void handleActionUpEvent(MotionEvent event) {
int x = (int)event.getX();
boolean isSuccess = Math.abs(x - getRight()) <= 15;
if (isSuccess) {
Toast.makeText(mContext, R.string.unlock_success, Toast.LENGTH_LONG).show();
resetViewState();
vibrate();
mainHandler.obtainMessage(MainActivity.MSG_LOCK_SUCCESS).sendToTarget();
} else {
mLastMoveX = x;
int distance = x - tv_slider_icon.getRight();
if (distance > 0) {
mHandler.sendEmptyMessageDelayed(MSG_BACK_SLIDER_IMG, DELAY_TIME);
} else {
resetViewState();
}
}
}
private void vibrate() {
Vibrator vibrator= (Vibrator)mContext.getSystemService(Context.VIBRATOR_SERVICE);
vibrator.vibrate(200);
}
private void resetViewState() {
mLastMoveX = 1000;
tv_slider_icon.setVisibility(View.VISIBLE);
invalidate();
}
private boolean handleActionDownEvent(MotionEvent event) {
Rect rect = new Rect();
tv_slider_icon.getHitRect(rect);
boolean isHit = rect.contains((int)event.getX(), (int)event.getY());
if (isHit) {
tv_slider_icon.setVisibility(View.INVISIBLE);
}
return isHit;
}
private static class MyHandler extends Handler{
private WeakReference
public MyHandler(SliderRelativeLayout layout) {
mLayout = new WeakReference
}
@Override
public void handleMessage(Message msg) {
SliderRelativeLayout layout = mLayout.get();
switch (msg.what) {
case MSG_BACK_SLIDER_IMG:
layout.backSliderImg();
break;
default:
break;
}
}
}
private void backSliderImg() {
mLastMoveX = mLastMoveX - 8;
invalidate();
boolean shoudEnd = Math.abs(mLastMoveX - tv_slider_icon.getRight()) <= 8;
if (!shoudEnd) {
mHandler.sendEmptyMessageDelayed(MSG_BACK_SLIDER_IMG, DELAY_TIME);
} else {
resetViewState();
}
}
public void setMainHandler(Handler handler) {
mainHandler = handler;
}
}
此應用中還用到了一個幀動畫。布局文件如下:
xmlns:android="http://schemas.android.com/apk/res/android"
android:oneshot="false">
幀動畫的具體實現看以參看我其他的文章
下邊看下主activity類,這個類中有一些鎖屏功能所需要的必要設置,比如屏蔽Home鍵等。
package com.wind.dragimg;
import java.lang.ref.WeakReference;
import android.app.Activity;
import android.content.Intent;
import android.graphics.drawable.AnimationDrawable;
import android.os.Bundle;
import android.os.Handler;
import android.os.Message;
import android.view.KeyEvent;
import android.view.Menu;
import android.view.Window;
import android.view.WindowManager;
import android.widget.ImageView;
public class MainActivity extends Activity {
private ImageView animal;
private AnimationDrawable animationDrawable;
public final static int MSG_LOCK_SUCCESS = 1;
public static final int FLAG_HOMEKEY_DISPATCHED = 0x80000000;
private SliderRelativeLayout sliderRelativeLayout;
private Handler mHandler;
@Override
protected void onCreate(Bundle savedInstanceState) {
super.onCreate(savedInstanceState);
//窗口無標題
this.requestWindowFeature(Window.FEATURE_NO_TITLE);
//窗口全屏顯示
getWindow().setFlags(WindowManager.LayoutParams.FLAG_FULLSCREEN,
WindowManager.LayoutParams.FLAG_FULLSCREEN);
this.getWindow().setFlags(FLAG_HOMEKEY_DISPATCHED, FLAG_HOMEKEY_DISPATCHED);
//為窗口添加了這個標志後,當前activity運行的時候不會鎖屏
this.getWindow().setFlags(WindowManager.LayoutParams.FLAG_DISMISS_KEYGUARD,
WindowManager.LayoutParams.FLAG_DISMISS_KEYGUARD);
setContentView(R.layout.activity_main);
animal = (ImageView)this.findViewById(R.id.getup_arrow);
sliderRelativeLayout = (SliderRelativeLayout)this.findViewById(R.id.slider_layout);
animationDrawable = (AnimationDrawable)animal.getDrawable();
animationDrawable.start();
mHandler = new MyHandler(this);
sliderRelativeLayout.setMainHandler(mHandler);
startService(new Intent(MainActivity.this, DragImgService.class));
}
@Override
public boolean onCreateOptionsMenu(Menu menu) {
// Inflate the menu; this adds items to the action bar if it is present.
getMenuInflater().inflate(R.menu.main, menu);
return true;
}
//這個函數可以屏蔽Back鍵,Menu鍵
@Override
public boolean onKeyDown(int keyCode, KeyEvent event) {
switch (keyCode) {
case KeyEvent.KEYCODE_BACK:
return true;
case KeyEvent.KEYCODE_MENU:
return true;
default:
break;
}
return super.onKeyDown(keyCode, event);
}
private static class MyHandler extends Handler {
private WeakReference
public MyHandler(MainActivity mainAcvity) {
this.mActivity = new WeakReference
}
@Override
public void handleMessage(Message msg) {
MainActivity activity = mActivity.get();
switch (msg.what) {
case MSG_LOCK_SUCCESS:
activity.closeActivity();
break;
default:
break;
}
}
}
private void closeActivity() {
finish();
}
}
為了能實現手機滅屏後開啟鎖屏程序,我添加了一個service,具體實現如下
package com.wind.dragimg;
import android.app.Service;
import android.content.BroadcastReceiver;
import android.content.Context;
import android.content.Intent;
import android.content.IntentFilter;
import android.os.IBinder;
public class DragImgService extends Service{
private Intent mainIntent;
private BroadcastReceiver screenOffReceiver;
@Override
public IBinder onBind(Intent intent) {
// TODO Auto-generated method stub
return null;
}
@Override
public void onCreate() {
// TODO Auto-generated method stub
super.onCreate();
mainIntent = new Intent(DragImgService.this, MainActivity.class);
mainIntent.addFlags(Intent.FLAG_ACTIVITY_NEW_TASK);
IntentFilter screenOffFilter = new IntentFilter("android.intent.action.SCREEN_OFF");
screenOffReceiver = new ScreenOffReceiver();
registerReceiver(screenOffReceiver, screenOffFilter);
}
@Override
public void onDestroy() {
super.onDestroy();
unregisterReceiver(screenOffReceiver);
startService(new Intent(DragImgService.this, DragImgService.class));
}
private class ScreenOffReceiver extends BroadcastReceiver {
@Override
public void onReceive(Context context, Intent intent) {
String action = intent.getAction();
String screen_off_action = "android.intent.action.SCREEN_OFF";
if (action.equals(screen_off_action)) {
context.startActivity(mainIntent);
}
}
}
}
至此,鎖屏的主要功能已經實現
 紅米note3和樂視1s哪個好 紅米note3和樂1s區別對比評測
紅米note3介紹:外觀設計紅米Note3金屬機身背面是三段式設計,上下兩端為塑料材質。配置方面紅米Note3采用5.5英寸1080P屏幕,1300萬像素後
 Android動畫使用開源動畫庫nineoldandroids
Android系統支持原生動畫,這為應用開發者開發絢麗的界面提供了極大的方便,有時候動畫是很必要的,當你想做一個滑動的特效的時候,如果苦思冥想都搞不定,那麼你可以考慮下動
 YingBeautyNote
項目地址:YingBeautyNote簡介:一款類似印象筆記的 App,隨時記錄您的生活點滴。一款類似印象筆記的 App,隨時記錄您的生活點滴,但時目前功能還沒達到印象筆
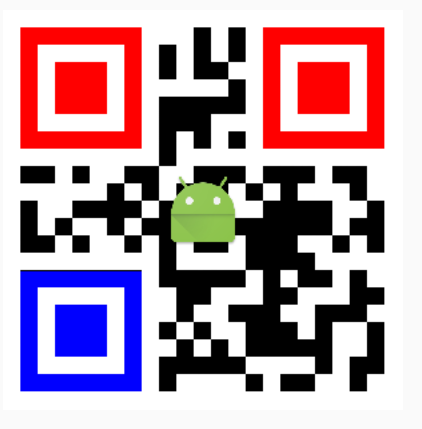 Android中生成彩色位置探測點的二維碼
前段時間項目有需要要顯示彩色探測點的二維碼,網上搜了下,有基於java,c等的源碼。網上的java源碼直接照搬有些問題,自己改了改。不說廢話,先上結果圖。原理其實很簡單,