編輯:關於Android編程
這個是第一次寫源碼分析的文章(僅僅是給自己做個也給自己兩天對volley學習的一個交代吧)。以前的老大經常強調一種代碼閱讀能力(如何通過源碼的閱讀了解框架、流程、及使用注意細節呢)網上查找了很多相關資料,如何培養源碼閱讀能力,但也是零零閃閃不全面。這可能與源碼閱讀設計到多方面,經驗+知識面寬度等等。(這裡不總結,個人修道還不深,求大神帶飛),但是個人覺得思路還是一樣的,源碼閱讀也罷新技術學習也罷。重點在於 核心概念+流程+關鍵點這裡寫上個人理解。
核心概念:每一個框架都有自己的核心概念(如:struct2 中的過濾器、action;spring中的Ioc,Aop、Android系統中的Activity、Intent 等等,這個是框架特有的)
流程:指的是框架的數據流、時序調度等。按照框架使用的方法入口,順籐摸瓜先摸出個大體脈路也就完成了60%(這部分不要局限於細節本身,最後畫出 類圖+ 關鍵時序圖即可)
已 volley 為例子,這裡個人覺得需要本流程重點在於,一個http 請求是如何發起的?發起過程中經過了哪些步驟?使用緩存步驟是怎樣的?如何響應回調?【根據自己的使用多問幾個why 、how】
關鍵點(細節):每種框架的實現總會面臨具體要解決的問題(如何緩存(磁盤、內存)? 如何實現調度?如何實現面對並發?用了什麼數據結構和算法?為什麼?)的實現細節與技術。
已 volley 為例子,如 DiskBasedCache 是如何實現磁盤緩存的?PoolingByteArrayOutputStream 是如何實現內存池的?等 【帶著具體問題看代碼】帶著別人的問題看代碼
啰嗦了很久,最後再啰嗦一點,關於借鑒與學習,網上的關於volley源碼分析的文字很多很多(可能是volley小巧,設計優雅、代碼易懂吧)那我們有沒有必要再造輪子呢?(這裡指的是重新從源碼一步步閱讀,分析流程)個人覺得還是有必要的,畢竟通過別人的文章博客吸收的都是二手的或者是自己覺得不真是的,只有自己閱讀代碼中的出來的心得那才是自己的(軟件工程是一門技術活、工科嘛),照片再沒,也沒有自己來一場旅行來的實在(知行合一)。所以個人覺得學習的最佳實踐就是 站在前人的肩膀上,跟隨前人的腳步行走,看自己該看的風景((⊙o⊙)…我也不知道說了什麼),簡單的話就是對照別人的分析框架流程,看源代碼!!!(個人不喜歡跟著博客中的源碼學習,第一是看著累,第二是對子源碼閱讀能力提升不夠,但是跟著流程走還是挺有用的省時)

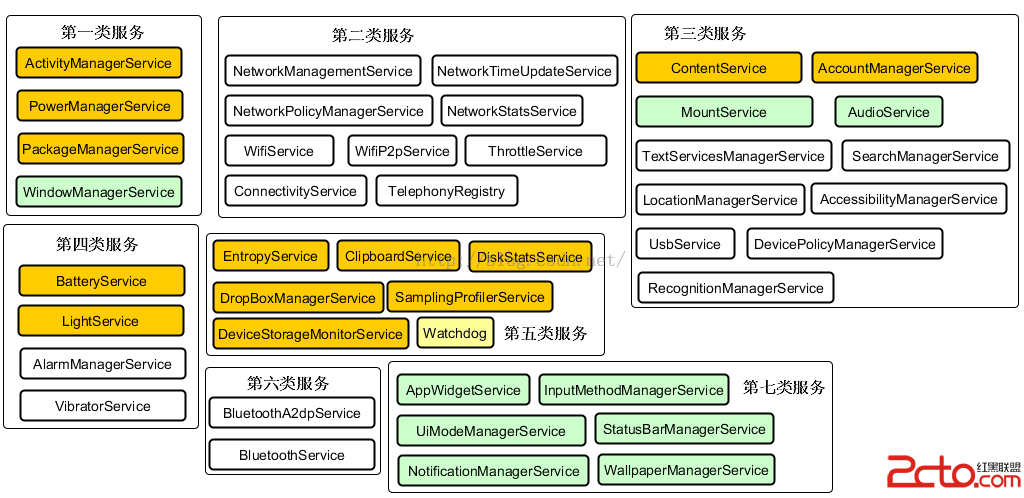
從上圖可以看出,volley 采用了分層架構上層次調用下層次服務,下層為上層提供接口
借鑒一張流程圖:
解釋:主要是通過兩種Dispatch Thread不斷從RequestQueue中取出請求,根據是否允許且已緩存調用Cache或NetwZ喎?/kf/ware/vc/" target="_blank" class="keylink">vcmvV4sG9wODK/b7du/HIob3Tv9rWrtK7o6y008TatOa7urTmu/LKx7f+zvHG98ihtcPH68fztcTK/b7do6zIu7rzvbvTyVJlc3BvbnNlRGVsaXZlcnnIpdf2veG5+7fWt6K8sLvYtfe0psDtob7XotLio7pSZXNwb25zZURlbGl2ZXJ5t9a3or3hufvNqLn9SGFuZGVy1NrW98/fs8zW0LX308OhvzwvcD4NCjxwPrrL0MTKsdDyzbyjuqG+0ru0zsfrx/O1vc/g06a1xMirsr+5/bPMob88L3A+DQo8cD48aW1nIGFsdD0="核心流程時序圖" src="/uploadfile/Collfiles/20160513/20160513091755475.png" title="\" />
注意Http請求庫的選擇問題
HttpURLConnection 和 AndroidHttpClient(HttpClient 的封裝)如何選擇及原因
在 Froyo(2.2) 之前,HttpURLConnection 有個重大 Bug,調用 close() 函數會影響連接池,導致連接復用失效,所以在 Froyo 之前使用 HttpURLConnection 需要關閉 keepAlive。另外在 Gingerbread(2.3) HttpURLConnection 默認開啟了 gzip 壓縮,提高了 HTTPS 的性能,Ice Cream Sandwich(4.0) HttpURLConnection 支持了請求結果緩存。 再加上 HttpURLConnection 本身 API 相對簡單,所以對 Android 來說,在 2.3 之後建議使用 HttpURLConnection,之前建議使用 AndroidHttpClient。
這個類是一個入口,工具類,默認了提供了一個RequestQueue的組裝(如默認代碼中使用DiskBasedCache處理具體緩存,BasicNetwork 作為網絡處理、根據版本選擇HurlStack、或者AndroidHttpClient)。 由於Volley的所有流程控制框架搭建全部都是面向接口(抽象)且依賴於初始化RequestQueue具體實現參數,是的系統具有高度的可擴展性【面向接口編程、對擴展開發修改關閉】
應為在實際應用中具體實現這個接口擴展自己的Request應用較多所以分析下兩個abstract的方法的執行流程
子類必須重寫的兩個方法:
abstract protected Response parseNetworkResponse(NetworkResponse response);
這個方法可以看到是在 CacheDispatcher、 NetworkDispatcher【兩個用於分發請求的線程 run 】得到的request請求結果NetworkResponse對象,並調用此方法轉換具體類的請求的Response。代碼如下:
子類重寫此方法,將網絡返回的原生字節內容,轉換成合適的類型。此方法會在工作線程中被調用。
CacheDispatcher、NetworkDispatcher中調用
 Response response = request.parseNetworkResponse(
                        new NetworkResponse(entry.data, entry.responseHeaders));
如:StringRequest中真,將返回泛型類型類 Sting 的響應。
  @Override
    protected Response parseNetworkResponse(NetworkResponse response) {
        String parsed;
        try {
            parsed = new String(response.data, HttpHeaderParser.parseCharset(response.headers));
        } catch (UnsupportedEncodingException e) {
            parsed = new String(response.data);
        }
        return Response.success(parsed, HttpHeaderParser.parseCacheHeaders(response));
    }
而在JsonObjectRequest返回的數據轉化為JSONObject對象。
 @Override
    protected Response parseNetworkResponse(NetworkResponse response) {
        try {
            String jsonString = new String(response.data,
                    HttpHeaderParser.parseCharset(response.headers, PROTOCOL_CHARSET));
            return Response.success(new JSONObject(jsonString),
                    HttpHeaderParser.parseCacheHeaders(response));
        } catch (UnsupportedEncodingException e) {
            return Response.error(new ParseError(e));
        } catch (JSONException je) {
            return Response.error(new ParseError(je));
        }
    }
response傳遞接口:
abstract protected void deliverResponse(T response);
Request 的deliveryResponse 函數調用在ExecutorDelivery 這個具體類中。(該實現ResponseDelivery接口),並在postResponse 接口中新建一個線程提交到主線程運行並在線程內部調用 mRequest.deliverResponse(mResponse.result); 的方法進行response傳遞。(注意:如果響應錯誤會mRequest.deliverError() 方法)具體代碼如下:
 @Override
    public void postResponse(Request request, Response response, Runnable runnable) {
        request.markDelivered();
        request.addMarker("post-response");
        mResponsePoster.execute(new ResponseDeliveryRunnable(request, response, runnable));
    }
重上面代碼可以看出,首先是標記該request一被傳遞。之後執mResponsePoster.execute()mResponsePoster是什麼呢?
跟蹤代碼發現:賦值的地方有兩處都是在構造函數中
 public ExecutorDelivery(Executor executor) {
        mResponsePoster = executor;
    }
public ExecutorDelivery(final Handler handler) {
        // Make an Executor that just wraps the handler.
        mResponsePoster = new Executor() {
            @Override
            public void execute(Runnable command) {
                handler.post(command);
            }
        };
    }
而我們應用中可以看到RequestQueue 中創建的代碼如下:
   public RequestQueue(Cache cache, Network network, int threadPoolSize) {
        this(cache, network, threadPoolSize,
                new ExecutorDelivery(new Handler(Looper.getMainLooper())));
    }
結合可以看出,postResponse函數中的 execute 方法,其實就是在通過Hander post一個 Runable(線程)到主線程的消息隊列裡面調度。主要可以知道reques.的response傳遞是在主線程中調度的那麼ResponseDeliveryRunnable 是什麼呢?
ResponseDeliveryRunnable 是一個內部類 implement Runable 接口,在run中函數代碼如下
  public void run() {
            // If this request has canceled, finish it and don't deliver.
            if (mRequest.isCanceled()) {
                mRequest.finish("canceled-at-delivery");
                return;
            }

            // Deliver a normal response or error, depending.
            if (mResponse.isSuccess()) {
                mRequest.deliverResponse(mResponse.result);
            } else {
                mRequest.deliverError(mResponse.error);
            }

            // If this is an intermediate response, add a marker, otherwise we're done
            // and the request can be finished.
            if (mResponse.intermediate) {
                mRequest.addMarker("intermediate-response");
            } else {
                mRequest.finish("done");
            }

            // If we have been provided a post-delivery runnable, run it.
            if (mRunnable != null) {
                mRunnable.run();
            }
        }
在上面可以看到,當mResponse.isSuccess() 時候。會調用 mRequest.deliverResponse(mResponse.result);進行傳遞response 給上層。這個流程調用分析完成。
附帶 那麼上面注意到有在run 中有代碼
 if (mRunnable != null) {
                mRunnable.run();
            }
那什麼時候在進行Response傳遞之後還需要run 一個線程呢?而且是在主線程中。我們留意到,在CacheDispatcher 的 run 中有如下一段代碼:
// 判斷緩存時間是否過期,如果過期需要重新刷新數據
  if (!entry.refreshNeeded()) {
                    // Completely unexpired cache hit. Just deliver the response.
                    mDelivery.postResponse(request, response);
                } else {
                    // Soft-expired cache hit. We can deliver the cached response,
                    // but we need to also send the request to the network for
                    // refreshing.
                    request.addMarker("cache-hit-refresh-needed");
                    request.setCacheEntry(entry);

                    // Mark the response as intermediate.
                    response.intermediate = true;

                    // Post the intermediate response back to the user and have
                    // the delivery then forward the request along to the network.
                    mDelivery.postResponse(request, response, new Runnable() {
                        @Override
                        public void run() {
                            try {
                                mNetworkQueue.put(request);
                            } catch (InterruptedException e) {
                                // Not much we can do about this.
                            }
                        }
                    });
                }
上面代碼可以看出,在緩存過期後。會在run新建一個新的 Runable並 在 run 中將這個 request 添加到 mNetworkQueue 隊列中,供NetWorkDispatch分發起網絡請求。
為什麼談到這個呢?因為個人覺得這個實現有點巧妙,雖然使用的也是循環加重復操作計算控制 Retry 策略,但是循環利用了一個while(true) 死循環中。使用吞掉異常的機制
控制循環。代碼控制如下:正常直接退出 直接調用 return跳出循環
首先我們看:RetryPolicy 接口的具體實現類 DefaultRetryPolicy (每個request 中默認的 RetryPolicy )retry 函數:
 @Override
    public void retry(VolleyError error) throws VolleyError {
        mCurrentRetryCount++;
        mCurrentTimeoutMs += (mCurrentTimeoutMs * mBackoffMultiplier);
        if (!hasAttemptRemaining()) {
            throw error;
        }
    }
上面的代碼可以看出每次 retry 後 mCurrentRetryCount ++ 當 hasAttemptRemaining 函數不通過時候知己拋出異常。
看看hasAttemptRemaining 其實就是簡單的重復次數判斷
 /**
     * Returns true if this policy has attempts remaining, false otherwise.
     */
    protected boolean hasAttemptRemaining() {
        return mCurrentRetryCount <= mMaxNumRetries;
    }
那麼在哪裡會調用 retry 函數呢?跟蹤代碼可以發現在BasicNetwork 中有如下函數 attemptRetryOnException 函數。
 /**
     * Attempts to prepare the request for a retry. If there are no more attempts remaining in the
     * request's retry policy, a timeout exception is thrown.
     * @param request The request to use.
     */
    private static void attemptRetryOnException(String logPrefix, Request request,
            VolleyError exception) throws VolleyError {
        RetryPolicy retryPolicy = request.getRetryPolicy();
        int oldTimeout = request.getTimeoutMs();

        try {
            retryPolicy.retry(exception);
        } catch (VolleyError e) {
            request.addMarker(
                    String.format("%s-timeout-giveup [timeout=%s]", logPrefix, oldTimeout));
            throw e;
        }
        request.addMarker(String.format("%s-retry [timeout=%s]", logPrefix, oldTimeout));
    }
從代碼中可以發現,如果retryPolicy.retry(exception); 拋出異常。那麼會 throw e 向上拋出異常。接著繼續看在哪 調用 attemptRetryOnException 函數呢? 注意到該類的
performRequest
 public NetworkResponse performRequest(Request request) throws VolleyError {
        long requestStart = SystemClock.elapsedRealtime();
        while (true) {
            HttpResponse httpResponse = null;
            byte[] responseContents = null;
            Map responseHeaders = Collections.emptyMap();
            try {
                // Gather headers.
                Map headers = new HashMap();
                addCacheHeaders(headers, request.getCacheEntry());

                // call HurlStack performRequest function ...
                httpResponse = mHttpStack.performRequest(request, headers);
                StatusLine statusLine = httpResponse.getStatusLine();
                int statusCode = statusLine.getStatusCode();

                responseHeaders = convertHeaders(httpResponse.getAllHeaders());
                // Handle cache validation.
                if (statusCode == HttpStatus.SC_NOT_MODIFIED) {// 如果返回304

                    Entry entry = request.getCacheEntry();
                    if (entry == null) {
                        return new NetworkResponse(HttpStatus.SC_NOT_MODIFIED, null,
                                responseHeaders, true,
                                SystemClock.elapsedRealtime() - requestStart);
                    }

                    // A HTTP 304 response does not have all header fields. We
                    // have to use the header fields from the cache entry plus
                    // the new ones from the response.
                    // http://www.w3.org/Protocols/rfc2616/rfc2616-sec10.html#sec10.3.5
                    entry.responseHeaders.putAll(responseHeaders);
                    return new NetworkResponse(HttpStatus.SC_NOT_MODIFIED, entry.data,
                            entry.responseHeaders, true,
                            SystemClock.elapsedRealtime() - requestStart);
                }
                // Some responses such as 204s do not have content.  We must check.
                // note by zhourj:
                if (httpResponse.getEntity() != null) {
                  responseContents = entityToBytes(httpResponse.getEntity());
                } else {
                  // Add 0 byte response as a way of honestly representing a
                  // no-content request.
                  responseContents = new byte[0];
                }

                // if the request is slow, log it.
                long requestLifetime = SystemClock.elapsedRealtime() - requestStart;
                logSlowRequests(requestLifetime, request, responseContents, statusLine);

                if (statusCode < 200 || statusCode > 299) {
                    throw new IOException();
                }
                return new NetworkResponse(statusCode, responseContents, responseHeaders, false,
                        SystemClock.elapsedRealtime() - requestStart);
            } catch (SocketTimeoutException e) {
                attemptRetryOnException("socket", request, new TimeoutError());
            } catch (ConnectTimeoutException e) {
                attemptRetryOnException("connection", request, new TimeoutError());
            } catch (MalformedURLException e) {
                throw new RuntimeException("Bad URL " + request.getUrl(), e);
            } catch (IOException e) {
                int statusCode;
                if (httpResponse != null) {
                    statusCode = httpResponse.getStatusLine().getStatusCode();
                } else {
                    throw new NoConnectionError(e);
                }
                VolleyLog.e("Unexpected response code %d for %s", statusCode, request.getUrl());
                NetworkResponse networkResponse;
                if (responseContents != null) {
                    networkResponse = new NetworkResponse(statusCode, responseContents,
                            responseHeaders, false, SystemClock.elapsedRealtime() - requestStart);
                    if (statusCode == HttpStatus.SC_UNAUTHORIZED ||
                            statusCode == HttpStatus.SC_FORBIDDEN) {
                        attemptRetryOnException("auth",
                                request, new AuthFailureError(networkResponse));
                    } else if (statusCode >= 400 && statusCode <= 499) {
                        // Don't retry other client errors.
                        throw new ClientError(networkResponse);
                    } else if (statusCode >= 500 && statusCode <= 599) {
                        if (request.shouldRetryServerErrors()) {
                            attemptRetryOnException("server",
                                    request, new ServerError(networkResponse));
                        } else {
                            throw new ServerError(networkResponse);
                        }
                    } else {
                        // 3xx? No reason to retry.
                        throw new ServerError(networkResponse);
                    }
                } else {
                    attemptRetryOnException("network", request, new NetworkError());
                }
            }
        }
    }
代碼很長,關注重點(裡面包含了很多Http 狀態碼的異常處理),最外層使用的while(true)死循環,那麼什麼時候跳出循環呢?(跳出循環意味著對 Request 不再處理)return 和 throw excepthion 的時候。當出現網絡超時等問題時候都會調用 attemptRetryOnException 函數,而上面的分析可以知道,當還有 retry 次數的時會選擇將異常吞掉。這樣while 不會退出。所以進入下一次 retry .
DiskBasedCache具體依賴文件進行存儲,已URL為key 具體細節不分析了。但是備忘兩個問題。
1、個人覺得要理解緩存需要理解HTTP 的一些響應頭和請求頭,並理解304 狀態碼的機制。
在Volley 中使用了 If-None-Match If-Modified-Since 請求頭。
詳細的可以看BasicNetwork addCacheHeaders 函數。這個函數執行 performRequest 時候會進行調用。而他的作用主要是添加請求頭的 協商緩存函數(具體需可以了解浏覽器的協商緩存)
 private void addCacheHeaders(Map headers, Cache.Entry entry) {
        // If there's no cache entry, we're done.
        if (entry == null) {
            return;
        }

        if (entry.etag != null) {
            /**
             * If-None-Match,它和ETags(HTTP協議規格說明定義ETag為“被請求變量的實體值”,或者是一個可以與Web資源關聯的記號)常用來判斷當前請求資源是否改變。類似於Last-Modified和HTTP-IF-MODIFIED-SINCE。但是有所不同的是Last-Modified和HTTP-IF-MODIFIED-SINCE只判斷資源的最後修改時間,而ETags和If-None-Match可以是資源任何的任何屬性,不如資源的MD5等。

             ETags和If-None-Match的工作原理是在HTTP Response中添加ETags信息。當客戶端再次請求該資源時,將在HTTP Request中加入If-None-Match信息(ETags的值)。如果服務器驗證資源的ETags沒有改變(該資源沒有改變),將返回一個304狀態;否則,服務器將返回200狀態,並返回該資源和新的ETags。

             ETag如何幫助提升性能?
             聰明的服務器開發者會把ETags和GET請求的“If-None-Match”頭一起使用,這樣可利用客戶端(例如浏覽器)的緩存。因為服務器首先產生ETag,服務器可在稍後使用它來判斷頁面是否已經被修改。本質上,客戶端通過將該記號傳回服務器要求服務器驗證其(客戶端)緩存。
             其過程如下:
             1.客戶端請求一個頁面(A)。
             2.服務器返回頁面A,並在給A加上一個ETag。
             3.客戶端展現該頁面,並將頁面連同ETag一起緩存。
             4.客戶再次請求頁面A,並將上次請求時服務器返回的ETag一起傳遞給服務器。
             5.服務器檢查該ETag,並判斷出該頁面自上次客戶端請求之後還未被修改,直接返回響應304(未修改——Not Modified)和一個空的響應體。
             http://www.cnblogs.com/czh-liyu/archive/2011/06/22/2087113.html
             */
            headers.put("If-None-Match", entry.etag);
        }

        if (entry.lastModified > 0) {
            Date refTime = new Date(entry.lastModified);
            /**
             * If-Modified-Since是標准的HTTP請求頭標簽,在發送HTTP請求時,把浏覽器端緩存頁面的最後修改時間一起發到服務器去,服務器會把這個時間與服務器上實際文件的最後修改時間進行比較。
             *  如果時間一致,那麼返回HTTP狀態碼304(不返回文件內容),客戶端接到之後,就直接把本地緩存文件顯示到浏覽器中。
             * 如果時間不一致,就返回HTTP狀態碼200和新的文件內容,客戶端接到之後,會丟棄舊文件,把新文件緩存起來,並顯示到浏覽器中。
             **/
            headers.put("If-Modified-Since", DateUtils.formatDate(refTime));
        }
    }
第二個是問題是關於:為什麼DiskBasedCache 的writeInt Long 函數需要計算?
/**
     * 為什麼寫入的時候需要進行運算呢?
     * http://a.codekk.com/detail/Android/grumoon/Volley%20源碼解析
     * note: 只是按照字節順序寫入而已,沒有涉及到大小端問題
     */
    static void writeInt(OutputStream os, int n) throws IOException {
        os.write((n >> 0) & 0xff);
        os.write((n >> 8) & 0xff);
        os.write((n >> 16) & 0xff);
        os.write((n >> 24) & 0xff);
    }
有人說,這個是處理大小端的問題【不明大小端的可以谷歌,這個大小端名字的起源還很有意思,:-D】?確實網絡傳輸存在大小端問題。網絡傳輸一般用的是大端,而不同的操作系統使用的不同的端,但是個人覺得上面的代碼,只是將int按照字節順序寫入文件而已,不涉及什麼大小端。
PoolingByteArrayOutputStream 繼承自 ByteArrayOutputStream。並且內部使用了一個 ByteArrayPool mPool; (字節緩存池)。這個很有意思。將 ByteArrayOutputStream 中的buff 對象引用到 ByteArrayPool 中實現 byte[] 數組的循環利用。而這裡詳細說說ByteArrayPool ,很精短的代碼實現了一個LRU 算法。
代碼很多直接拷貝:
public class ByteArrayPool {

    /** The buffer pool, arranged both by last use and by buffer size */
    private List mBuffersByLastUse = new LinkedList();// 最近最上使用的隊列
    private List mBuffersBySize = new ArrayList(64);// order by buffer size

    /** The total size of the buffers in the pool */
    private int mCurrentSize = 0;

    /**
     * The maximum aggregate size of the buffers in the pool. Old buffers are discarded to stay
     * under this limit.
     */
    private final int mSizeLimit;

    /** Compares buffers by size */
    protected static final Comparator BUF_COMPARATOR = new Comparator() {
        @Override
        public int compare(byte[] lhs, byte[] rhs) {
            return lhs.length - rhs.length;
        }
    };

    /**
     * @param sizeLimit the maximum size of the pool, in bytes
     */
    public ByteArrayPool(int sizeLimit) {
        mSizeLimit = sizeLimit;
    }

    /**
     * Returns a buffer from the pool if one is available in the requested size, or allocates a new
     * one if a pooled one is not available.
     *
     * @param len the minimum size, in bytes, of the requested buffer. The returned buffer may be
     *        larger.
     * @return a byte[] buffer is always returned.
     */
    public synchronized byte[] getBuf(int len) {
        for (int i = 0; i < mBuffersBySize.size(); i++) {
            byte[] buf = mBuffersBySize.get(i);
            if (buf.length >= len) {
                mCurrentSize -= buf.length;
                mBuffersBySize.remove(i);
                mBuffersByLastUse.remove(buf);
                return buf;
            }
        }
        return new byte[len];
    }

    /**
     * Returns a buffer to the pool, throwing away old buffers if the pool would exceed its allotted
     * size.
     *
     * @param buf the buffer to return to the pool.
     */
    public synchronized void returnBuf(byte[] buf) {
        if (buf == null || buf.length > mSizeLimit) {
            return;
        }
        mBuffersByLastUse.add(buf);
        int pos = Collections.binarySearch(mBuffersBySize, buf, BUF_COMPARATOR);
        if (pos < 0) {
            pos = -pos - 1;
        }
        mBuffersBySize.add(pos, buf);
        mCurrentSize += buf.length;
        trim();
    }

    /**
     * Removes buffers from the pool until it is under its size limit.
     */
    private synchronized void trim() {
        while (mCurrentSize > mSizeLimit) {
            byte[] buf = mBuffersByLastUse.remove(0);
            mBuffersBySize.remove(buf);
            mCurrentSize -= buf.length;
        }
    }
}
我們來逐步分析:
數據連個數據結構:
private List mBuffersByLastUse = new LinkedList();// 最近最上使用的隊列
    private List mBuffersBySize = new ArrayList(64);// order by buffer size
mBuffersByLastUse 使用 LinkedList鏈表記錄最近使用的byte[] ,最近使用的放在鏈表尾部,(在returnBuf 函數中, byte[] 回收後會放在鏈表尾部,這個也是最新使用的內存。
mBuffersBySize byte[] 是一個有序數據,按照byte[] 的大小從小到大存放。(怎麼知道是從小到大?為什麼是從小到大?)
第一:怎麼知道我們可以看 returnBuf 函數中有如下代碼:
 int pos = Collections.binarySearch(mBuffersBySize, buf, BUF_COMPARATOR);
        if (pos < 0) {
            pos = -pos - 1;
        }
        mBuffersBySize.add(pos, buf);
上面代碼是根據二分搜索找打 buf 的合適位置,並插入其中。根據BUF_COMPARATOR 函數可以知道mBuffersBySize 是從小到大排列的。
第二為什麼要從小到大呢?可以看getBuff() 函數。
 public synchronized byte[] getBuf(int len) {
        for (int i = 0; i < mBuffersBySize.size(); i++) {
            byte[] buf = mBuffersBySize.get(i);
            if (buf.length >= len) {
                mCurrentSize -= buf.length;
                mBuffersBySize.remove(i);
                mBuffersByLastUse.remove(buf);
                return buf;
            }
        }
        return new byte[len];
    }
這個要從緩存池中拿到 大於 len 的且長度最短(提高空間利用率)所有如果從小到大排列,一次遍歷即可。
為什麼說是LRU能算法呢?可以看到在每次內存使用超過 最大限制時候回調用 trim 函數。將前面最早使用 byte[]數組 remove 掉,直到空間不超過限制。
 Android菜鳥的成長筆記(28)——Google官方對Andoird 2.x提供的ActionBar支持
在Google官方Android設計指南中(鏈接:http://www.apkbus.com/design/get-started/ui-overview.html)有一
 華為安卓(Android)手機工程模式詳解
上一篇文章我們介紹了安卓(Android)手機拔號盤下隱藏的功能,除了這些隱藏的暗碼以外,各大手機廠商也在安卓(Android)手機裡設置了自己的工程模式,
 Bluestacks安卓模擬器簡單設置使用圖解教程
Bluestacks是一個可以讓Android應用程序運行在電腦(現在包括windows系統,mac版)的一種模擬器,就是我們在電腦上也可以運行Androi
 深入理解Android之AOP
深入理解Android之AOP 一、閒談AOP大家都知道OOP,即ObjectOriented Programming,面向對象編程。而本文要介紹的是AOP。A