編輯:關於Android編程
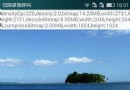
前段時間項目有需要要顯示彩色探測點的二維碼,網上搜了下,有基於java,c等的源碼。網上的java源碼直接照搬有些問題,自己改了改。不說廢話,先上結果圖。


原理其實很簡單,利用zxing的寫二維碼功能生成二維碼圖片時,對相應像素點進行著色即可。關鍵是如何准確獲取到二維碼探測點在matrix裡的位置。
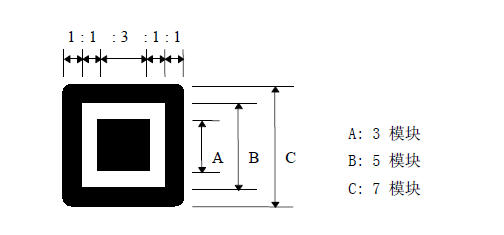
二維碼一共有40個尺寸。官方叫版本Version。Version 1是21 x 21的矩陣,Version 2是 25 x 25的矩陣,Version 3是29的尺寸,每增加一個version,就會增加4的尺寸,公式是:(V-1)*4 + 21(V是版本號) 最高Version 40,(40-1)*4+21 = 177,所以最高是177 x 177 的正方形。……而三個角的探測點的長度相對來講是固定的。
上面這段話是對二維碼的尺寸規格的說明。另外,探測點在任何尺寸的二維碼中,單邊長度都是8個模塊(包含外圍的一條白邊)。根據這些,我們就可以計算出探測點在像素矩陣中的具體位置了。
利用zxing生成二維碼,是先生成Matrix,再由BarcodeEncoder轉成Bitmap。看BarcodeEncoder中代碼:
    public Bitmap createBitmap(BitMatrix matrix) {
        int width = matrix.getWidth();
        int height = matrix.getHeight();
        int[] pixels = new int[width * height];
        for (int y = 0; y < height; y++) {
            int offset = y * width;
            for (int x = 0; x < width; x++) {
                pixels[offset + x] = matrix.get(x, y) ? BLACK : WHITE;
            }
        }

        Bitmap bitmap = Bitmap.createBitmap(width, height, Bitmap.Config.ARGB_8888);
        bitmap.setPixels(pixels, 0, width, 0, 0, width, height);
        return bitmap;
    }
其中重要的一句
pixels[offset + x] = matrix.get(x, y) ? BLACK : WHITE;
根據矩陣中的0,1做顏色轉換,由此我們可以自己來設定自己所需要的顏色。現在我們的任務就是確定探測點的准確位置。
要想確定生成的二維碼探測點位置,首先要確定生成的二維碼的尺寸。看zxing中的QRCodeWriter類,其中
public BitMatrix encode(String contents,
                      BarcodeFormat format,
                      int width,
                      int height,
                      Map hints) throws WriterException {

if (contents.isEmpty()) {
  throw new IllegalArgumentException("Found empty contents");
}

if (format != BarcodeFormat.QR_CODE) {
  throw new IllegalArgumentException("Can only encode QR_CODE, but got " + format);
}

if (width < 0 || height < 0) {
  throw new IllegalArgumentException("Requested dimensions are too small: " + width + 'x' +
      height);
}
ErrorCorrectionLevel errorCorrectionLevel = ErrorCorrectionLevel.L;
int quietZone = QUIET_ZONE_SIZE;
if (hints != null) {
  ErrorCorrectionLevel requestedECLevel = (ErrorCorrectionLevel) hints.get(EncodeHintType.ERROR_CORRECTION);
  if (requestedECLevel != null) {
    errorCorrectionLevel = requestedECLevel;
  }
  Integer quietZoneInt = (Integer) hints.get(EncodeHintType.MARGIN);
  if (quietZoneInt != null) {
    quietZone = quietZoneInt;
  }
}

QRCode code = Encoder.encode(contents, errorCorrectionLevel, hints);
return renderResult(code, width, height, quietZone);
}
主要是調用Encoder中的encode生成一個QRCode,再由renderResult方法生成一個BitMatrix。而生成的QRCode中包含了我們所需要的Version信息。所以我們可以自己改寫一個QRCodeWriter類,拿到QRCode。直接將QRCodeWriter復制出來,重寫幾個方法即可。如我寫的ColorQRCodeWriter:
public class ColorQRCodeWriter {
private static final int QUIET_ZONE_SIZE = 4;
public Map encode(String contents, BarcodeFormat format, int width, int height)
throws WriterException {
return encode(contents, format, width, height, null);
}
public Map encode(String contents,
BarcodeFormat format,
int width,
int height,
Map hints) throws WriterException {
if (contents.isEmpty()) {
throw new IllegalArgumentException("Found empty contents");
}
if (format != BarcodeFormat.QR_CODE) {
throw new IllegalArgumentException("Can only encode QR_CODE, but got " + format);
}
if (width < 0 || height < 0) {
throw new IllegalArgumentException("Requested dimensions are too small: " + width + 'x' +
height);
}
ErrorCorrectionLevel errorCorrectionLevel = ErrorCorrectionLevel.L;
int quietZone = QUIET_ZONE_SIZE;
if (hints != null) {
ErrorCorrectionLevel requestedECLevel = (ErrorCorrectionLevel) hints.get(EncodeHintType.ERROR_CORRECTION);
if (requestedECLevel != null) {
errorCorrectionLevel = requestedECLevel;
}
Integer quietZoneInt = (Integer) hints.get(EncodeHintType.MARGIN);
if (quietZoneInt != null) {
quietZone = quietZoneInt;
}
}
QRCode code = Encoder.encode(contents, errorCorrectionLevel, hints);
return renderResult(code, width, height, quietZone);
}
// Note that the input matrix uses 0 == white, 1 == black, while the output matrix uses
// 0 == black, 255 == white (i.e. an 8 bit greyscale bitmap).
private static Map renderResult(QRCode code, int width, int height, int quietZone) {
ByteMatrix input = code.getMatrix();
if (input == null) {
throw new IllegalStateException();
}
int inputWidth = input.getWidth();
int inputHeight = input.getHeight();
int qrWidth = inputWidth + (quietZone * 2);
int qrHeight = inputHeight + (quietZone * 2);
int outputWidth = Math.max(width, qrWidth);
int outputHeight = Math.max(height, qrHeight);
int multiple = Math.min(outputWidth / qrWidth, outputHeight / qrHeight);
// Padding includes both the quiet zone and the extra white pixels to accommodate the requested
// dimensions. For example, if input is 25x25 the QR will be 33x33 including the quiet zone.
// If the requested size is 200x160, the multiple will be 4, for a QR of 132x132. These will
// handle all the padding from 100x100 (the actual QR) up to 200x160.
int leftPadding = (outputWidth - (inputWidth * multiple)) / 2;
int topPadding = (outputHeight - (inputHeight * multiple)) / 2;
BitMatrix output = new BitMatrix(outputWidth, outputHeight);
for (int inputY = 0, outputY = topPadding; inputY < inputHeight; inputY++, outputY += multiple) {
// Write the contents of this row of the barcode
for (int inputX = 0, outputX = leftPadding; inputX < inputWidth; inputX++, outputX += multiple) {
if (input.get(inputX, inputY) == 1) {
output.setRegion(outputX, outputY, multiple, multiple);
}
}
}
Map map=new HashMap<>();
map.put("BitMatrix",output);
map.put("Version",code.getVersion());
return map;
}
public Bitmap encodeBitmap(String content, int width, int height,boolean all){
return encodeBitmap(content,width,height,null,null,null,all);
}
/**
* 生成基點顏色不同的圖片
* @param content 需要生成的二維碼的內容
* @param width 二維碼寬
* @param height 二維碼高
* @param topLeftColor 左基點顏色
* @param topRightColor 右頂基點顏色
* @param bottomLeftColor 左底基點顏色
* @return
*/
public Bitmap encodeBitmap(String content, int width, int height,
Integer topLeftColor, Integer topRightColor, Integer bottomLeftColor,boolean all){
try {
int startModel=2;
int endModel=5;
if(all){
startModel=0;
endModel=7;
}
Map hints = new HashMap();
hints.put(EncodeHintType.CHARACTER_SET, "UTF-8");
hints.put(EncodeHintType.MARGIN, 1);
Map map= encode(content,BarcodeFormat.QR_CODE,width,height,hints);
BitMatrix matrix= (BitMatrix) map.get("BitMatrix");
Version version= (Version) map.get("Version");
int[] tl=matrix.getTopLeftOnBit();
int totalModelNum=(version.getVersionNumber()-1)*4+5+16; //獲取單邊模塊數
int resultWidth=width-2*(tl[0]);
int modelWidth=resultWidth/totalModelNum; //得到每個模塊長度
//得到三個基准點的起始與終點
int topEndX=tl[0]+modelWidth*endModel;
int topStartX=tl[0]+modelWidth*startModel;
int topStartY=tl[0]+modelWidth*startModel;
int topEndY=tl[0]+modelWidth*endModel;
int rightStartX=(totalModelNum-endModel)*modelWidth+tl[0];
int rightEndX=width-modelWidth*startModel-tl[0];
int leftStartY=height-modelWidth*endModel-tl[1];
int leftEndY=height-modelWidth*startModel-tl[1];
int[] pixels=new int[width*height];
for(int y=0;y=topStartX&&x=topStartY&&y=rightStartX&&y>=topStartY&&y=topStartX&&x=leftStartY&&y其中的addLogo方法直接從網上找的。
下面附上源碼地址:下載地址請點擊
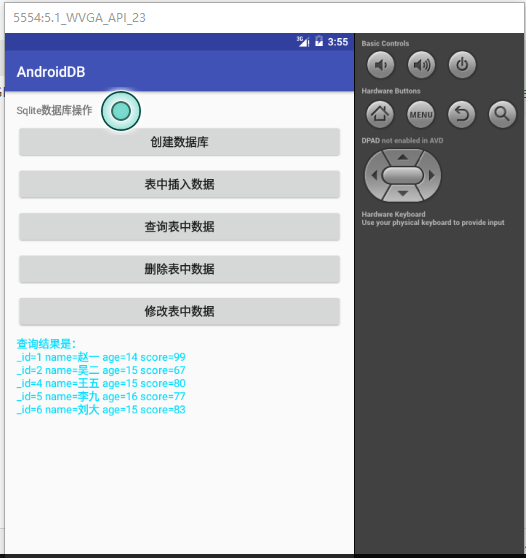 Android Sqlite數據庫常用操作
很久前也寫過一篇Android數據庫操作相關內容。在正式項目中,我們通常會使用數據庫開源框架如GreenDao來對數據庫進行操作。感覺很久沒有直接使用Sql語句了,這幾天
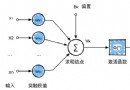 DeepLearning - CNN - 人工神經網絡ANN
背景之前在網上搜索了好多好多關於CNN,卷積神經網絡的文章,很多都講如何卷積、卷積層如何操作、具體如何進行卷積計算、卷積的好處。我也在此之前走了好多彎路,已經很了解如何卷
 android 自定義控件實現流式布局
什麼是流式布局呢?也不知道哪個高手把它稱之為流失布局,叫什麼不重要,重要的是要知道怎麼實現,今天就實現下這個功能,先看下圖什麼就知道是什麼是流式布局了,做過電商的app或
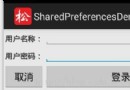 Android存儲之SharedPreferences
SharedPreferences是Android提供用來存儲一些簡單的配置信息的一種機制,例如,一些默認歡迎語、登錄的用戶名和密碼等。其以鍵值對的方式存儲