編輯:關於Android編程
我們先說一下思路,在android系統中就自帶了圖片剪切的應用,所以,我們只需要將我們獲取到的相片傳給圖片剪切應用,再將剪切好的相片返回到我們自己的界面顯示就ok了
在開發一些APP的過程中,我們可能涉及到頭像的處理,比如從手機或者相冊獲取頭像,剪裁成自己需要的頭像,設置或上傳頭像等。網上一些相關的資料也是多不勝數,但在實際應用中往往會存在各種問題,沒有一個完美的解決方案。由於近期項目的需求,就研究了一下,目前看來還沒有什麼問題。
這裡我們只討論獲取、剪裁與設置,上傳流程根據自己的業務需求添加。先上一張流程圖:
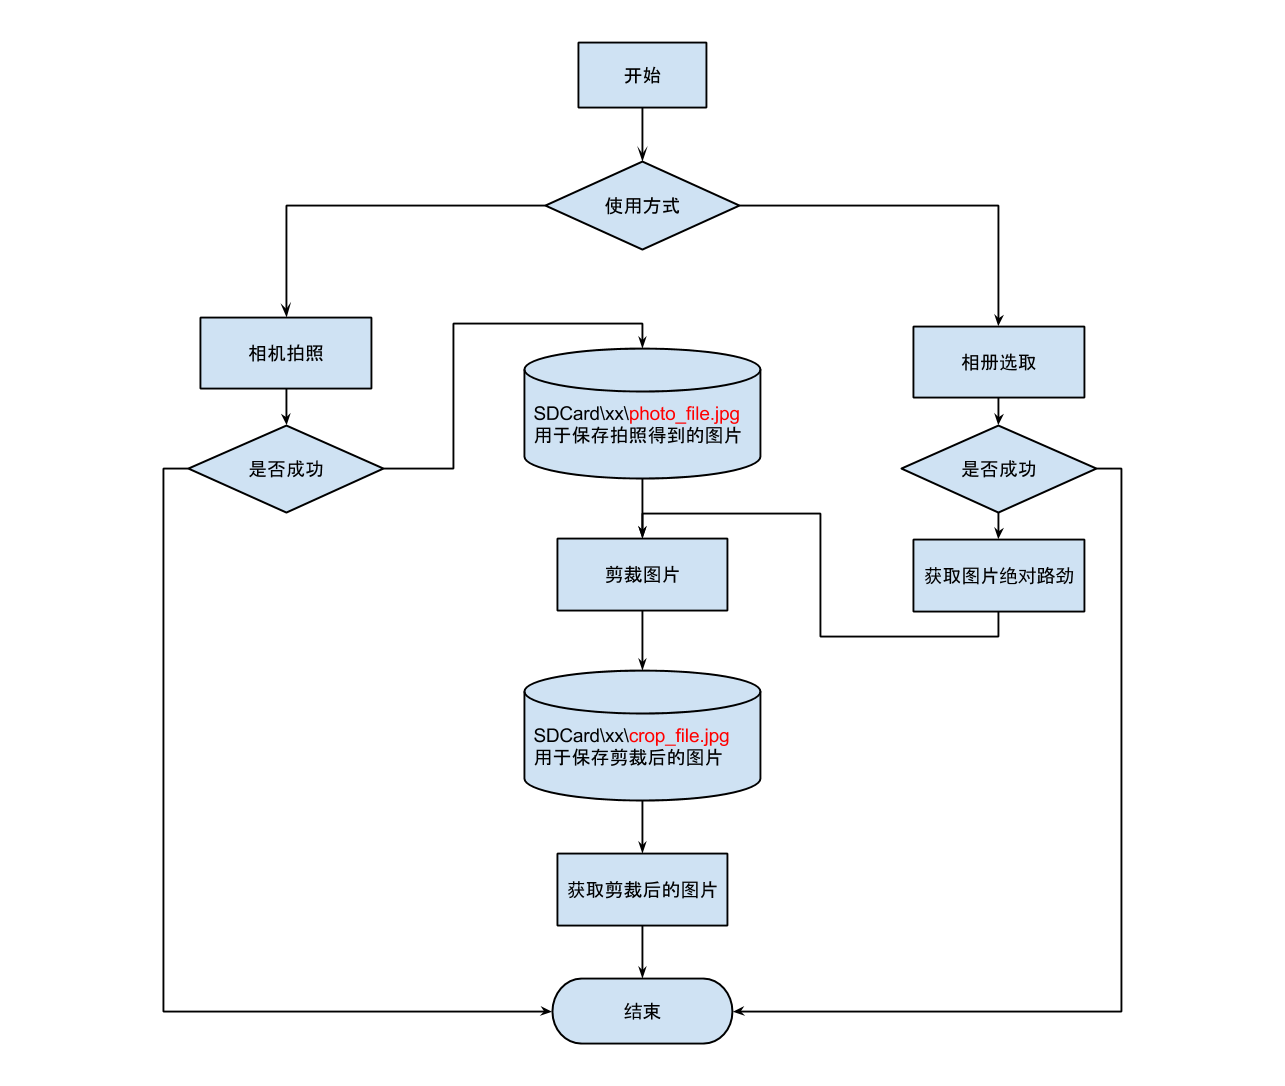
這圖是用Google Drive的繪圖工具繪制的,不得不贊歎Google可以把在線編輯工具做得如此強大。好吧,我就是Google的腦殘粉!回到主題,這是我設計的思路,接下來進行詳細分析:
1、獲得圖片的途徑無非就兩種,第一是相機拍攝,第二是從本地相冊獲取。
2、我在SD卡上創建了一個文件夾,裡面有兩個Uri,一個是用於保存拍照時獲得的原始圖片,一個是保存剪裁後的圖片。之前我考慮過用同一個Uri來保存圖片,但是在實踐中遇到一個問題,當拍照後不進行剪裁,那麼下次從SD卡拿到就是拍照保存的大圖,不僅丟失了之前剪裁的圖片,還會因為加載大圖導致內存崩潰。基於此考慮,我選擇了兩個Uri來分別保存圖片。
3、相機拍攝時,我們使用Intent調用系統相機,並將設置輸出設置到SDCard\xx\photo_file.jpg,以下是代碼片段:
//調用系統相機
Intent intentCamera = new Intent(MediaStore.ACTION_IMAGE_CAPTURE);
//將拍照結果保存至photo_file的Uri中,不保留在相冊中
intentCamera.putExtra(MediaStore.EXTRA_OUTPUT, imagePhotoUri);
startActivityForResult(intentCamera, PHOTO_REQUEST_CAREMA);
在回調時,我們需要對photo_file.jpg調用系統工具進行剪裁,並設置輸出設置到SDCard\xx\crop_file.jpg,以下是代碼片段:
case PHOTO_REQUEST_CAREMA:
  if (resultCode == RESULT_OK) {
    //從相機拍攝保存的Uri中取出圖片,調用系統剪裁工具
    if (imagePhotoUri != null) {
      CropUtils.cropImageUri(this, imagePhotoUri, imageUri, ibUserIcon.getWidth(), ibUserIcon.getHeight(), PHOTO_REQUEST_CUT);
    } else {
      ToastUtils.show(this, "沒有得到拍照圖片");
    }
  } else if (resultCode == RESULT_CANCELED) {
    ToastUtils.show(this, "取消拍照");
  } else {
    ToastUtils.show(this, "拍照失敗");
  }
  break;
//調用系統的剪裁處理圖片並保存至imageUri中
public static void cropImageUri(Activity activity, Uri orgUri, Uri desUri, int width, int height, int requestCode) {
  Intent intent = new Intent("com.android.camera.action.CROP");
  intent.setDataAndType(orgUri, "image/*");
  intent.putExtra("crop", "true");
  intent.putExtra("aspectX", 1);
  intent.putExtra("aspectY", 1);
  intent.putExtra("outputX", width);
  intent.putExtra("outputY", height);
  intent.putExtra("scale", true);
  //將剪切的圖片保存到目標Uri中
  intent.putExtra(MediaStore.EXTRA_OUTPUT, desUri);
  intent.putExtra("return-data", false);
  intent.putExtra("outputFormat", Bitmap.CompressFormat.JPEG.toString());
  intent.putExtra("noFaceDetection", true);
  activity.startActivityForResult(intent, requestCode);
}
最後,我們需要在回調中取出crop_file.jpg,因為剪裁時,對圖片已經進行了壓縮,所以也不用擔心內存的問題,在這裡我提供兩個方法,第一個是直接獲取原始圖片的Bitmap,第二個是獲取原始圖片並做成圓形,相信大多數的人對後者比較感興趣,哈哈!以下是代碼片段:
case PHOTO_REQUEST_CUT:
  if (resultCode == RESULT_OK) {
    Bitmap bitmap = decodeUriiAsBimap(this,imageCropUri)
  } else if (resultCode == RESULT_CANCELED) {
    ToastUtils.show(this, "取消剪切圖片");
  } else {
    ToastUtils.show(this, "剪切失敗");
  }
  break;
//從Uri中獲取Bitmap格式的圖片
private static Bitmap decodeUriAsBitmap(Context context, Uri uri) {
  Bitmap bitmap;
  try {
    bitmap = BitmapFactory.decodeStream(context.getContentResolver().openInputStream(uri));
  } catch (FileNotFoundException e) {
    e.printStackTrace();
    return null;
  }
  return bitmap;
}
//獲取圓形圖片
public static Bitmap getRoundedCornerBitmap(Bitmap bitmap) {
  if (bitmap == null) {
  return null;
  }
  Bitmap output = Bitmap.createBitmap(bitmap.getWidth(), bitmap.getHeight(), Bitmap.Config.ARGB_8888);
  Canvas canvas = new Canvas(output);
  final Paint paint = new Paint();
  /* 去鋸齒 */
  paint.setAntiAlias(true);
  paint.setFilterBitmap(true);
  paint.setDither(true);
  // 保證是方形,並且從中心畫
  int width = bitmap.getWidth();
  int height = bitmap.getHeight();
  int w;
  int deltaX = 0;
  int deltaY = 0;
  if (width <= height) {
    w = width;
    deltaY = height - w;
  } else {
    w = height;
    deltaX = width - w;
  }
  final Rect rect = new Rect(deltaX, deltaY, w, w);
  final RectF rectF = new RectF(rect);

  paint.setAntiAlias(true);
  canvas.drawARGB(0, 0, 0, 0);
  // 圓形,所有只用一個
  int radius = (int) (Math.sqrt(w * w * 2.0d) / 2);
  canvas.drawRoundRect(rectF, radius, radius, paint);
  paint.setXfermode(new PorterDuffXfermode(PorterDuff.Mode.SRC_IN));
  canvas.drawBitmap(bitmap, rect, rect, paint);
  return output;
}
4、相冊獲取時,這也是最難的地方。Android 4.4以下的版本,從相冊獲取的圖片Uri能夠完美調用系統剪裁工具,或者直接從選取相冊是帶入剪裁圖片的Intent,而且效果非常完美。但是在Android 4.4及其以上的版本,獲取到的Uri根本無法調用系統剪裁工具,會直接導致程序崩潰。我也是研究了很久,才發現兩者的Uri有很大的區別,Google官方文檔中讓開發者使用Intent.ACTION_GET_CONTENT代替以前的Action,並且就算你仍然使用以前的Action,都會返回一種新型的Uri,我個人猜測是因為Google把所有的內容獲取分享做成一個統一的Uri,如有不對,請指正!想通這一點後,問題就變得簡單了,我把這種新型的Uri重新封裝一次,得到以為"file:\\..."標准的絕對路勁,傳入系統剪裁工具中,果然成功了,只是這個封裝過程及其艱難,查閱了很多資料,終於還是拿到了。下面說下具體步驟:
第一、調用系統相冊,以下是代碼片段:
//調用系統相冊
  Intent photoPickerIntent = new Intent(Intent.ACTION_GET_CONTENT);
  photoPickerIntent.setType("image/*");
  startActivityForResult(photoPickerIntent, PHOTO_REQUEST_GALLERY);
第二、在回調中,重新封裝Uri,並調用系統剪裁工具將輸出設置到crop_file.jpg,調用系統剪裁工具代碼在拍照獲取的步驟中已經貼出,這裡就不重復制造車輪了,重點貼重新封裝Uri的代碼,以下是代碼片段:
case PHOTO_REQUEST_GALLERY:
  if (resultCode == RESULT_OK) {
    //從相冊選取成功後,需要從Uri中拿出圖片的絕對路徑,再調用剪切
    Uri newUri = Uri.parse("file:///" + CropUtils.getPath(this, data.getData()));
    if (newUri != null) {
      CropUtils.cropImageUri(this, newUri, imageUri, ibUserIcon.getWidth(),
      ibUserIcon.getHeight(), PHOTO_REQUEST_CUT);
    } else {
      ToastUtils.show(this, "沒有得到相冊圖片");
    }
  } else if (resultCode == RESULT_CANCELED) {
    ToastUtils.show(this, "從相冊選取取消");
  } else {
    ToastUtils.show(this, "從相冊選取失敗");
  }
  break;
@SuppressLint("NewApi")
public static String getPath(final Context context, final Uri uri) {

final boolean isKitKat = Build.VERSION.SDK_INT >= Build.VERSION_CODES.KITKAT;

// DocumentProvider
if (isKitKat && DocumentsContract.isDocumentUri(context, uri)) {
  // ExternalStorageProvider
  if (isExternalStorageDocument(uri)) {
    final String docId = DocumentsContract.getDocumentId(uri);
    final String[] split = docId.split(":");
    final String type = split[0];

    if ("primary".equalsIgnoreCase(type)) {
      return Environment.getExternalStorageDirectory() + "/"+ split[1];
    }

  }
  // DownloadsProvider
  else if (isDownloadsDocument(uri)) {

    final String id = DocumentsContract.getDocumentId(uri);
    final Uri contentUri = ContentUris.withAppendedId(Uri.parse("content://downloads/public_downloads"),Long.valueOf(id));

    return getDataColumn(context, contentUri, null, null);
  }
  // MediaProvider
  else if (isMediaDocument(uri)) {
    final String docId = DocumentsContract.getDocumentId(uri);
    final String[] split = docId.split(":");
    final String type = split[0];

    Uri contentUri = null;
    if ("image".equals(type)) {
      contentUri = MediaStore.Images.Media.EXTERNAL_CONTENT_URI;
    } else if ("video".equals(type)) {
      contentUri = MediaStore.Video.Media.EXTERNAL_CONTENT_URI;
    } else if ("audio".equals(type)) {
      contentUri = MediaStore.Audio.Media.EXTERNAL_CONTENT_URI;
    }

    final String selection = "_id=?";
    final String[] selectionArgs = new String[]{split[1]};

    return getDataColumn(context, contentUri, selection,selectionArgs);
    }
  }
  // MediaStore (and general)
  else if ("content".equalsIgnoreCase(uri.getScheme())) {
    return getDataColumn(context, uri, null, null);
  }
  // File
  else if ("file".equalsIgnoreCase(uri.getScheme())) {
    return uri.getPath();
  }

  return null;
}

/**
* Get the value of the data column for this Uri. This is useful for
* MediaStore Uris, and other file-based ContentProviders.
*
* @param context    The context.
* @param uri      The Uri to query.
* @param selection   (Optional) Filter used in the query.
* @param selectionArgs (Optional) Selection arguments used in the query.
* @return The value of the _data column, which is typically a file path.
*/
private static String getDataColumn(Context context, Uri uri,String selection, String[] selectionArgs) {

  Cursor cursor = null;
  final String column = "_data";
  final String[] projection = {column};

  try {
    cursor = context.getContentResolver().query(uri, projection,selection, selectionArgs, null);
    if (cursor != null && cursor.moveToFirst()) {
      final int column_index = cursor.getColumnIndexOrThrow(column);
      return cursor.getString(column_index);
    }
  } finally {
    if (cursor != null)
      cursor.close();
  }
  return null;
}

/**
* @param uri The Uri to check.
* @return Whether the Uri authority is ExternalStorageProvider.
*/
private static boolean isExternalStorageDocument(Uri uri) {
  return "com.android.externalstorage.documents".equals(uri.getAuthority());
}

/**
* @param uri The Uri to check.
* @return Whether the Uri authority is DownloadsProvider.
*/
private static boolean isDownloadsDocument(Uri uri) {
  return "com.android.providers.downloads.documents".equals(uri.getAuthority());
}

/**
* @param uri The Uri to check.
* @return Whether the Uri authority is MediaProvider.
*/
private static boolean isMediaDocument(Uri uri) {
  return "com.android.providers.media.documents".equals(uri.getAuthority());
}
後續的系統剪裁工具調用跟拍照獲取步驟一致,請參見上的代碼。
5、所有步驟完成,在Nexus 5設備中的最新系統中測試通過,在小米、三星等一些設備中表現也很完美。如果在你的設備上存在缺陷,一定要跟帖給我反饋,謝謝!
文章結尾附上一個網友的完整示例,給了我很多的參考
package com.only.android.app;

import java.io.File;

import android.app.Activity;
import android.app.AlertDialog;
import android.content.DialogInterface;
import android.content.Intent;
import android.graphics.Bitmap;
import android.graphics.BitmapFactory;
import android.net.Uri;
import android.os.Bundle;
import android.os.SystemClock;
import android.provider.MediaStore;
import android.view.View;
import android.widget.Button;
import android.widget.ImageView;

import com.only.android.R;

public class CopyOfImageScaleActivity extends Activity implements View.OnClickListener {
  /** Called when the activity is first created. */
  private Button selectImageBtn;
  private ImageView imageView;

  private File sdcardTempFile;
  private AlertDialog dialog;
  private int crop = 180;

  @Override
  public void onCreate(Bundle savedInstanceState) {
    super.onCreate(savedInstanceState);
    setContentView(R.layout.imagescale);

    selectImageBtn = (Button) findViewById(R.id.selectImageBtn);
    imageView = (ImageView) findViewById(R.id.imageView);

    selectImageBtn.setOnClickListener(this);
    sdcardTempFile = new File("/mnt/sdcard/", "tmp_pic_" + SystemClock.currentThreadTimeMillis() + ".jpg");

  }

  @Override
  public void onClick(View v) {
    if (v == selectImageBtn) {
      if (dialog == null) {
        dialog = new AlertDialog.Builder(this).setItems(new String[] { "相機", "相冊" }, new DialogInterface.OnClickListener() {
          @Override
          public void onClick(DialogInterface dialog, int which) {
            if (which == 0) {
              Intent intent = new Intent("android.media.action.IMAGE_CAPTURE");
              intent.putExtra("output", Uri.fromFile(sdcardTempFile));
              intent.putExtra("crop", "true");
              intent.putExtra("aspectX", 1);// 裁剪框比例
              intent.putExtra("aspectY", 1);
              intent.putExtra("outputX", crop);// 輸出圖片大小
              intent.putExtra("outputY", crop);
              startActivityForResult(intent, 101);
            } else {
              Intent intent = new Intent("android.intent.action.PICK");
              intent.setDataAndType(MediaStore.Images.Media.INTERNAL_CONTENT_URI, "image/*");
              intent.putExtra("output", Uri.fromFile(sdcardTempFile));
              intent.putExtra("crop", "true");
              intent.putExtra("aspectX", 1);// 裁剪框比例
              intent.putExtra("aspectY", 1);
              intent.putExtra("outputX", crop);// 輸出圖片大小
              intent.putExtra("outputY", crop);
              startActivityForResult(intent, 100);
            }
          }
        }).create();
      }
      if (!dialog.isShowing()) {
        dialog.show();
      }
    }
  }

  @Override
  protected void onActivityResult(int requestCode, int resultCode, Intent intent) {
    if (resultCode == RESULT_OK) {
      Bitmap bmp = BitmapFactory.decodeFile(sdcardTempFile.getAbsolutePath());
      imageView.setImageBitmap(bmp);
    }
  }
}
最後再啰嗦一句,功能雖然已經實現了,但是實際代碼還是可以進一步優化的,感興趣的童鞋們可以改進下。
 白話開發——自己動手編譯Android源碼
簡單的介紹了Android Studio代碼調試的一些技巧.現在呢,我們來談談android源碼編譯的一些事.(俺認為,作為android developer人人都應該有
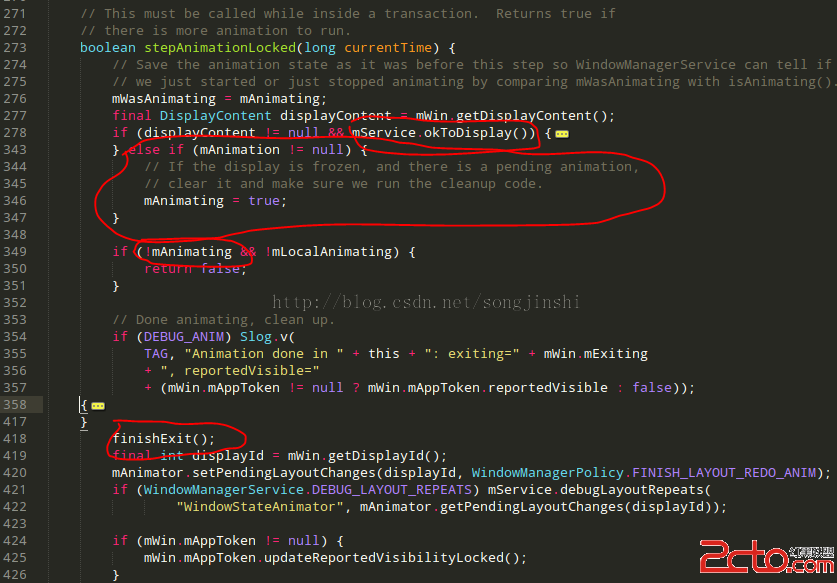 Android5.0L退出APP橫豎屏切換導致的觸摸屏輸入(Touch Event)無效(凍屏)問題分析(Key Event仍然有效)
一、問題現象1、多次進出需要強制橫屏的app,比如Real FootBall2015,在退出app的時候會有概率出現退出卡頓,然後TP無法輸入的問題。2、出問題時Powe
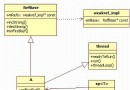 Android FrameWork中的SP、RefBase、weakref_impl,Thread類
在閱讀Android的Framework處的代碼可以發現,無處不在SP給予了我視覺上的沖擊,這個是什麼?初級的我,看這個當初就基本當成指針來用,熟不知其的內在美,於是在這
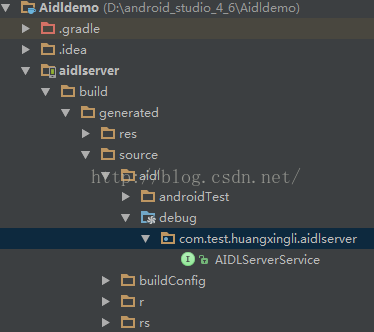 Android studio 中創建AIDL Service
1、概述AIDL在android系統中的作用AIDL,Android Interface definition language的縮寫,它是一種android內部進程通信