編輯:關於Android編程
這裡我們將采取的方案是使用組合View的方式,先自定義一個布局繼承自LinearLayout,然後在這個布局中加入下拉頭和ListView這兩個子元素,並讓這兩個子元素縱向排列。初始化的時候,讓下拉頭向上偏移出屏幕,這樣我們看到的就只有ListView了。然後對ListView的touch事件進行監聽,如果當前ListView已經滾動到頂部並且手指還在向下拉的話,那就將下拉頭顯示出來,松手後進行刷新操作,並將下拉頭隱藏。那我們現在就來動手實現一下,新建一個項目起名叫PullToRefreshTest,先在項目中定義一個下拉頭的布局文件pull_to_refresh.xml,代碼如下所示:
<RelativeLayout xmlns:android="http://schemas.android.com/apk/res/android"
xmlns:tools="http://schemas.android.com/tools"
android:id="@+id/pull_to_refresh_head"
android:layout_width="fill_parent"
android:layout_height="dip" >
<LinearLayout
android:layout_width="dip"
android:layout_height="dip"
android:layout_centerInParent="true"
android:orientation="horizontal" >
<RelativeLayout
android:layout_width="dip"
android:layout_height="dip"
android:layout_weight=""
>
<ImageView
android:id="@+id/arrow"
android:layout_width="wrap_content"
android:layout_height="wrap_content"
android:layout_centerInParent="true"
android:src="@drawable/arrow"
/>
<ProgressBar
android:id="@+id/progress_bar"
android:layout_width="dip"
android:layout_height="dip"
android:layout_centerInParent="true"
android:visibility="gone"
/>
</RelativeLayout>
<LinearLayout
android:layout_width="dip"
android:layout_height="dip"
android:layout_weight=""
android:orientation="vertical" >
<TextView
android:id="@+id/description"
android:layout_width="fill_parent"
android:layout_height="dip"
android:layout_weight=""
android:gravity="center_horizontal|bottom"
android:text="@string/pull_to_refresh" />
<TextView
android:id="@+id/updated_at"
android:layout_width="fill_parent"
android:layout_height="dip"
android:layout_weight=""
android:gravity="center_horizontal|top"
android:text="@string/updated_at" />
</LinearLayout>
</LinearLayout>
</RelativeLayout>
•在這個布局中,我們包含了一個下拉指示箭頭,一個下拉狀態文字提示,和一個上次更新的時間。當然,還有一個隱藏的旋轉進度條,只有正在刷新的時候我們才會將它顯示出來。布局中所有引用的字符串我們都放在strings.xml中,如下所示:
<?xml version="." encoding="utf-"?>
<resources>
<string name="app_name">PullToRefreshTest</string>
<string name="pull_to_refresh">下拉可以刷新</string>
<string name="release_to_refresh">釋放立即刷新</string>
<string name="refreshing">正在刷新…</string>
<string name="not_updated_yet">暫未更新過</string>
<string name="updated_at">上次更新於%$s前</string>
<string name="updated_just_now">剛剛更新</string>
<string name="time_error">時間有問題</string>
</resources>
•然後新建一個RefreshableView繼承自LinearLayout,代碼如下所示:
public class RefreshableView extends LinearLayout implements OnTouchListener {
//下拉狀態
public static final int STATUS_PULL_TO_REFRESH = ;
//釋放立即刷新狀態
public static final int STATUS_RELEASE_TO_REFRESH =
//正在刷新狀態
public static final int STATUS_REFRESHING = ;
//刷新完成或未刷新狀態
public static final int STATUS_REFRESH_FINISHED = ;
//下拉頭部回滾的速度
public static final int SCROLL_SPEED = -;
//一分鐘的毫秒值,用於判斷上次的更新時間
public static final long ONE_MINUTE = * ;
//一小時的毫秒值,用於判斷上次的更新時間
public static final long ONE_HOUR = * ONE_MINUTE;
//一天的毫秒值,用於判斷上次的更新時間
public static final long ONE_DAY = * ONE_HOUR;
//一月的毫秒值,用於判斷上次的更新時間
public static final long ONE_MONTH = * ONE_DAY;
//一年的毫秒值,用於判斷上次的更新時間
public static final long ONE_YEAR = * ONE_MONTH;
//上次更新時間的字符串常量,用於作為SharedPreferences的鍵值
private static final String UPDATED_AT = "updated_at";
//下拉刷新的回調接口
private PullToRefreshListener mListener;
//用於存儲上次更新時間
private SharedPreferences preferences;
//下拉頭的View
private View header;
//需要去下拉刷新的ListView
private ListView listView;
//刷新時顯示的進度條
private ProgressBar progressBar;
//指示下拉和釋放的箭頭
private ImageView arrow;
//指示下拉和釋放的文字描述
private TextView description;
//上次更新時間的文字描述
private TextView updateAt;
//下拉頭的布局參數
private MarginLayoutParams headerLayoutParams;
//上次更新時間的毫秒值
private long lastUpdateTime;
//為了防止不同界面的下拉刷新在上次更新時間上互相有沖突,使用id來做區分
private int mId = -;
//下拉頭的高度
private int hideHeaderHeight;
//當前處理什麼狀態,可選值有STATUS_PULL_TO_REFRESH,STATUS_RELEASE_TO_REFRESH,STATUS_REFRESHING 和 STATUS_REFRESH_FINISHED
private int currentStatus = STATUS_REFRESH_FINISHED;;
//記錄上一次的狀態是什麼,避免進行重復操作
private int lastStatus = currentStatus;
//手指按下時的屏幕縱坐標
private float yDown;
//在被判定為滾動之前用戶手指可以移動的最大值。
private int touchSlop;
//是否已加載過一次layout,這裡onLayout中的初始化只需加載一次
private boolean loadOnce;
//當前是否可以下拉,只有ListView滾動到頭的時候才允許下拉
private boolean ableToPull;
//下拉刷新控件的構造函數,會在運行時動態添加一個下拉頭的布局。
public RefreshableView(Context context, AttributeSet attrs) {
super(context, attrs);
preferences = PreferenceManager.getDefaultSharedPreferences(context);
header = LayoutInflater.from(context).inflate(R.layout.pull_to_refresh, null, true);
progressBar = (ProgressBar) header.findViewById(R.id.progress_bar);
arrow = (ImageView) header.findViewById(R.id.arrow);
description = (TextView) header.findViewById(R.id.description);
updateAt = (TextView) header.findViewById(R.id.updated_at);
touchSlop = ViewConfiguration.get(context).getScaledTouchSlop();
refreshUpdatedAtValue();
setOrientation(VERTICAL);
addView(header, );
}
//進行一些關鍵性的初始化操作,比如:將下拉頭向上偏移進行隱藏,給ListView注冊touch事件。
protected void onLayout(boolean changed, int l, int t, int r, int b) {
super.onLayout(changed, l, t, r, b);
if (changed && !loadOnce) {
hideHeaderHeight = -header.getHeight();
headerLayoutParams = (MarginLayoutParams) header.getLayoutParams();
headerLayoutParams.topMargin = hideHeaderHeight;
listView = (ListView) getChildAt();
listView.setOnTouchListener(this);
loadOnce = true;
}
}
//當ListView被觸摸時調用,其中處理了各種下拉刷新的具體邏輯。
public boolean onTouch(View v, MotionEvent event) {
setIsAbleToPull(event);
if (ableToPull) {
switch (event.getAction()) {
case MotionEvent.ACTION_DOWN:
yDown = event.getRawY();
break;
case MotionEvent.ACTION_MOVE:
float yMove = event.getRawY();
int distance = (int) (yMove - yDown);
// 如果手指是下滑狀態,並且下拉頭是完全隱藏的,就屏蔽下拉事件
if (distance <= && headerLayoutParams.topMargin <= hideHeaderHeight) {
return false;
}
if (distance < touchSlop) {
return false;
}
if (currentStatus != STATUS_REFRESHING) {
if (headerLayoutParams.topMargin > ) {
currentStatus = STATUS_RELEASE_TO_REFRESH;
} else {
currentStatus = STATUS_PULL_TO_REFRESH;
}
// 通過偏移下拉頭的topMargin值,來實現下拉效果
headerLayoutParams.topMargin = (distance / ) + hideHeaderHeight;
header.setLayoutParams(headerLayoutParams);
}
break;
case MotionEvent.ACTION_UP:
default:
if (currentStatus == STATUS_RELEASE_TO_REFRESH) {
// 松手時如果是釋放立即刷新狀態,就去調用正在刷新的任務
new RefreshingTask().execute();
} else if (currentStatus == STATUS_PULL_TO_REFRESH) {
// 松手時如果是下拉狀態,就去調用隱藏下拉頭的任務
new HideHeaderTask().execute();
}
break;
}
// 時刻記得更新下拉頭中的信息
if (currentStatus == STATUS_PULL_TO_REFRESH
|| currentStatus == STATUS_RELEASE_TO_REFRESH) {
updateHeaderView();
// 當前正處於下拉或釋放狀態,要讓ListView失去焦點,否則被點擊的那一項會一直處於選中狀態
listView.setPressed(false);
listView.setFocusable(false);
listView.setFocusableInTouchMode(false);
lastStatus = currentStatus;
// 當前正處於下拉或釋放狀態,通過返回true屏蔽掉ListView的滾動事件
return true;
}
}
return false;
}
//給下拉刷新控件注冊一個監聽器。
//為了防止不同界面的下拉刷新在上次更新時間上互相有沖突, 請不同界面在注冊下拉刷新監聽器時一定要傳入不同的id。
public void setOnRefreshListener(PullToRefreshListener listener, int id) {
mListener = listener;
mId = id;
}
// 當所有的刷新邏輯完成後,記錄調用一下,否則你的ListView將一直處於正在刷新狀態。
public void finishRefreshing() {
currentStatus = STATUS_REFRESH_FINISHED;
preferences.edit().putLong(UPDATED_AT + mId, System.currentTimeMillis()).commit();
new HideHeaderTask().execute();
}
//根據當前ListView的滾動狀態來設定 {@link #ableToPull}的值,每次都需要在onTouch中第一個執行,這樣可以判斷出當前應該是滾動ListView,還是應該進行下拉。
private void setIsAbleToPull(MotionEvent event) {
View firstChild = listView.getChildAt();
if (firstChild != null) {
int firstVisiblePos = listView.getFirstVisiblePosition();
if (firstVisiblePos == && firstChild.getTop() == ) {
if (!ableToPull) {
yDown = event.getRawY();
}
// 如果首個元素的上邊緣,距離父布局值為,就說明ListView滾動到了最頂部,此時應該允許下拉刷新
ableToPull = true;
} else {
if (headerLayoutParams.topMargin != hideHeaderHeight) {
headerLayoutParams.topMargin = hideHeaderHeight;
header.setLayoutParams(headerLayoutParams);
}
ableToPull = false;
}
} else {
// 如果ListView中沒有元素,也應該允許下拉刷新
ableToPull = true;
}
}
//更新下拉頭中的信息。
private void updateHeaderView() {
if (lastStatus != currentStatus) {
if (currentStatus == STATUS_PULL_TO_REFRESH) {
description.setText(getResources().getString(R.string.pull_to_refresh));
arrow.setVisibility(View.VISIBLE);
progressBar.setVisibility(View.GONE);
rotateArrow();
} else if (currentStatus == STATUS_RELEASE_TO_REFRESH) {
description.setText(getResources().getString(R.string.release_to_refresh));
arrow.setVisibility(View.VISIBLE);
progressBar.setVisibility(View.GONE);
rotateArrow();
} else if (currentStatus == STATUS_REFRESHING) {
description.setText(getResources().getString(R.string.refreshing));
progressBar.setVisibility(View.VISIBLE);
arrow.clearAnimation();
arrow.setVisibility(View.GONE);
}
refreshUpdatedAtValue();
}
}
//根據當前的狀態來旋轉箭頭。
private void rotateArrow() {
float pivotX = arrow.getWidth() / f;
float pivotY = arrow.getHeight() / f;
float fromDegrees = f;
float toDegrees = f;
if (currentStatus == STATUS_PULL_TO_REFRESH) {
fromDegrees = f;
toDegrees = f;
} else if (currentStatus == STATUS_RELEASE_TO_REFRESH) {
fromDegrees = f;
toDegrees = f;
}
RotateAnimation animation = new RotateAnimation(fromDegrees, toDegrees, pivotX, pivotY);
animation.setDuration();
animation.setFillAfter(true);
arrow.startAnimation(animation);
}
//刷新下拉頭中上次更新時間的文字描述。
private void refreshUpdatedAtValue() {
lastUpdateTime = preferences.getLong(UPDATED_AT + mId, -);
long currentTime = System.currentTimeMillis();
long timePassed = currentTime - lastUpdateTime;
long timeIntoFormat;
String updateAtValue;
if (lastUpdateTime == -) {
updateAtValue = getResources().getString(R.string.not_updated_yet);
} else if (timePassed < ) {
updateAtValue = getResources().getString(R.string.time_error);
} else if (timePassed < ONE_MINUTE) {
updateAtValue = getResources().getString(R.string.updated_just_now);
} else if (timePassed < ONE_HOUR) {
timeIntoFormat = timePassed / ONE_MINUTE;
String value = timeIntoFormat + "分鐘";
updateAtValue = String.format(getResources().getString(R.string.updated_at), value);
} else if (timePassed < ONE_DAY) {
timeIntoFormat = timePassed / ONE_HOUR;
String value = timeIntoFormat + "小時";
updateAtValue = String.format(getResources().getString(R.string.updated_at), value);
} else if (timePassed < ONE_MONTH) {
timeIntoFormat = timePassed / ONE_DAY;
String value = timeIntoFormat + "天";
updateAtValue = String.format(getResources().getString(R.string.updated_at), value);
} else if (timePassed < ONE_YEAR) {
timeIntoFormat = timePassed / ONE_MONTH;
String value = timeIntoFormat + "個月";
updateAtValue = String.format(getResources().getString(R.string.updated_at), value);
} else {
timeIntoFormat = timePassed / ONE_YEAR;
String value = timeIntoFormat + "年";
updateAtValue = String.format(getResources().getString(R.string.updated_at), value);
}
updateAt.setText(updateAtValue);
}
//正在刷新的任務,在此任務中會去回調注冊進來的下拉刷新監聽器。
class RefreshingTask extends AsyncTask<Void, Integer, Void> {
protected Void doInBackground(Void... params) {
int topMargin = headerLayoutParams.topMargin;
while (true) {
topMargin = topMargin + SCROLL_SPEED;
if (topMargin <= ) {
topMargin = ;
break;
}
publishProgress(topMargin);
sleep();
}
currentStatus = STATUS_REFRESHING;
publishProgress();
if (mListener != null) {
mListener.onRefresh();
}
return null;
}
protected void onProgressUpdate(Integer... topMargin) {
updateHeaderView();
headerLayoutParams.topMargin = topMargin[];
header.setLayoutParams(headerLayoutParams);
}
}
//隱藏下拉頭的任務,當未進行下拉刷新或下拉刷新完成後,此任務將會使下拉頭重新隱藏。
class HideHeaderTask extends AsyncTask<Void, Integer, Integer> {
protected Integer doInBackground(Void... params) {
int topMargin = headerLayoutParams.topMargin;
while (true) {
topMargin = topMargin + SCROLL_SPEED;
if (topMargin <= hideHeaderHeight) {
topMargin = hideHeaderHeight;
break;
}
publishProgress(topMargin);
sleep();
}
return topMargin;
}
protected void onProgressUpdate(Integer... topMargin) {
headerLayoutParams.topMargin = topMargin[];
header.setLayoutParams(headerLayoutParams);
}
protected void onPostExecute(Integer topMargin) {
headerLayoutParams.topMargin = topMargin;
header.setLayoutParams(headerLayoutParams);
currentStatus = STATUS_REFRESH_FINISHED;
}
}
//使當前線程睡眠指定的毫秒數。指定當前線程睡眠多久,以毫秒為單位
private void sleep(int time) {
try {
Thread.sleep(time);
} catch (InterruptedException e) {
e.printStackTrace();
}
}
//下拉刷新的監聽器,使用下拉刷新的地方應該注冊此監聽器來獲取刷新回調。
public interface PullToRefreshListener {
//刷新時會去回調此方法,在方法內編寫具體的刷新邏輯。注意此方法是在子線程中調用的, 你可以不必另開線程來進行耗時操作。
void onRefresh();
}
}
•這個類是整個下拉刷新功能中最重要的一個類,注釋已經寫得比較詳細了,我再簡單解釋一下。首先在RefreshableView的構造函數中動態添加了剛剛定義的pull_to_refresh這個布局作為下拉頭,然後在onLayout方法中將下拉頭向上偏移出了屏幕,再給ListView注冊了touch事件。之後每當手指在ListView上滑動時,onTouch方法就會執行。在onTouch方法中的第一行就調用了setIsAbleToPull方法來判斷ListView是否滾動到了最頂部,只有滾動到了最頂部才會執行後面的代碼,否則就視為正常的ListView滾動,不做任何處理。當ListView滾動到了最頂部時,如果手指還在向下拖動,就會改變下拉頭的偏移值,讓下拉頭顯示出來,下拉的距離設定為手指移動距離的1/2,這樣才會有拉力的感覺。如果下拉的距離足夠大,在松手的時候就會執行刷新操作,如果距離不夠大,就僅僅重新隱藏下拉頭。
•具體的刷新操作會在RefreshingTask中進行,其中在doInBackground方法中回調了PullToRefreshListener接口的onRefresh方法,這也是大家在使用RefreshableView時必須要去實現的一個接口,因為具體刷新的邏輯就應該寫在onRefresh方法中,後面會演示使用的方法。
•另外每次在下拉的時候都還會調用updateHeaderView方法來改變下拉頭中的數據,比如箭頭方向的旋轉,下拉文字描述的改變等。更加深入的理解請大家仔細去閱讀RefreshableView中的代碼。
現在我們已經把下拉刷新的所有功能都完成了,接下來就要看一看如何在項目中引入下拉刷新了。打開或新建activity_main.xml作為程序主界面的布局,加入如下代碼:
<RelativeLayout xmlns:android="http://schemas.android.com/apk/res/android"
xmlns:tools="http://schemas.android.com/tools"
android:layout_width="match_parent"
android:layout_height="match_parent"
tools:context=".MainActivity" >
<com.example.pulltorefreshtest.RefreshableView
android:id="@+id/refreshable_view"
android:layout_width="fill_parent"
android:layout_height="fill_parent" >
<ListView
android:id="@+id/list_view"
android:layout_width="fill_parent"
android:layout_height="fill_parent" >
</ListView>
</com.example.pulltorefreshtest.RefreshableView>
</RelativeLayout>
•可以看到,我們在自定義的RefreshableView中加入了一個ListView,這就意味著給這個ListView加入了下拉刷新的功能,就是這麼簡單!然後我們再來看一下程序的主Activity,打開或新建MainActivity,加入如下代碼:
public class MainActivity extends Activity {
RefreshableView refreshableView;
ListView listView;
ArrayAdapter<String> adapter;
String[] items = { "A", "B", "C", "D", "E", "F", "G", "H", "I", "J", "K", "L" };
protected void onCreate(Bundle savedInstanceState) {
super.onCreate(savedInstanceState);
requestWindowFeature(Window.FEATURE_NO_TITLE);
setContentView(R.layout.activity_main);
refreshableView = (RefreshableView) findViewById(R.id.refreshable_view);
listView = (ListView) findViewById(R.id.list_view);
adapter = new ArrayAdapter<String>(this, android.R.layout.simple_list_item_, items);
listView.setAdapter(adapter);
refreshableView.setOnRefreshListener(new PullToRefreshListener() {
public void onRefresh() {
try {
Thread.sleep();
} catch (InterruptedException e) {
e.printStackTrace();
}
refreshableView.finishRefreshing();
}
}, );
}
}
•可以看到,我們通過調用RefreshableView的setOnRefreshListener方法注冊了一個監聽器,當ListView正在刷新時就會回調監聽器的onRefresh方法,刷新的具體邏輯就在這裡處理。而且這個方法已經自動開啟了線程,可以直接在onRefresh方法中進行耗時操作,比如向服務器請求最新數據等,在這裡我就簡單讓線程睡眠3秒鐘。另外在onRefresh方法的最後,一定要調用RefreshableView中的finishRefreshing方法,這個方法是用來通知RefreshableView刷新結束了,不然我們的ListView將一直處於正在刷新的狀態。
•不知道大家有沒有注意到,setOnRefreshListener這個方法其實是有兩個參數的,我們剛剛也是傳入了一個不起眼的0。那這第二個參數是用來做什麼的呢?由於RefreshableView比較智能,它會自動幫我們記錄上次刷新完成的時間,然後下拉的時候會在下拉頭中顯示距上次刷新已過了多久。這是一個非常好用的功能,讓我們不用再自己手動去記錄和計算時間了,但是卻存在一個問題。
•如果當前我們的項目中有三個地方都使用到了下拉刷新的功能,現在在一處進行了刷新,其它兩處的時間也都會跟著改變!因為刷新完成的時間是記錄在配置文件中的,由於在一處刷新更改了配置文件,導致在其它兩處讀取到的配置文件時間已經是更改過的了。
•那解決方案是什麼?就是每個用到下拉刷新的地方,給setOnRefreshListener方法的第二個參數中傳入不同的id就行了。這樣各處的上次刷新完成時間都是單獨記錄的,相互之間就不會再有影響。
•讓我們來運行一下,看看效果吧。
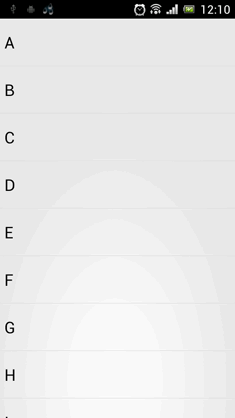
•效果看起來還是非常不錯的。我們最後再來總結一下,在項目中引入ListView下拉刷新功能只需三步:
1.在Activity的布局文件中加入自定義的RefreshableView,並讓ListView包含在其中。
2.在Activity中調用RefreshableView的setOnRefreshListener方法注冊回調接口。
3.在onRefresh方法的最後,記得調用RefreshableView的finishRefreshing方法,通知刷新結束。
 論Android應用進程長存的可行性
如何能讓我們的應用能夠在系統後台持續地運行是一個自Android從娘(ma)胎(bi)裡出來時就議論不停的話題,而且這似乎成了一個牛(liu)逼(mang)應用標配的功能
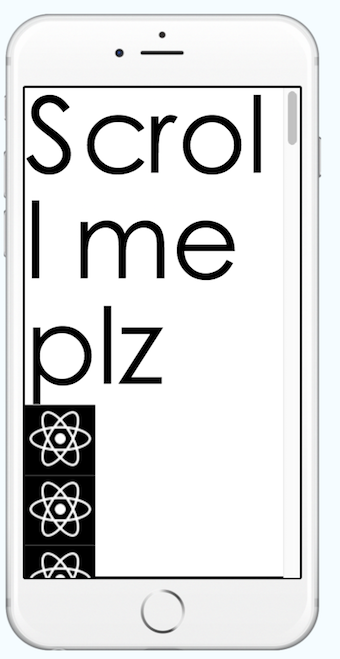 混合開發的大趨勢之一React Native ScrollView (拉伸視圖),ListView(列表視圖)
最近都會有些碎片時間學習,所以文章會繼續跟著更,因為東西還是比較連貫的,所以有興趣的小伙們可以從頭開始看,或者從專欄開始選。https://github.com/ddwh
 Android 面試題總結之Android 進階(一)
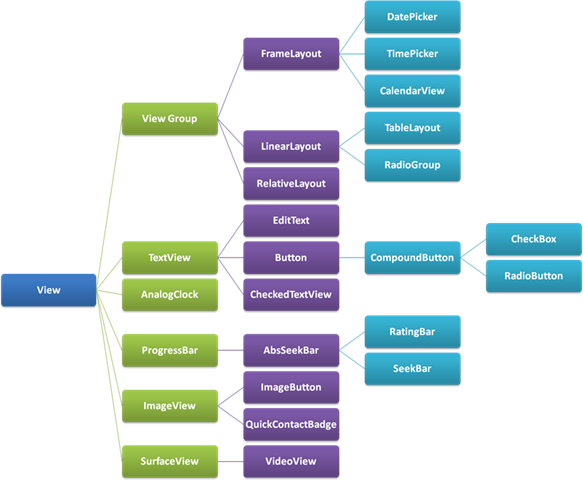
掌握什麼是View? View 坐標的基本概念 View的生命周期 如何自定義View什麼是View?android.app.View 就是手機的UI,View 負責繪制
 Android 圖片選擇詳解及實例代碼
Android 圖片選擇可以達到的效果:1.第一個圖片的位置放照相機,點擊打開照相機2.其余的是顯示全部存儲的圖片,點擊一次是查看大圖,長按則是每張圖片出現一