編輯:關於Android編程
我們已經有文章向你描述如何使用<include />標簽來重用和共享你的布局代碼。這篇文章將向你闡述<merge />標簽的使用以及如何與<include />標簽互補使用。
<merge />標簽用於減少View樹的層次來優化Android的布局。通過看一個例子,你就能很容易的理解這個標簽能解決的問題。下面的XML布局顯示一個圖片,並且有一個標題位於其上方。這個結構相當的簡單;FrameLayout裡放置了一個ImageView,其上放置了一個TextView:
<FrameLayout xmlns:android="http://schemas.android.com/apk/res/android"
  android:layout_width="fill_parent"
  android:layout_height="fill_parent">
  <ImageView
    android:layout_width="fill_parent"
    android:layout_height="fill_parent"
    android:scaleType="center"
    android:src="@drawable/golden_gate" />
  <TextView
    android:layout_width="wrap_content"
    android:layout_height="wrap_content"
    android:layout_marginBottom="20dip"
    android:layout_gravity="center_horizontal|bottom"
    android:padding="12dip"
    android:background="#AA000000"
    android:textColor="#ffffffff"
    android:text="Golden Gate" />
</FrameLayout>
布局渲染起來很漂亮,而且看不出有什麼問題:

當你使用HierarchyViewer工具來檢查時,你會發現事情變得很有趣。如果你仔細查看View樹,你將會注意到,我們在XML文件中定義的FrameLayout(藍色高亮顯示)是另一個FrameLayout唯一的子元素:
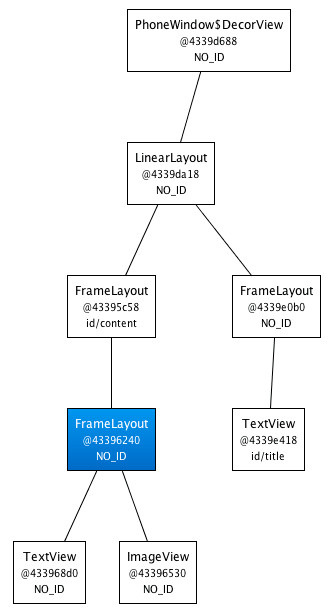
既然我們的FrameLayout和它的父元素有著相同的尺寸(歸功於fill_parent常量),並且也沒有定義任何的background,額外的padding或者gravity,所以它完全是無用的。我們所做的,只是讓UI變得更為復雜。怎樣我們才能擺脫這個FrameLayout呢?畢竟,XML文檔需要一個根標簽且XML布局總是與相應的View實例想對應。
這時候,<merge />標簽閃亮登場了。當LayoutInflater遇到這個標簽時,它會跳過它,並將<merge />內的元素添加到<merge />的父元素裡。迷惑了嗎?讓我們用<merge />來替換FrameLayout,並重寫之前的XML布局:
<merge xmlns:android="http://schemas.android.com/apk/res/android">
  <ImageView
    android:layout_width="fill_parent"
    android:layout_height="fill_parent"
    android:scaleType="center"
    android:src="@drawable/golden_gate" />
  <TextView
    android:layout_width="wrap_content"
    android:layout_height="wrap_content"
    android:layout_marginBottom="20dip"
    android:layout_gravity="center_horizontal|bottom"
    android:padding="12dip"
    android:background="#AA000000"
    android:textColor="#ffffffff"
    android:text="Golden Gate" />
</merge>
新的代碼中,TextView和ImageView都直接添加到上一層的FrameLayout裡。雖然視覺上看起來一樣,但View的層次更加簡單了:

很顯然,在這個場合使用<merge />是因為Activity的ContentView的父元素始終是FrameLayout。如果你的布局使用LinearLayout作為它的根標簽(舉例),那麼你就不能使用這個技巧。<merge />在其它的一些場合也很有用的。例如,它與<include />標簽結合起來就能表現得很完美。你還可以在創建一個自定義的組合View時使用<merge />。讓我們看一個使用<merge />創建一個新View的例子——OkCancelBar,包含兩個按鈕,並可以設置按鈕標簽。下面的XML用於在一個圖片上顯示自定義的View:
<merge
  xmlns:android="http://schemas.android.com/apk/res/android"  xmlns:okCancelBar="http://schemas.android.com/apk/res/com.example.android.merge">
  <ImageView
    android:layout_width="fill_parent"
    android:layout_height="fill_parent"
    android:scaleType="center"
    android:src="@drawable/golden_gate" />
  <com.example.android.merge.OkCancelBar
    android:layout_width="fill_parent"
    android:layout_height="wrap_content"
    android:layout_gravity="bottom"
    android:paddingTop="8dip"
    android:gravity="center_horizontal"
    android:background="#AA000000"
    okCancelBar:okLabel="Save"
    okCancelBar:cancelLabel="Don't save" />
</merge>
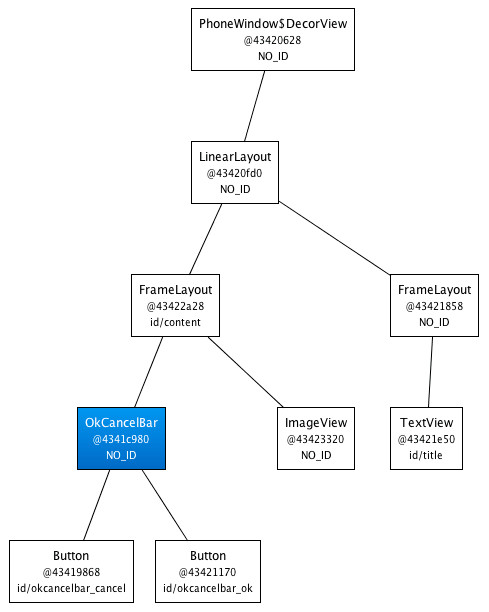
新的布局效果如下圖所示:

OkCancelBar的代碼很簡單,因為這兩個按鈕在外部的XML文件中定義,通過LayoutInflate類導入。如下面的代碼片段所示,R.layout.okcancelbar以OkCancelBar為父元素:
public class OkCancelBar extends LinearLayout {
  public OkCancelBar(Context context, AttributeSet attrs) {
    super(context, attrs);
    setOrientation(HORIZONTAL);
    setGravity(Gravity.CENTER);
    setWeightSum(1.0f);

    LayoutInflater.from(context).inflate(R.layout.okcancelbar, this, true);

    TypedArray array = context.obtainStyledAttributes(attrs, R.styleable.OkCancelBar, 0, 0);

    String text = array.getString(R.styleable.OkCancelBar_okLabel);
    if (text == null) text = "Ok";
    ((Button) findViewById(R.id.okcancelbar_ok)).setText(text);

    text = array.getString(R.styleable.OkCancelBar_cancelLabel);
    if (text == null) text = "Cancel";
    ((Button) findViewById(R.id.okcancelbar_cancel)).setText(text);

    array.recycle();
  }
}
兩個按鈕的定義如下面的XML所示。正如你所看到的,我們使用<merge />標簽直接添加兩個按鈕到OkCancelBar。每個按鈕都是從外部相同的XML布局文件包含進來的,便於維護;我們只是簡單地重寫它們的id:
<merge xmlns:android="http://schemas.android.com/apk/res/android">
  <include
    layout="@layout/okcancelbar_button"
    android:id="@+id/okcancelbar_ok" />
  <include
    layout="@layout/okcancelbar_button"
    android:id="@+id/okcancelbar_cancel" />
</merge>
我們創建了一個靈活且易於維護的自定義View,它有著高效的View層次:
<merge />標簽極其有用。然而它也有以下兩個限制:
· <merge />只能作為XML布局的根標簽使用
· 當Inflate以<merge />開頭的布局文件時,必須指定一個父ViewGroup,並且必須設定attachToRoot為true(參看inflate(int, android.view.ViewGroup, Boolean)方法)。
效果圖:

以上就是本文的全部內容,希望對大家的學習有所幫助,也希望大家多多支持本站。
 解決方法:android 6.0(api 23) SDK,不再提供org.apache.http.*(只保留幾個類)
在使用android-async-http的時候我的apl 更新到了23,我的build version也是23的時候出現了,org.apache.http.Heade
 Android-啟動模式task-lunchmodle-intent flag 總結
總結:同一task內的activity可以是來自不同進程的activity棧內的activity不會重新排序,只能push或者popstandard模式允許多
 微信怎麼鑒別二手機?微信鑒別二手手機方法分享
微信怎麼鑒別二手機?現在還有不用微信的童鞋嗎?不過估計即使是最早的一批微信玩家,到現在也無法摸透它的所有隱藏功能。比如,用微信查崗和鑒別二手機,下面小編就給
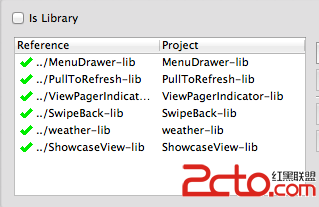 Android之高仿雅虎天氣(二)---代碼結構解析
本例使用了6個庫代碼和1個主工程代碼。 一、6個庫代碼如下圖所示: 其中 ①.MenuDrawer、ViewPagerIndi