編輯:關於Android編程
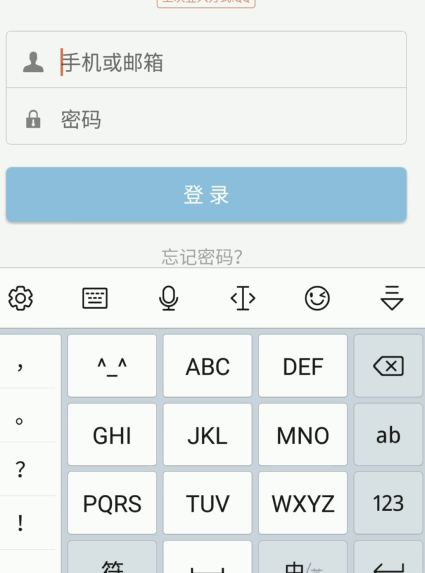
簡書App 是我很喜歡的一款軟件。今天就模仿了一下他的登錄框。先上圖:
好了下面上代碼,自定義ImgEditText 繼承與EditText。重寫一些方法。
package lyf.myimgedittextdemo;
import android.content.Context;
import android.graphics.Rect;
import android.graphics.drawable.Drawable;
import android.text.Editable;
import android.text.TextWatcher;
import android.util.AttributeSet;
import android.view.MotionEvent;
import android.widget.EditText;
/**
* lyf on 2016/12/6.
* 自定義的EditText右邊帶圖片,可以設置點擊事件
*/
public class ImgEditText extends EditText implements TextWatcher {
//控件左邊的圖片
private Drawable leftDrawable = null;
//控件右邊的圖片
private Drawable rightDrawable = null;
// 控件是否有焦點
private boolean hasFoucs;
private IMyRightDrawableClick mightDrawableClick;
public ImgEditText(Context context) {
this(context, null);
}
public ImgEditText(Context context, AttributeSet attrs) {
//這裡構造方法也很重要,不加這個很多屬性不能再XML裡面定義
this(context, attrs, android.R.attr.editTextStyle);
}
public ImgEditText(Context context, AttributeSet attrs, int defStyleAttr) {
super(context, attrs, defStyleAttr);
init();
}
//初始化基本圖片
private void init() {
//獲取RadioButton的圖片集合
Drawable[] drawables = getCompoundDrawables();
leftDrawable = drawables[0];
rightDrawable = drawables[2];
setCompoundDrawablesWithIntrinsicBounds(leftDrawable, null, null, null);
//設置輸入框裡面內容發生改變的監聽
addTextChangedListener(this);
}
//設置顯示圖片的大小
public void setCompoundDrawablesWithIntrinsicBounds(Drawable left, Drawable top, Drawable right, Drawable bottom) {
super.setCompoundDrawablesWithIntrinsicBounds(left, top, right, bottom);
//這裡只要改後面兩個參數就好了,一個寬一個是高,如果想知道為什麼可以查找源碼
if (left != null) {
left.setBounds(0, 0, 50, 50);
}
if (right != null) {
right.setBounds(0, 0, 50, 50);
}
if (top != null) {
top.setBounds(0, 0, 100, 100);
}
if (bottom != null) {
bottom.setBounds(0, 0, 100, 100);
}
setCompoundDrawables(left, top, right, bottom);
}
//光標選中時判斷
@Override
protected void onFocusChanged(boolean focused, int direction, Rect previouslyFocusedRect) {
super.onFocusChanged(focused, direction, previouslyFocusedRect);
this.hasFoucs = focused;
if (focused) {
setImageVisible(getText().length() > 0);
} else {
setImageVisible(false);
}
}
//設置清除圖標的顯示與隱藏,調用setCompoundDrawables為EditText繪制上去
protected void setImageVisible(boolean flag) {
//如果當前右側有圖片則覆蓋右側的圖片,如果沒有還是顯示原來的圖片
if (getCompoundDrawables()[2] != null) {
rightDrawable = getCompoundDrawables()[2];
}
if (flag) {
setCompoundDrawables(getCompoundDrawables()[0], null, rightDrawable, null);
} else {
setCompoundDrawables(getCompoundDrawables()[0], null, null, null);
}
}
//文本框監聽事件
@Override
public void onTextChanged(CharSequence text, int start, int lengthBefore, int lengthAfter) {
if (hasFoucs) {
if (text.length() > 0) {
setImageVisible(true);
} else {
setImageVisible(false);
}
}
}
public void beforeTextChanged(CharSequence s, int start, int count, int after) {
}
public void afterTextChanged(Editable s) {
}
/**
* 因為我們不能直接給EditText設置點擊事件,所以我們用記住我們按下的位置來模擬點擊事件
* 當我們按下的位置 在 EditText的寬度 - 圖標到控件右邊的間距 - 圖標的寬度 和
* EditText的寬度 - 圖標到控件右邊的間距之間我們就算點擊了圖標,豎直方向就沒有考慮
* (參考 http://blog.csdn.net/xiaanming/article/details/11066685/)
*/
@Override
public boolean onTouchEvent(MotionEvent event) {
if (event.getAction() == MotionEvent.ACTION_UP) {
if (getCompoundDrawables()[2] != null) {
boolean touchable = event.getX() > (getWidth() - getTotalPaddingRight())
&& (event.getX() < ((getWidth() - getPaddingRight())));
if (touchable) {
//調用點擊事件(外部實現)
mightDrawableClick.rightDrawableClick();
}
}
}
return super.onTouchEvent(event);
}
//設置右側按鈕的點擊事件,外部調用的時候實現該方法
public void setDrawableClick( IMyRightDrawableClick myMightDrawableClick){
this.mightDrawableClick = myMightDrawableClick;
}
//自定義接口(實現右邊圖片點擊事件)
public interface IMyRightDrawableClick {
void rightDrawableClick();
}
//允許外部修改右側顯示的圖片
public void setRightDrawable(Drawable drawable){
rightDrawable = drawable;
setCompoundDrawablesWithIntrinsicBounds(leftDrawable, null, rightDrawable, null);
}
}
以上就是自定義類的主要代碼了,注釋比較清楚。
布局布局文件裡直接引用就好。
<lyf.myimgedittextdemo.ImgEditText
android:id="@+id/pwdIet"
android:layout_width="0dp"
android:layout_height="wrap_content"
android:layout_weight="1"
android:background="@null"
android:drawableLeft="@mipmap/mm_image"
android:drawableRight="@mipmap/eye_normal"
android:paddingLeft="15dp"
android:paddingRight="15dp"
android:paddingTop="5dp"
android:drawablePadding="15dp"
android:layout_marginTop="10dp"
android:layout_marginBottom="10dp"
android:hint="密碼"
android:inputType="numberPassword" />
下面看代碼中的設置
pwdIet = (ImgEditText) this.findViewById(R.id.pwdIet);
pwdIet.setDrawableClick(new ImgEditText.IMyRightDrawableClick() {
@Override
public void rightDrawableClick() {
if (isHidden) {
//設置EditText文本為可見的
pwdIet.setTransformationMethod(HideReturnsTransformationMethod.getInstance());
pwdIet.setRightDrawable(getResources().getDrawable(R.mipmap.eye_selected));
} else {
//設置EditText文本為隱藏的
pwdIet.setTransformationMethod(PasswordTransformationMethod.getInstance());
pwdIet.setRightDrawable(getResources().getDrawable(R.mipmap.eye_normal));
}
isHidden = !isHidden;
pwdIet.postInvalidate();
//切換後將EditText光標置於末尾
CharSequence charSequence = pwdIet.getText();
if (charSequence instanceof Spannable) {
Spannable spanText = (Spannable) charSequence;
Selection.setSelection(spanText, charSequence.length());
}
}
});
這樣我們的例子就完成了。
以上所述是小編給大家介紹的Android 開發仿簡書登錄框可刪除內容或顯示密碼框的內容,希望對大家有所幫助,如果大家有任何疑問請給我留言,小編會及時回復大家的。在此也非常感謝大家對本站網站的支持!
 JAVA基礎再回首(二十三)——操作基本數據類型的流、內存操作流、打印流、隨機訪問流、合並流、序列化流
有些日子沒寫博客了,當然這段時間也比較忙,大家見諒,好了,話不多說,開始學習吧。我們繼續學習IO流,還有幾個知識點沒有學。操作基本數據類型的流操作基本數據類型DataIn
 Android中ListView結合CheckBox實現數據批量選擇(全選、反選、全不選)
APP的開發中,會常遇到這樣的需求:批量取消(刪除)List中的數據。這就要求ListVIew支持批量選擇、全選、單選等等功能,做一個比較強大的ListView批量選擇功
 Android Animation中關於Interpolator的解釋
網上有很多解釋Interpolator屬性的文章,但是基本上都是停留在直接翻譯SDK的意思層面上。Interpolator英文意思是: 篡改者; 分類機;
 Android 內存洩露簡介、典型情景及檢測解決
什麼是內存洩露?Android虛擬機的垃圾回收采用的是根搜索算法。GC會從根節點(GC Roots)開始對heap進行遍歷。到最後,部分沒有直接或者間接引用到GC Roo