編輯:關於Android編程
本文實例講述了Android開發之ViewSwitcher用法。分享給大家供大家參考,具體如下:
android.widget.ViewSwitcher是ViewAnimator的子類,用於在兩個View之間切換,但每次只能顯示一個View。
ViewSwitcher的addView函數的代碼如下:
/**
 * {@inheritDoc}
 *
 * @throws IllegalStateException if this switcher already contains two children
 */
@Override
public void addView(View child, int index, ViewGroup.LayoutParams params) {
  if (getChildCount() >= 2) {
    throw new IllegalStateException("Can't add more than 2 views to a ViewSwitcher");
  }
  super.addView(child, index, params);
}
可以看出,若View的數量超過兩個,會拋出異常:java.lang.IllegalStateException,打印 "Can't add more than 2 views to a ViewSwitcher" 。你可以使用ViewSwitcher的factory創建View或添加自己創建的View。
下面用一個例子介紹一下ViewSwitcher的用法。
布局文件:activity_main.xml
<?xml version="1.0" encoding="utf-8"?>
<LinearLayout xmlns:android="http://schemas.android.com/apk/res/android"
       xmlns:tools="http://schemas.android.com/tools"
       android:layout_width="match_parent"
       android:layout_height="match_parent"
       android:orientation="vertical"
       tools:context=".MainActivity" >
  <LinearLayout
      android:layout_width="match_parent"
      android:layout_height="wrap_content"
      android:orientation="horizontal" >
    <Button
        android:id="@+id/prev"
        android:layout_width="0dp"
        android:layout_height="wrap_content"
        android:layout_weight="1"
        android:text="previous" />
    <Button
        android:id="@+id/next"
        android:layout_width="0dp"
        android:layout_height="wrap_content"
        android:layout_weight="1"
        android:text="next" />
  </LinearLayout>
  <ViewSwitcher
      android:id="@+id/viewswitcher"
      android:layout_width="match_parent"
      android:layout_height="wrap_content" >
    <ImageView
        android:layout_width="wrap_content"
        android:layout_height="wrap_content"
        android:src="@drawable/ic_launcher" />
    <LinearLayout
        android:layout_width="match_parent"
        android:layout_height="wrap_content"
        android:gravity="center"
        android:orientation="vertical" >
      <Button
          android:layout_width="wrap_content"
          android:layout_height="wrap_content"
          android:text="- Button 2 -" />
      <TextView
          android:layout_width="wrap_content"
          android:layout_height="wrap_content"
          android:text="LinearLayout 2" />
    </LinearLayout>
  </ViewSwitcher>
</LinearLayout>
Activity的代碼:
package com.example.AndroidTest;
import android.app.Activity;
import android.os.Bundle;
import android.view.View;
import android.view.animation.Animation;
import android.view.animation.AnimationUtils;
import android.widget.Button;
import android.widget.ViewSwitcher;
public class MyActivity extends Activity {
  Button buttonPrev, buttonNext;
  ViewSwitcher viewSwitcher;
  Animation slide_in_left, slide_out_right;
  @Override
  protected void onCreate(Bundle savedInstanceState) {
    super.onCreate(savedInstanceState);
    setContentView(R.layout.activity_main);
    buttonPrev = (Button) findViewById(R.id.prev);
    buttonNext = (Button) findViewById(R.id.next);
    viewSwitcher = (ViewSwitcher) findViewById(R.id.viewswitcher);
    slide_in_left = AnimationUtils.loadAnimation(this,
        android.R.anim.slide_in_left);
    slide_out_right = AnimationUtils.loadAnimation(this,
        android.R.anim.slide_out_right);
    viewSwitcher.setInAnimation(slide_in_left);
    viewSwitcher.setOutAnimation(slide_out_right);
    buttonPrev.setOnClickListener(new View.OnClickListener() {
      @Override
      public void onClick(View arg0) {
        viewSwitcher.showPrevious();
      }
    });
    buttonNext.setOnClickListener(new View.OnClickListener() {
      @Override
      public void onClick(View arg0) {
        viewSwitcher.showNext();
      }
    });
    ;
  }
}
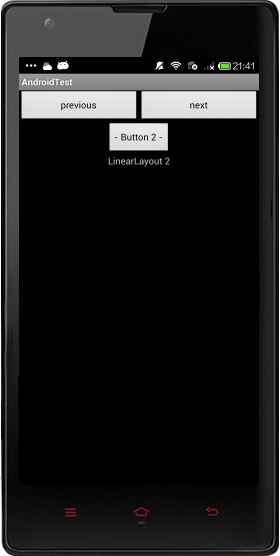
實現效果圖:
使用ViewSwitcher的setFactory設置切換的View,分為兩步。
第一步:獲得ViewSwithcer的實例
switcher = (ViewSwitcher) findViewById(R.id.viewSwitcher);
第二部:實現接口ViewFactory
switcher.setFactory(new ViewFactory()
{
  @Override
  public View makeView()
  {
    return inflater.inflate(R.layout.slidelistview, null);
  }
});
更多關於Android相關內容感興趣的讀者可查看本站專題:《Android開發入門與進階教程》、《Android控件用法總結》、《Android短信與電話操作技巧匯總》及《Android多媒體操作技巧匯總(音頻,視頻,錄音等)》
希望本文所述對大家Android程序設計有所幫助。
 Android:長按連續響應的Button
在電商類app的購物車頁面,經常會有這樣的需求:長按“+”按鈕或者“-”按鈕時,購物車中的商品數量連續的增加或減少。本例的
 Android中直播視頻技術探究之---視頻直播服務端環境搭建(Nginx+RTMP)
一、前言前面介紹了Android中視頻直播中的一個重要類ByteBuffer,我們開始動手開發了,因為我們後續肯定是需要直播視頻功能,然後把視頻推流到服務端,本地在進行拉
 Android程序開發之使用PullToRefresh實現下拉刷新和上拉加載
PullToRefresh是一套實現非常好的下拉刷新庫,它支持:1.ListView2.ExpandableListView3.GridView4.WebView等多種常
 Android RxJava使用介紹(四) RxJava的操作符
本篇文章繼續介紹以下類型的操作符Observable Utility Operators(Observable的功能性操作符) Conditional and Boole