編輯:關於android開發
在如今的互聯網時代,微信已是一個超級App。這篇通過ViewPager + Fragment實現一個類似於微信的界面,之前有用FragmentTabHost實現過類似界面,ViewPager的實現方式相對於FragmentTabHost的方式更簡單明了。
ViewPager:
ViewPager繼承自ViewGroup,是一個容器類,可以往裡添加View.
ViewPager的使用很簡單,通過setAdapter()方法設置一個PagerAdapter即可,這個PagerAdapter需要自己寫,實現裡面的一些方法。本篇要和Fragment結合,所以實現的是FragmentPagerAdapter類,FragmentPagerAdapter繼承自PagerAdapter.
ViewPager通過addOnPageChangeListener()方法可以設置一個ViewPager.OnPageChangeListener監聽,當Pager發生變化時就調用相應的方法。
Fragment:
Fragment有自己的生命周期, 有興趣的可以自己通過各種方式研究下(自己打Log看是最簡單的一種方式),這裡就不在贅述。和ViewPager結合,有幾個Pager就需要實現幾個不同的Fragment.
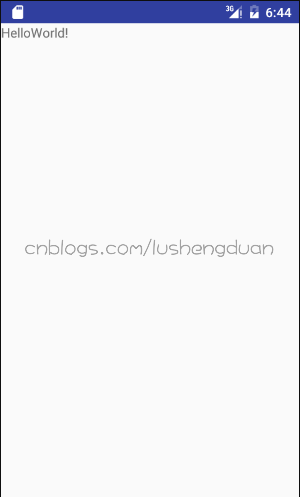
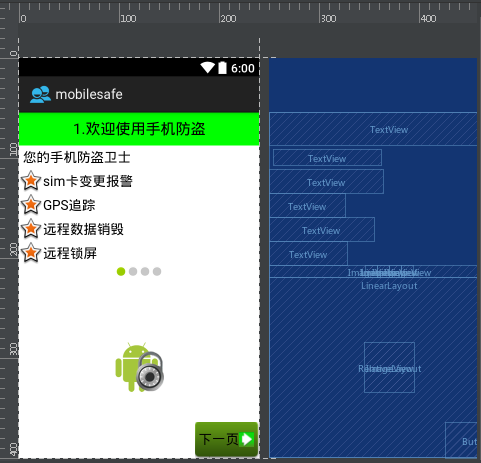
先看一下最後實現的效果圖:

布局上分為三部分:
最上面的layout_top.xml,主要就是上面那個標題,就一個TextView,中間的ViewPager,最下面的layout_bottom.xml包括三個線性布局,每個線性布局包括一個ImageView和TextView.
activity_main.xml:
 1 <?xml version="1.0" encoding="utf-8"?>
 2 <LinearLayout xmlns:android="http://schemas.android.com/apk/res/android"
 3     xmlns:tools="http://schemas.android.com/tools"
 4     android:layout_width="match_parent"
 5     android:layout_height="match_parent"
 6     android:orientation="vertical"
 7     tools:context="com.example.administrator.viewpagerl.MainActivity">
 8
 9     <include layout="@layout/layout_top"></include>
10
11     <android.support.v4.view.ViewPager
12         android:id="@+id/ViewPagerLayout"
13         android:layout_width="match_parent"
14         android:layout_height="match_parent"
15         android:layout_weight="1">
16     </android.support.v4.view.ViewPager>
17
18     <include layout="@layout/layout_bottom"></include>
19
20 </LinearLayout>
layout_top.xml

layout_bottom.xml
上面有提到,ViewPager需要實現一個Pageradapter,很簡單繼承FragmentPagerAdapter,實現裡面的getItem()和getCount()方法即可。
ViewPagerFragmentAdapter .java
 1 package com.example.administrator.viewpagerl;
 2
 3 import android.support.v4.app.Fragment;
 4 import android.support.v4.app.FragmentManager;
 5 import android.support.v4.app.FragmentPagerAdapter;
 6 import android.util.Log;
 7
 8 import java.util.ArrayList;
 9 import java.util.List;
10
11 public class ViewPagerFragmentAdapter extends FragmentPagerAdapter {
12
13     private List<Fragment> mList = new ArrayList<Fragment>();
14     public ViewPagerFragmentAdapter(FragmentManager fm , List<Fragment> list) {
15         super(fm);
16         this.mList = list;
17     }
18
19     @Override
20     public Fragment getItem(int position) {
21         return mList.get(position);
22     }
23
24     @Override
25     public int getCount() {
26         return mList != null ? mList.size() : 0;
27     }
28 }
ViewPager的每個Pager都需要一個Fragment,Fragment會實例化布局,顯示在ViewPager的每個Pager中
ChatFragment.java
 1 package com.example.administrator.fragment;
 2
 3 import android.os.Bundle;
 4 import android.support.annotation.Nullable;
 5 import android.support.v4.app.Fragment;
 6 import android.util.Log;
 7 import android.view.LayoutInflater;
 8 import android.view.View;
 9 import android.view.ViewGroup;
10 import android.widget.TextView;
11
12 import com.example.administrator.viewpagerl.R;
13
14 public class ChatFragment extends Fragment {
15
16     View mView;
17     @Nullable
18     @Override
19     public View onCreateView(LayoutInflater inflater, @Nullable ViewGroup container, @Nullable Bundle savedInstanceState) {
20         if (mView == null) {
21             mView = inflater.inflate(R.layout.fragment_layout,null);
22         }
23         ((TextView)mView.findViewById(R.id.mTextView)).setText("聊天界面");
24         return mView;
25     }
26 }
這裡需要三個Fragment,因為這裡使用的布局很簡單,三個布局基本是一致的,FriendFragment、FindFragment 這裡就都不貼出代碼了。微信裡面的聊天列表,朋友列表都是在Fragment裡面實例化的布局裡有個ListView,通過ListView的方式實現的,這裡只是為了記錄ViewPager就沒有實現那些,有興趣的可以自己搞搞,其實也不難。
在Activity裡面只需要給ViewPager設置上面那個Adapter,設置一個監聽知道Pager如何變化即可。點擊最下面微信、朋友、發現三個按鈕,通過ViewPager的setCurrentItem()方法就能跳轉到對應的Pager,除了這些還有就是通過一些簡單的邏輯,控制一下界面的改變就行,沒有太難的東西。
MainActivity.java
  1 package com.example.administrator.viewpagerl;
  2
  3 import android.support.v4.app.Fragment;
  4 import android.support.v4.app.FragmentManager;
  5 import android.support.v4.view.ViewPager;
  6 import android.support.v7.app.AppCompatActivity;
  7 import android.os.Bundle;
  8 import android.util.Log;
  9 import android.view.View;
 10 import android.widget.LinearLayout;
 11 import android.widget.TextView;
 12
 13 import com.example.administrator.fragment.ChatFragment;
 14 import com.example.administrator.fragment.FindFragment;
 15 import com.example.administrator.fragment.FriendFragment;
 16
 17 import java.util.ArrayList;
 18 import java.util.List;
 19
 20 public class MainActivity extends AppCompatActivity implements View.OnClickListener {
 21
 22     private static final String TAG = "MainActivity.TAG";
 23     TextView titleTextView;
 24     public LinearLayout firstLinearLayout;
 25     public LinearLayout secondLinearLayout;
 26     public LinearLayout threeLinearLayout;
 27     ViewPager mViewPager;
 28     ViewPagerFragmentAdapter mViewPagerFragmentAdapter;
 29     FragmentManager mFragmentManager;
 30
 31     String[] titleName = new String[] {"微信","朋友","發現"};
 32     List<Fragment> mFragmentList = new ArrayList<Fragment>();
 33     @Override
 34     protected void onCreate(Bundle savedInstanceState) {
 35         super.onCreate(savedInstanceState);
 36         mFragmentManager = getSupportFragmentManager();
 37         setContentView(R.layout.activity_main);
 38         initFragmetList();
 39         mViewPagerFragmentAdapter = new ViewPagerFragmentAdapter(mFragmentManager,mFragmentList);
 40         initView();
 41         initViewPager();
 42     }
 43
 44     @Override
 45     protected void onResume() {
 46         super.onResume();
 47     }
 48
 49     public void initViewPager() {
 50         mViewPager.addOnPageChangeListener(new ViewPagetOnPagerChangedLisenter());
 51         mViewPager.setAdapter(mViewPagerFragmentAdapter);
 52         mViewPager.setCurrentItem(0);
 53         titleTextView.setText(titleName[0]);
 54         updateBottomLinearLayoutSelect(true,false,false);
 55     }
 56
 57     public void initFragmetList() {
 58         Fragment chat = new ChatFragment();
 59         Fragment friend = new FriendFragment();
 60         Fragment find = new FindFragment();
 61         mFragmentList.add(chat);
 62         mFragmentList.add(friend);
 63         mFragmentList.add(find);
 64     }
 65
 66     public void initView() {
 67         titleTextView = (TextView) findViewById(R.id.ViewTitle);
 68         mViewPager = (ViewPager) findViewById(R.id.ViewPagerLayout);
 69         firstLinearLayout = (LinearLayout) findViewById(R.id.firstLinearLayout);
 70         firstLinearLayout.setOnClickListener(this);
 71         secondLinearLayout = (LinearLayout) findViewById(R.id.secondLinearLayout);
 72         secondLinearLayout.setOnClickListener(this);
 73         threeLinearLayout = (LinearLayout) findViewById(R.id.threeLinearLayout);
 74         threeLinearLayout.setOnClickListener(this);
 75     }
 76
 77     @Override
 78     public void onClick(View v) {
 79         switch (v.getId()) {
 80             case R.id.firstLinearLayout:
 81                 mViewPager.setCurrentItem(0);
 82                 updateBottomLinearLayoutSelect(true,false,false);
 83                 break;
 84             case R.id.secondLinearLayout:
 85                 mViewPager.setCurrentItem(1);
 86                 updateBottomLinearLayoutSelect(false,true,false);
 87                 break;
 88             case R.id.threeLinearLayout:
 89                 mViewPager.setCurrentItem(2);
 90                 updateBottomLinearLayoutSelect(false,false,true);
 91                 break;
 92             default:
 93                 break;
 94         }
 95     }
 96     private void updateBottomLinearLayoutSelect(boolean f, boolean s, boolean t) {
 97         firstLinearLayout.setSelected(f);
 98         secondLinearLayout.setSelected(s);
 99         threeLinearLayout.setSelected(t);
100     }
101     class ViewPagetOnPagerChangedLisenter implements ViewPager.OnPageChangeListener {
102         @Override
103         public void onPageScrolled(int position, float positionOffset, int positionOffsetPixels) {
104 //            Log.d(TAG,"onPageScrooled");
105         }
106         @Override
107         public void onPageSelected(int position) {
108             Log.d(TAG,"onPageSelected");
109             boolean[] state = new boolean[titleName.length];
110             state[position] = true;
111             titleTextView.setText(titleName[position]);
112             updateBottomLinearLayoutSelect(state[0],state[1],state[2]);
113         }
114         @Override
115         public void onPageScrollStateChanged(int state) {
116             Log.d(TAG,"onPageScrollStateChanged");
117         }
118     }
119 }
其實就這麼簡單,只要動動手很容易實現的。有什麼不對的地方,還望大神指點。
 Android 連接webservice(利用谷歌提供的jar包),androidwebservice
Android 連接webservice(利用谷歌提供的jar包),androidwebserviceAndroid開發,需要連接webservice,之前就想用谷歌提供
 Android 手機衛士--參照文檔編寫選擇器,android選擇器
Android 手機衛士--參照文檔編寫選擇器,android選擇器本文來實現《Android 手機衛士--導航界面1的布局編寫》中的圖片選擇器部分的代碼。 本文地址:h
 ErrorExecution failed for task 'apptransformClassesWithDexForDebug',classes.dex
ErrorExecution failed for task 'apptransformClassesWithDexForDebug',classes.d
 基於HTML5的WebGL設計漢諾塔3D游戲
基於HTML5的WebGL設計漢諾塔3D游戲在這裡我們將構造一個基於HT for Web的HTML5+JavaScript來實現漢諾塔游戲。http://hightopo