編輯:關於android開發
WebView,在Android開發中,我們總是會遇到,它是Google封裝的,使用WebKit渲染引擎加載顯示網頁。接下來,我們就詳細看看WebView的介紹以及使用。本文是通過Android官網的文檔來解釋說明。(不喜歡的勿噴)
1.WebView
A View that displays web pages. This class is the basis upon which you can roll your own web browser or simply display some online content within your Activity. It uses the WebKit rendering engine to display web pages and includes methods to navigate forward and backward through a history, zoom in and out, perform text searches and more. Note that, in order for your Activity to access the Internet and load web pages in a WebView, you must add the INTERNET permissions to your Android Manifest file:顯示網頁的一個View。這個類是基於在你滾動你自己的web浏覽器或者在Activity總顯示一些網上內容上的。它使用的是WebKit渲染引擎來顯示網頁和包含浏覽歷史、放大和縮小、執行搜索文本等等一些方法。This must be a child of the element. For more information, read Building Web Apps in WebView.
需要注意的時,為了在Activity中使用網絡權限和在WebView中加載網頁,你必須在你的Android Manifest file.xml文件中添加使用網絡的權限:...
這必須是一個子元素。
Basic usage

By default, a WebView provides no browser-like widgets, does not enable
JavaScript and web page errors are ignored. If your goal is only to
display some HTML as a part of your UI, this is probably fine;
the user won't need to interact with the web page beyond reading it,
and the web page won't need to interact with the user. If you actually
want a full-blown web browser, then you probably want to invoke the
Browser application with a URL Intent rather than show it with a WebView. For example:

 Uri uri = Uri.parse("http://www.example.com");
 Intent intent = new Intent(Intent.ACTION_VIEW, uri);
 startActivity(intent);

See Intent for more information.
基本使用
默認情況下,一個WebView提供的是不像浏覽器的控件,沒有開啟JavaScript並且忽略網頁錯誤。如果你的目的是僅僅顯示一些HTML作為你的UI的一部分,那顯示可能是沒有問題的(顯示正常),用戶不需要交互的網頁無法閱讀,並且網頁不需要和用戶交互。如果你真的想要一個完整的Web浏覽器,那你可能需要調用浏覽器應用程序通過一個URL Intent而不是顯示一個WebView,例如:... 查看Intent的更多信息。
To provide a WebView in your own Activity, include a在你的Activity中提供一個WebView,可以在你的布局文件中包含in your layout, or set the entire Activity window as a WebView during onCreate(): WebView webview = new WebView(this); setContentView(webview); Then load the desired web page: // Simplest usage: note that an exception will NOT be thrown // if there is an error loading this page (see below). webview.loadUrl("http://slashdot.org/"); // OR, you can also load from an HTML string: String summary = "You scored 192 points."; webview.loadData(summary, "text/html", null); // ... although note that there are restrictions on what this HTML can do. // See the JavaDocs for loadData() and loadDataWithBaseURL() for more info.
 A WebView has several customization points where you can add your own behavior. These are:
Creating and setting a WebChromeClient subclass. This class is called
 when something that might impact a browser UI happens, for instance,
 progress updates and JavaScript alerts are sent here (see Debugging Tasks).
Creating and setting a WebViewClient subclass. It will be called when
things happen that impact the rendering of the content, eg, errors or
form submissions. You can also intercept URL loading here (via shouldOverrideUrlLoading()).
Modifying the WebSettings, such as enabling JavaScript with setJavaScriptEnabled().
Injecting Jaa objects into the WebView using the addJavascriptInterface
(Object, String) method. This method allows you to inject Java objects into
a page's JavaScript context, so that they can be accessed by JavaScript in the page.
WebView有幾個可以自定義的地方,你可以添加屬於你自己的行為。這些有:
創建和設置一個WebChromeClient 子類。這個類被調用時,可能會影響浏覽器UI的,例如,進度更新和發送JavaScript 警告(見調試任務)。
創建和設置一個WebViewClient 子類,這將被調用時對渲染內容產生影響,例如,錯誤或者表單提交。你可以攔截URL加載在這兒(via shouldOverrideUrlLoading())。
修改WebSettings,例如開啟JavaScript 通過setJavaScriptEnabled()。
注入Java對象到WebView通過addJavascriptInterface(Object, String)方法。這個方法允許你注入一個Java對象到網頁的JavaScript 的上下文,以便它們訪問在頁面中的JavaScript 。
Here's a more complicated example, showing error handling, settings, and progress notification:

 // Let's display the progress in the activity title bar, like the
 // browser app does.
 getWindow().requestFeature(Window.FEATURE_PROGRESS);

 webview.getSettings().setJavaScriptEnabled(true);

 final Activity activity = this;
 webview.setWebChromeClient(new WebChromeClient() {
   public void onProgressChanged(WebView view, int progress) {
     // Activities and WebViews measure progress with different scales.
     // The progress meter will automatically disappear when we reach 100%
     activity.setProgress(progress * 1000);
   }
 });
 webview.setWebViewClient(new WebViewClient() {
   public void onReceivedError(WebView view, int errorCode, String description, String failingUrl) {
     Toast.makeText(activity, "Oh no! " + description, Toast.LENGTH_SHORT).show();
   }
 });

 webview.loadUrl("http://developer.android.com/");
這裡有一些更復雜的例子,顯示錯誤處理、設置和進度通知:...
Zoom

To enable the built-in zoom, set WebSettings.setBuiltInZoomControls(boolean)
(introduced in API level CUPCAKE).
NOTE: Using zoom if either the height or width is set to WRAP_CONTENT may
lead to undefined behavior and should be avoided.
縮放
啟用內置的縮放,需要設置WebSettings.setBuiltInZoomControls(boolean)(包含的api版本是CUPCAKE)。
注:使用縮放如果寬高都設置為WRAP_CONTENT,可能會導致不可預知的行為,所以應當避免。
Cookie and window management

For obvious security reasons, your application has its own cache, cookie store etc.
—it does not share the Browser application's data.
By default, requests by the HTML to open new windows are ignored. This is true
whether they be opened by JavaScript or by the target attribute on a link.
You can customize your WebChromeClient to provide your own behaviour for opening
 multiple windows, and render them in whatever manner you want.
The standard behavior for an Activity is to be destroyed and recreated when
 the device orientation or any other configuration changes. This will cause
 the WebView to reload the current page. If you don't want that,
 you can set your Activity to handle the orientation and keyboardHidden changes,
 and then just leave the WebView alone. It'll automatically re-orient itself as
 appropriate. Read Handling Runtime Changes for more information about how
 to handle configuration changes during runtime.
Cookie 和窗口管理
出於安全的原因,你的應用程序有它的緩存、cookie 存貯等。-它不共享浏覽器應用程序的數據。
默認情況下,通過HTML 請求打開一個新窗口是被忽略的,不管是通過JavaScript 打開還是通過目標屬性連接,這都是對的。你可以定制你的WebChromeClient 用來提供你自己的行為為打開多個窗口,並使其以任何你想要的方式。一個Activity 的標准行為是銷毀和重建當設備屏幕方向發生變化或者其他配置改變時。這將引起WebView 去重新加載當前的頁面。如果你不想這樣,那麼你可以設置Activity 去處理orientation和keyboardHidden 改變,僅僅留下WebView 。它會自動重定向合適的自己。讀取處理運行時更改更過信息關於如何處理在運行時配置改變。
Building web pages to support different screen densities

The screen density of a device is based on the screen resolution. A screen with
low density has fewer available pixels per inch, where a screen with high density
 has more — sometimes significantly more — pixels per inch. The density of a screen
 is important because, other things being equal, a UI element (such as a button)
 whose height and width are defined in terms of screen pixels will appear larger
 on the lower density screen and smaller on the higher density screen. For simplicity,
 Android collapses all actual screen densities into three generalized densities: high,
 medium, and low.
By default, WebView scales a web page so that it is drawn at a size that matches the
default appearance on a medium density screen. So, it applies 1.5x scaling on a high
 density screen (because its pixels are smaller) and 0.75x scaling on a low density
 screen (because its pixels are bigger). Starting with API level ECLAIR, WebView supports
 DOM, CSS, and meta tag features to help you (as a web developer) target screens with
 different screen densities.
構建網頁適配不同屏幕密度
一個設備的屏幕密度是基於屏幕分辨率。一個低密度的屏幕每英寸有較少的像素,一個高密度的屏幕有較多-有時候更多-每英寸的像素。一個平面的密度是很重要的,在其他的條件相同下,一個UI元素(例如一個按鈕)在定義高度和寬度時,通過設置屏幕像素,在低密度的屏幕顯示較大,而在高密度的屏幕顯示較小。為了簡單,Android 定義所有屏幕密度為三個廣義的密度:高,中,低。
默認情況下,WebView 縮放一個網頁是為了畫一個大小匹配默認顯示中等密度屏幕。因此,它適用於1.5倍比例在高密度屏幕(因為它的像素比較小),0.75倍的比例在低密度屏幕(因為它的像素較大)。從ECLAIR的API開始,WebView 支持DOM、CSS和meta 標簽幫助你(作為一個網頁開發者)實現屏幕適配在不同屏幕密度。
Here's a summary of the features you can use to handle different screen densities:
The window.devicePixelRatio DOM property. The value of this property specifies the
default scaling factor used for the current device. For example, if the value of
 window.devicePixelRatio is "1.0", then the device is considered a medium density
 (mdpi) device and default scaling is not applied to the web page; if the value is "1.5",
 then the device is considered a high density device (hdpi) and the page content is
 scaled 1.5x; if the value is "0.75", then the device is considered a low density device
 (ldpi) and the content is scaled 0.75x.
The -webkit-device-pixel-ratio CSS media query. Use this to specify the screen densities
for which this style sheet is to be used. The corresponding value should be either "0.75",
 "1", or "1.5", to indicate that the styles are for devices with low density, medium density,
 or high density screens, respectively. For example:
The hdpi.css stylesheet is only used for devices with a screen pixel ration of 1.5, which is the high density pixel ratio.這是一個處理不同屏幕密度的功能摘要:
window.devicePixelRatio DOM的屬性,它的屬性值用於指定當前設備的默認縮放比例。例如,window.devicePixelRatio的值是1.0,那麼設備被認為是一個中密度(mdpi)設備並且默認縮放不適配與網頁;如果,它的值是1.5,那麼設備被認為是一個高設備(hdpi)並且網頁內容放大1.5倍;如果它的值是0.75,那麼設備被認為是低密度設備(ldpi)並且內容是0.75倍。
-webkit-device-pixel-ratioCSS媒體查詢。使用這個來指定屏幕密度使用該樣式表。相應的值是0.75,1,1.5,分別來表示設備的樣式是低密度、中密度和高密度。例如:...
hdpi.css 樣式僅僅用於設備像素比例是1.5,是一個高密度像素比例。
HTML5 Video support

In order to support inline HTML5 video in your application you need to have hardware acceleration turned on.
HTML5視頻支持
為了支持HTML5視頻在你的應用程序中,你需要打開一個硬件加速開關。
Full screen support
In order to support full screen — for video or other HTML content — you need to set
 a WebChromeClient and implement both onShowCustomView(View, WebChromeClient.CustomViewCallback)
 and onHideCustomView(). If the implementation of either of these two methods is missing then
 the web contents will not be allowed to enter full screen. Optionally you can implement
 getVideoLoadingProgressView() to customize the View displayed whilst a video is loading.
全屏支持
為了支持全屏-一個視頻或者HTML 內容-你需要設置一個WebChromeClient 並且實現onShowCustomView(View, WebChromeClient.CustomViewCallback)和onHideCustomView()。如果這方法有任何一個沒有實現,那麼網頁內容不會允許進入全屏。你也可以實現getVideoLoadingProgressView()在定義View的時候同時加載視頻。
2.使用WebView構建一個web應用
If you want to deliver a web application (or just a web page) as a part of a client
 application, you can do it using WebView. The WebView class is an extension
 of Android's View class that allows you to display web pages as a part of your
 activity layout. It does not include any features of a fully developed web browser,
 such as navigation controls or an address bar. All that WebView does, by default, is show a web page.
如果你想用一個web應用(或者一個網頁)作為一個客戶端應用的一部分,那麼你可以使用WebView。WebView類繼承了android的View,它允許你顯示網頁作為你的Activity布局的一部分。它不包含一個完全開發的web浏覽器,例如導航欄和地址欄。所有的WebView,默認情況下,顯示的都是一個網頁。
A common scenario in which using WebView is helpful is when you want to provide
 information in your application that you might need to update, such as an end-user
 agreement or a user guide. Within your Android application, you can create an
 Activity that contains a WebView, then use that to display your document that's hosted online.
一個常見的場景,使用WebView時有用的,當你想提供在你的應用中,你可能需要更新,例如最終用戶協議或者用戶指南。在你的應用中,你可以創建一個Activity包含一個WebView,用它來顯示你的文檔在主機。
Another scenario in which WebView can help is if your application provides data to the user
 that always requires an Internet connection to retrieve data, such as email. In this case,
 you might find that it's easier to build a WebView in your Android application that shows
 a web page with all the user data, rather than performing a network request, then parsing
 the data and rendering it in an Android layout. Instead, you can design a web page that's
 tailored for Android devices and then implement a WebView in your Android application that loads the web page.
另為一個場景,WebView可以幫助如果你的應用提供數據為用戶,那麼它總是需要網絡連接請求來獲取數據,例如email.在這種情況下,你可能會發現在你的Android應用中建立一個WebView更容易顯示網頁為所有的用戶數據,而不是執行一個網絡請求,解析數據和渲染Android布局。相反的,你可以設計一個網頁專為Android設備並且實現一個WebView在你的應用中來加載網頁。
This document shows you how to get started with WebView and how to do some additional things,
 such as handle page navigation and bind JavaScript from your web page to client-side code in your Android application.
這篇文章顯示你如何開始使用WebView,以及做一些額外的事情,例如處理網頁導航和結合JavaScript從你的網頁客戶端代碼在你的Android應用。
Adding a WebView to Your Application To add a WebView to your Application, simply include the添加一個WebView在你的應用element in your activity layout. For example, here's a layout file in which the WebView fills the screen:
添加一個WebView在你的應用中,簡單包含一個WebView元素在你的activity布局中。例如,這個布局文件的WebView充滿整個屏幕。...
To load a web page in the WebView, use loadUrl(). For example:

WebView myWebView = (WebView) findViewById(R.id.webview);
myWebView.loadUrl("http://www.example.com");
在WebView中加載一個網頁,使用loadUrl()方法,例如:...
Before this will work, however, your application must have access to the Internet. To get Internet access, request the INTERNET permission in your manifest file. For example:然而,在將要工作前,你的應用必須有網絡權限。為了得到網絡權限,需要在你的manifest文件中有網絡請求。例如:...That's all you need for a basic WebView that displays a web page. ...
這是所有你需要的一個基本的WebView顯示一個網頁。
Using JavaScript in WebView
If the web page you plan to load in your WebView use JavaScript,
you must enable JavaScript for your WebView. Once JavaScript is enabled,
you can also create interfaces between your application code and your JavaScript code.
在WebView中使用JavaScript
如果你計劃的網頁加載在你的WebView要使用JavaScript,那麼你必須在WebView中開啟JavaScript。一旦JavaScript開啟,你就可以在你的應用代碼和你的JavaScript代碼創建接口。
Enabling JavaScript
JavaScript is disabled in a WebView by default. You can enable it through
the WebSettings attached to your WebView. You can retrieve WebSettings with
getSettings(), then enable JavaScript with setJavaScriptEnabled().
For example:
WebView myWebView = (WebView) findViewById(R.id.webview);
WebSettings webSettings = myWebView.getSettings();
webSettings.setJavaScriptEnabled(true);
開啟JavaScript
在WebView中JavaScript默認是禁止的。你要開啟可以通過WebSettings附屬在你的WebView。你可以通過getSettings()方法獲取到WebSettings,通過setJavaScriptEnabled()開啟JavaScript。例如:...
WebSettings provides access to a variety of other settings that you might
 find useful. For example, if you're developing a web application that's
 designed specifically for the WebView in your Android application, then
 you can define a custom user agent string with setUserAgentString(),
 then query the custom user agent in your web page to verify that the
 client requesting your web page is actually your Android application.
WebSettings 提供了大量的其他設置,你可能會使用到。例如,如果你開發一個web應用專為WebView在你的Android應用,那麼你可以自定義用戶代理字符串通過setUserAgentString(),然後在你的網友中查詢自定義用戶代理來驗證客戶端請求在你的網頁實際上是你的Android應用。
Binding JavaScript code to Android code
When developing a web application that's designed specifically for the
WebView in your Android application, you can create interfaces between
your JavaScript code and client-side Android code. For example, your
JavaScript code can call a method in your Android code to display a
Dialog, instead of using JavaScript's alert() function.
構建JavaScript代碼在Android代碼
如果你開發一個web應用專為WebView在你的Android應用,你可以在你的應用代碼和你的JavaScript代碼創建接口。例如,你的JavaScript代碼能調用一個方法在你的Android
代碼來顯示一個對話框,來替代使用JavaScript的對話框方法。
To bind a new interface between your JavaScript and Android code,
call addJavascriptInterface(), passing it a class instance to bind
to your JavaScript and an interface name that your JavaScript can call to access the class.
For example, you can include the following class in your Android application:

public class WebAppInterface {
    Context mContext;

    /** Instantiate the interface and set the context */
    WebAppInterface(Context c) {
        mContext = c;
    }

    /** Show a toast from the web page */
    @JavascriptInterface
    public void showToast(String toast) {
        Toast.makeText(mContext, toast, Toast.LENGTH_SHORT).show();
    }
}
Caution: If you've set your targetSdkVersion to 17 or higher, you must add the
@JavascriptInterface annotation to any method that you want available to your
JavaScript (the method must also be public). If you do not provide the annotation,
the method is not accessible by your web page when running on Android 4.2 or higher.
In this example, the WebAppInterface class allows the web page to create a Toast message,
using the showToast() method.
為了綁定一個新接口在JavaScript 和Android代碼,需要調用addJavascriptInterface()方法,它傳遞一個類的實例來綁定你的JavaScript並且接口的名字是你的JavaScript可以調用訪問類。例如,在你的Android應用中包含一個下面這個類:...
注意:如果你設置你的targetSdkVersion 是17或者更高,那麼你必須添加@JavascriptInterface注釋在任何你想提供給你的JavaScript的方法(方法必須是公用的)。如果你不能提供這個注釋,那麼該方法不能訪問在你的網頁中當運行在Android4.2或者更高版本。這個例子,WebAppInterface類運行網頁創建一個Toast消息,使用showToast()方法。
You can bind this class to the JavaScript that runs in your WebView with
addJavascriptInterface() and name the interface Android. For example:
WebView webView = (WebView) findViewById(R.id.webview);
webView.addJavascriptInterface(new WebAppInterface(this), "Android");
This creates an interface called Android for JavaScript running in the WebView.
At this point, your web application has access to the WebAppInterface class.
For example, here's some HTML and JavaScript that creates a toast message using
the new interface when the user clicks a button:


There's no need to initialize the Android interface from JavaScript. The WebView
automatically makes it available to your web page. So, at the click of the button,
the showAndroidToast() function uses the Android interface to call the WebAppInterface.showToast() method.

Note: The object that is bound to your JavaScript runs in another thread and not in the thread in which it was constructed.
Caution: Using addJavascriptInterface() allows JavaScript to control your Android application.
This can be a very useful feature or a dangerous security issue. When the HTML in the WebView
is untrustworthy (for example, part or all of the HTML is provided by an unknown person or process),
then an attacker can include HTML that executes your client-side code and possibly any code of the
attacker's choosing. As such, you should not use addJavascriptInterface() unless you wrote all of
the HTML and JavaScript that appears in your WebView. You should also not allow the user to navigate
to other web pages that are not your own, within your WebView (instead, allow the user's default
browser application to open foreign links—by default, the user's web browser opens all URL links,
so be careful only if you handle page navigation as described in the following section).
你可以綁定這個類的JavaScript在運行你的WebView通過addJavascriptInterface()和接口名稱是Android。例如,...
這個創建了一個接口調用Android的JavaScript運行WebView時,在這一點上,你的web應用可以訪問WebAppInterface 類。例如,下面是一些HTML 和 JavaScript在創建一個toast消息使用新接口當用戶點擊按鈕:...
這裡沒有必要初始化Android的JavaScript接口。WebView自動編譯時你的網頁可以使用。因此,在點擊按鈕的時候,showAndroidToast()方法使用Android接口去調用WebAppInterface.showToast()方法。
注:對象綁定在你的JavaScript 運行在另外的一個線程,不是一個構建的線程。
警告:使用addJavascriptInterface()方法運行JavaScript來控制你的Android應用。這可能是一個非常有用的功能或者一個危險的安全問題。當WebView的HTML是一個不可信賴的(例如,HTML的一部分或者全部的提供者是一個不可知的人或者進程),然後,攻擊者可以包含HTML去執行你的客戶端一邊的代碼和攻擊者選擇的任何代碼
。因此,你不應該使用addJavascriptInterface()除非你寫的所有的HTML 和 JavaScript都出現在你的WebView中。你也不應該用戶浏覽其他不屬於你的網頁,使用你的WebView(相反,在默認情況下,運行用戶的默認浏覽器打開國外連接,用戶的web浏覽器打開所有連接,因此要小心如果僅僅你處理網頁導航遵循下面的描述)
Handling Page Navigation
When the user clicks a link from a web page in your WebView, the default behavior is for Android to
launch an application that handles URLs. Usually, the default web browser opens and loads the
destination URL. However, you can override this behavior for your WebView, so links open within your
WebView. You can then allow the user to navigate backward and forward through their web page history that's maintained by your WebView.

To open links clicked by the user, simply provide a WebViewClient for your WebView,
using setWebViewClient(). For example:

WebView myWebView = (WebView) findViewById(R.id.webview);
myWebView.setWebViewClient(new WebViewClient());
That's it. Now all links the user clicks load in your WebView.

If you want more control over where a clicked link load, create your own WebViewClient
that overrides the shouldOverrideUrlLoading() method. For example:

private class MyWebViewClient extends WebViewClient {
    @Override
    public boolean shouldOverrideUrlLoading(WebView view, String url) {
        if (Uri.parse(url).getHost().equals("www.example.com")) {
            // This is my web site, so do not override; let my WebView load the page
            return false;
        }
        // Otherwise, the link is not for a page on my site, so launch another Activity that handles URLs
        Intent intent = new Intent(Intent.ACTION_VIEW, Uri.parse(url));
        startActivity(intent);
        return true;
    }
}
Then create an instance of this new WebViewClient for the WebView:

WebView myWebView = (WebView) findViewById(R.id.webview);
myWebView.setWebViewClient(new MyWebViewClient());
Now when the user clicks a link, the system calls shouldOverrideUrlLoading(), which checks
whether the URL host matches a specific domain (as defined above). If it does match, then
the method returns false in order to not override the URL loading (it allows the WebView
to load the URL as usual). If the URL host does not match, then an Intent is created to
launch the default Activity for handling URLs (which resolves to the user's default web browser).
頁面導航處理
當用戶從網頁上點擊一個連接在你的WebView,默認行為,Android會啟動一個應用去處理這個URLs。然而,你可以重新這個方法,使連接通過你的WebView打開。你可以允許用戶向前或者向後浏覽保存在你的WebView中歷史。
用戶打開連接,只是提供一個WebViewClient在你的WebView,使用setWebViewClient()。例如:...
就是這樣。用戶點擊所有的連接都是通過你的WebView加載。
如果你想要更多的控制點擊連接加載,那麼創建你自己的WebViewClient,並重寫shouldOverrideUrlLoading()方法,例如:...
在WebView創建WebViewClient 實例:...
現在當用戶點擊連接時,系統調用shouldOverrideUrlLoading(),校驗URL主機是否能夠匹配一個特定的域(如上所述)。如果它不匹配,那麼方法返回false,為了不重新URL加載(允許WebView像通常一樣加載URL)。如果URL 主機不匹配,那麼將創建一個Intent 來啟動默認的Activity來處理URLs(該用戶的默認web浏覽器)。
Navigating web page history
When your WebView overrides URL loading, it automatically accumulates a history of
visited web pages. You can navigate backward and forward through the history with goBack() and goForward().
For example, here's how your Activity can use the device Back button to navigate backward:
@Override
public boolean onKeyDown(int keyCode, KeyEvent event) {
    // Check if the key event was the Back button and if there's history
    if ((keyCode == KeyEvent.KEYCODE_BACK) && myWebView.canGoBack()) {
        myWebView.goBack();
        return true;
    }
    // If it wasn't the Back key or there's no web page history, bubble up to the default
    // system behavior (probably exit the activity)
    return super.onKeyDown(keyCode, event);
}
The canGoBack() method returns true if there is actually web page history for the user
to visit. Likewise, you can use canGoForward() to check whether there is a forward history.
If you don't perform this check, then once the user reaches the end of the history, goBack() or goForward() does nothing.
網頁導航歷史
當你的WebView重寫URL加載,它會自動累積浏覽歷史。你可以向後或者向前導航歷史通過goBack()和goForward()。
例如,這是如何在你的Activity中使用設備硬件返回按鈕去導航返回:...
canGoBack()這個方法true,如果用戶浏覽網頁歷史。同樣,你可以使用canGoForward()檢查是否有一個向前的歷史。如果你執行這個檢查,一旦用戶達到歷史結尾,那麼goBack() 和goForward()就沒什麼用。
3.總結
閱讀上面的信息後,相信大家對WebView會有一個新的認識,大家在使用WebView時會更得心應手。這篇文章只是簡單的說明了WebView以及使用。下一篇文章會介紹WebView的主要API。希望對大家有所幫助!(本人水平有限,有錯誤的地方,歡迎大家指出)
 BLE-NRF51822教程3-sdk程序框架剖析
BLE-NRF51822教程3-sdk程序框架剖析nordicBLE 技術交流群498676838本講為框架介紹,不會牽涉到太多代碼細節。 51822的官方SDK其實是
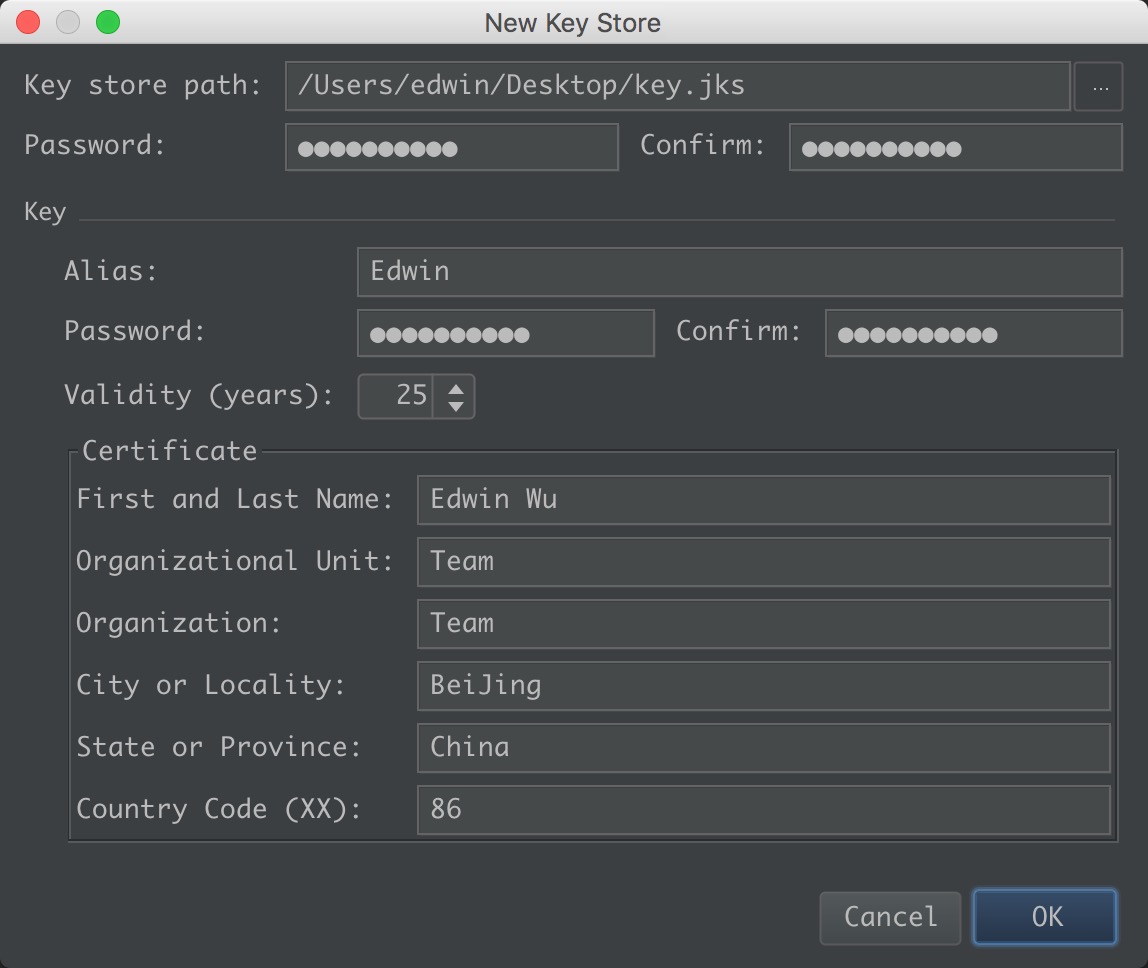 Android Studio 打包簽名發布New Key Store,androidstore
Android Studio 打包簽名發布New Key Store,androidstore Key store path:存放路徑 Key Alias
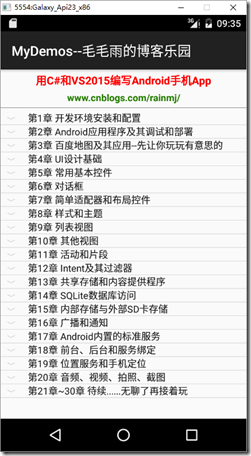 【Android】以後改為在Win10下開發了,androidwin10
【Android】以後改為在Win10下開發了,androidwin10分類:C#、Android、VS2015; 創建日期:2016-02-12 修改日期:2016-0
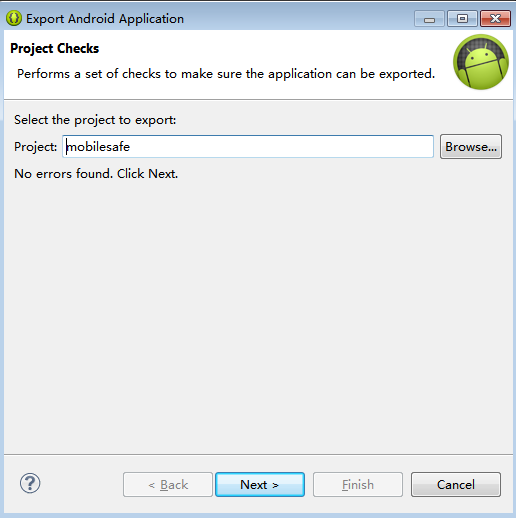 Android 手機衛士--打包生成apk維護到服務器,androidapk
Android 手機衛士--打包生成apk維護到服務器,androidapk項目打包生成apk過程: 1、生成簽名文件,並且指定所在位置 2、使用生成的簽名文件,給工程打