編輯:安卓省電與加速
現在手機上的懸浮窗應用越來越多,對用戶來說,最常見的懸浮窗應用就是安全軟件的懸浮小控件,拿360衛士來說,當開啟懸浮窗時,它是一個小球,小球可以拖動,當點擊小球出現大窗體控件,可以進行進一步的操作如:釋放手機內存等等。於是借著慕課網的視頻,仿著實現了360加速球,增加了點擊小球進行釋放內存的功能。
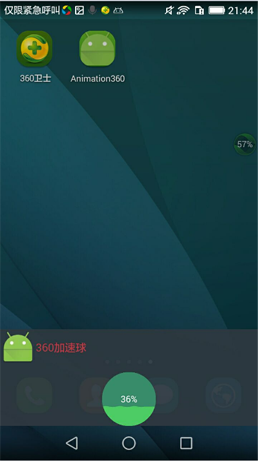
由於是手機只有頻幕截圖:實現後如下圖所示:點擊開啟按鈕,出現懸浮窗小球控件上面顯示手機的可用內存百分比;當拖動小球時,小球變為Android圖標;松開小球,小球依附在頻幕兩側;點擊小球,手機底部出現大窗體控件,點擊裡面的小球,進行手機內存的釋放;點擊手機屏幕的其他區域,大窗體消失,小球重新出現。
效果如下:

接下來就是實現的一些重要步驟:
1.FloatCircleView的實現(自定義view)
實現FloatCircleView的過程就是自定義view的過程。1、自定義View的屬性 2、在View的構造方法中獲得我們自定義的屬性 3、重寫onMesure 4、重寫onDraw。我們沒有自定義其他屬性所以省了好多步驟。
各種變量的初始化,設置拖動小球時要顯示的圖標,已經計算各種內存。(用於顯示在小球上)
 public int width=100;
  public int heigth=100;
  private Paint circlePaint;//畫圓
  private Paint textPaint; //畫字
  private float availMemory; //已用內存
  private float totalMemory; //總內存
  private String text;  //顯示的已用內存百分比
  private boolean isDraging=false; //是否在拖動狀態。
  private Bitmap src;
  private Bitmap scaledBitmap; //縮放後的圖片。
 /**
   * 初始化畫筆以及計算可用內存,總內存,和可用內存百分比。
   */
  public void initPatints() {
    circlePaint = new Paint();
    circlePaint.setColor(Color.CYAN);
    circlePaint.setAntiAlias(true);
    textPaint = new Paint();
    textPaint.setColor(Color.WHITE);
    textPaint.setTextSize(25);
    textPaint.setFakeBoldText(true);
    textPaint.setAntiAlias(true);
    //設置圖片
    src = BitmapFactory.decodeResource(getResources(), R.mipmap.ic_launcher);
    //縮放後的圖片(將圖標設置的和懸浮小球一樣大小。)
    scaledBitmap = Bitmap.createScaledBitmap(src, width, heigth, true);
    //計算已用內存,總內存,已用內存百分比,
    availMemory= (float) getAvailMemory(getContext());
    totalMemory= (float) getTotalMemory(getContext());
    text=(int)((availMemory/totalMemory)*100)+"%";
  }
onMeasure();就是將固定的寬高寫死,通過 setMeasuredDimension(width, heigth);傳入。
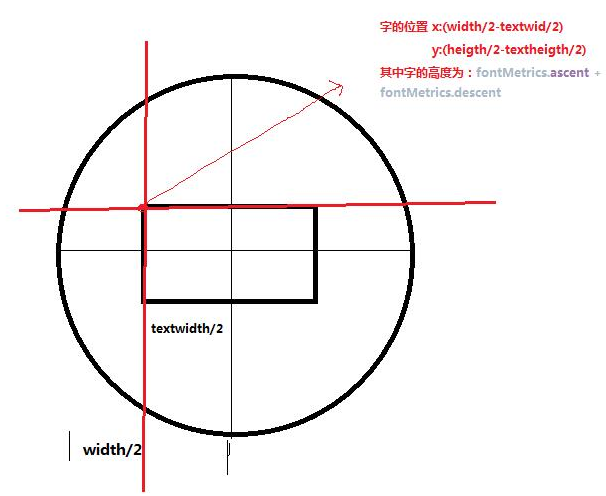
onDraw();進行懸浮小球繪制。定義一個boolean變量判斷當前狀態是否為拖動小球狀態,如果是拖動小球狀態,就在該位置繪制android圖標,如果不是拖動狀態,就進行小球繪制。畫小球沒有難度,關鍵是畫字。下面的2個圖可以加深對畫字時的理解。
1.畫字時的x坐標(1.textPaint.measureText(text);得到字的寬度2.小球的寬度/2-字的寬度/2。)
2.畫字時的y坐標(1.Paint.FontMetrics fontMetrics = textPaint.getFontMetrics();得到字體屬性測量類。2.(fontMetrics.ascent + fontMetrics.descent) / 2 得到字的高度。3.小球的高度/2-字體的高度/2)
畫個圖就很好理解了:
/**
   * 畫小球及文字。如果小球是在拖動狀態就顯示android圖標,如果不是拖動狀態就顯示小球。
   * @param canvas
   */
  @Override
  protected void onDraw(Canvas canvas) {
    if (isDraging){
      canvas.drawBitmap(scaledBitmap,0,0,null);
    }else {
      //1.畫圓
      canvas.drawCircle(width / 2, heigth / 2, width / 2, circlePaint);
      //2.畫text
      float textwidth = textPaint.measureText(text);//文本寬度
      float x = width / 2 - textwidth / 2;
      Paint.FontMetrics fontMetrics = textPaint.getFontMetrics();

      float dy = -(fontMetrics.ascent + fontMetrics.descent) / 2;
      float y = heigth / 2 + dy;
      canvas.drawText(text, x, y, textPaint);
    }


  }
獲得手機已用內存及總內存的方法:
public long getAvailMemory(Context context)
  {
    // 獲取android當前可用內存大小
    ActivityManager am = (ActivityManager) context.getSystemService(Context.ACTIVITY_SERVICE);
    ActivityManager.MemoryInfo mi = new ActivityManager.MemoryInfo();
    am.getMemoryInfo(mi);
    //mi.availMem; 當前系統的可用內存
    //return Formatter.formatFileSize(context, mi.availMem);// 將獲取的內存大小規格化

    return mi.availMem/(1024*1024);
  }
  public long getTotalMemory(Context context)
  {
    String str1 = "/proc/meminfo";// 系統內存信息文件
    String str2;
    String[] arrayOfString;
    long initial_memory = 0;
    try
    {
      FileReader localFileReader = new FileReader(str1);
      BufferedReader localBufferedReader = new BufferedReader(
          localFileReader, 8192);
      str2 = localBufferedReader.readLine();// 讀取meminfo第一行,系統總內存大小
      arrayOfString = str2.split("\\s+");
      for (String num : arrayOfString) {
        Log.i(str2, num + "\t");
      }
      initial_memory = Integer.valueOf(arrayOfString[1]).intValue() * 1024;// 獲得系統總內存,單位是KB,乘以1024轉換為Byte
      localBufferedReader.close();
    } catch (IOException e) {
    }
    //return Formatter.formatFileSize(context, initial_memory);// Byte轉換為KB或者MB,內存大小規格化

    return initial_memory/(1024*1024);
  }
2.創建WindowManager窗體管理類,管理懸浮小球和底部大窗體。
WindowManager類。用來管理整個懸浮小球和手機底部大窗體的顯示和隱藏。
必須在Manifest文件中增加<uses-permission android:name="android.permission.SYSTEM_ALERT_WINDOW" />權限。
通過 WindowManager wm = (WindowManager)getSystemService(Context.WINDOW_SERVICE);獲取窗體管理類;
利用wm.addView(view, params);將view增加到窗體中。
利用wm.remove(view,params);將view從窗體中移除。
利用wm.updateViewLayout(view,params);來更新view.
WindowManager.LayoutParams用來設置view的各種屬性。
1.創建FloatViewManager實例。
//單例模式創建
 public static FloatViewManager getInstance(Context context){
    if (inStance==null){
      synchronized(FloatViewManager.class){
        if (inStance==null){
          inStance=new FloatViewManager(context);
        }
      }
    }
    return inStance;
  }
2.展示懸浮小球和展示底部窗體的方法。(展示窗體的方法同展示懸浮小球類似。)
/**
   * 展示浮窗
   */
  public void showFloatCircleView(){
  //參數設置
    if (params==null){
      params = new WindowManager.LayoutParams();
      //寬高
      params.width=circleView.width;
      params.height=circleView.heigth;
      //對齊方式
      params.gravity= Gravity.TOP|Gravity.LEFT;
      //偏移量
      params.x=0;
      params.y=0;
      //類型
      params.type=WindowManager.LayoutParams.TYPE_TOAST;
      //設置該window屬性。
      params.flags= WindowManager.LayoutParams.FLAG_NOT_FOCUSABLE| WindowManager.LayoutParams.FLAG_NOT_TOUCH_MODAL;
      //像素格式
      params.format= PixelFormat.RGBA_8888;
    }
    //將小球加入窗體中。
    wm.addView(circleView, params);
  }

 public void showFloatCircleView(){
 ......
 }
3.當啟動程序,首先創建懸浮小球,小球可以拖拽,點擊小球,手機底部窗體顯示(FloatMenuView),小球隱藏。所以,對小球(circleView)要對其進行setOnTouchListener和setOnClickListener事件監聽。
分析小球的事件分發; 對於小球:
當ACTION_DOWN時,記錄小球的downX,downY,以及startX,startY,
當ACTION_MOVE時,將circleView是否拖拽狀態置為true,記錄小球的moveX,moveY,計算小球移動的距離(dx,dy),然後根據 wm.updateViewLayout(circleView,params);更新小球位置。最後將最後move的坐標賦值給startX,startY。
當ACTION_UP時,將circleView是否拖拽置為false,記錄抬起時的坐標,upx,根據upx和手機屏幕寬度/2,進行判斷,來覺得最終小球是貼在屏幕左側,還是右側。後面為小球拖拽的誤差。當小球拖拽的距離小於10個像素時,可以觸發小球的點擊事件。(小球的Touch事件,優先於小球的點擊事件,當Touch事件返回true時,此事件被消費,不再向下傳遞事件。當Touch事件返回false時,此事件繼續向下傳遞,從而觸發小球的點擊事件。)
小球的點擊事件:點擊小球,懸浮小球隱藏,手機底部窗體出現。並設置有底部窗體出現時的過渡動畫。
//給circleView設置touch監聽。
  private View.OnTouchListener circleViewOnTouchListener=new View.OnTouchListener() {
    @Override
    public boolean onTouch(View v, MotionEvent event) {
      switch (event.getAction()){
        case MotionEvent.ACTION_DOWN:
        //最後按下時的坐標,根據ACTION_MOVE理解。
          startX = event.getRawX();
          startY = event.getRawY();
          //按下時的坐標。
          downX = event.getRawX();
          downY = event.getRawY();
          break;
        case MotionEvent.ACTION_MOVE:
          circleView.setDrageState(true);
           moveX = event.getRawX();
           moveY=event.getRawY();
          float dx = moveX -startX;
          float dy=moveY-startY;
          params.x+=dx;
          params.y+=dy;
          wm.updateViewLayout(circleView,params);
          startX= moveX;
          startY=moveY;
          break;
        case MotionEvent.ACTION_UP:
          float upx=event.getRawX();
          if (upx>getScreenWidth()/2){
            params.x=getScreenWidth()-circleView.width;
          }else {
            params.x=0;
          }
          circleView.setDrageState(false);
          wm.updateViewLayout(circleView,params);
          if (Math.abs(moveX-downX)>10){
            return true;
          }else {
            return false;
          }
        default:
          break;
      }
      return false;
    }
  };
circleView.setOnTouchListener(circleViewOnTouchListener);
    circleView.setOnClickListener(new View.OnClickListener() {
      @Override
      public void onClick(View v) {
        //Toast.makeText(, "onclick", Toast.LENGTH_SHORT).show();
        //隱藏circleView,顯示菜單欄。
        wm.removeView(circleView);
        showFloatMenuView();
        floatMenuView.startAnimation();
      }
    });
3.MyProgreeView(手機底部窗體中小球的實現)。
1.初始化畫筆,對view進行手勢監聽。監聽單擊和雙擊事件。(必須設置view是可以點擊的)
private void initPaint() {
    //畫圓畫筆
    circlepaint = new Paint();
    circlepaint.setColor(Color.argb(0xff, 0x3a, 0x8c, 0x6c));
    circlepaint.setAntiAlias(true);
    //畫進度條畫筆
    progerssPaint = new Paint();
    progerssPaint.setAntiAlias(true);
    progerssPaint.setColor(Color.argb(0xff, 0x4e, 0xcc, 0x66));
    progerssPaint.setXfermode(new PorterDuffXfermode(PorterDuff.Mode.SRC_IN));//繪制重疊部分
    //畫進度畫筆
    textPaint = new Paint();
    textPaint.setAntiAlias(true);
    textPaint.setColor(Color.WHITE);
    textPaint.setTextSize(25);

    //畫布
    bitmap = Bitmap.createBitmap(width, heigth, Bitmap.Config.ARGB_8888);
    bitmapCanvas = new Canvas(bitmap);
    //手勢監聽。
    gestureDetector = new GestureDetector(new MyGertureDetectorListener());
    setOnTouchListener(new OnTouchListener() {
      @Override
      public boolean onTouch(View v, MotionEvent event) {
        return gestureDetector.onTouchEvent(event);
      }
    });
    //設置view可以點擊。
    setClickable(true);
  }
  class MyGertureDetectorListener extends GestureDetector.SimpleOnGestureListener{
    @Override
    public boolean onDoubleTap(MotionEvent e) {
    ......
     //雙擊事件的邏輯
      return super.onDoubleTap(e);
    }

    @Override
    public boolean onSingleTapConfirmed(MotionEvent e) {
    ......
     //單擊事件的邏輯
      return super.onSingleTapConfirmed(e);
    }
  }
2.用handler交互進行單擊和雙擊事件的狀態更新。單擊時,利用貝塞爾曲線,實現波紋蕩漾效果。雙擊時,波紋不斷下降,進行內存釋放,最後顯示內存釋放後的已用內存百分比。handler發送周期消息,讓單擊事件和雙擊事件的小球不斷進行重繪。(重繪在下一小節講)。
//單擊事件發送周期handler.
private void startSingleTapAnimation() {
    handler.postDelayed(singleTapRunnable,200);
  }
  private SingleTapRunnable singleTapRunnable=new SingleTapRunnable();
  class SingleTapRunnable implements Runnable{
    @Override
    public void run() {
      count--;
      if (count>=0) {
        invalidate();//不斷進行重繪。
        handler.postDelayed(singleTapRunnable,200);
      }else {
        handler.removeCallbacks(singleTapRunnable);
        count=50;
      }
    }
  }
  //雙擊事件發送周期handler。
  private void startDoubleTapAnimation() {
    handler.postDelayed(runnbale,50);
  }
  private DoubleTapRunnable runnbale=new DoubleTapRunnable();

  class DoubleTapRunnable implements Runnable{
    @Override
    public void run() {
      num--;
      if (num>=0){
        invalidate();//不斷進行重繪。
        handler.postDelayed(runnbale,50);
      }else {
        handler.removeCallbacks(runnbale);
        //釋放內存。
       killprocess();
       //計算釋放後的已用內存百分比。
        num=(int)(((float)currentProgress/max)*100);
      }
    }
  }
3.單擊事件和雙擊事件的重繪。
首先是小球的繪制,和波紋路徑的繪制。
//繪制小球
    bitmapCanvas.drawCircle(width / 2, heigth / 2, width / 2, circlepaint);
    //根據path,繪制波紋路徑。每次繪制前將上次的path,reset.
    path.reset();
    float y =(1-(float)num/100)*heigth;
    path.moveTo(width, y);
    path.lineTo(width, heigth);
    path.lineTo(0, heigth);
    path.lineTo(0, y);
接著利用貝塞爾曲線將波紋路徑繪制。
Android-貝塞爾曲線
貝塞爾曲線在android中的應用
這裡有詳細的講解貝塞爾曲線。其實不需要深入的理解。只要知道能用它來實現水波紋效果就行了(貝塞爾曲線用處很多,翻書效果也可以用它實現。)主要利用 path.rQuadTo(x1,y1,x2,y2); 終點(x2,y2),輔助控制點(x1,y1)的貝塞爾曲線。因此,通過不斷改變y1的位置,我們可以繪制出水波紋的效果。
首先判斷它是否為雙擊擊事件:
若是雙擊:設置一個變量d,通過不斷改變d的值(d的值的改變由num引起,而num實在handler中不斷減小的。num–;),來繪制貝塞爾曲線。實現水波紋的下降效果。
若是單擊:設置一個count值,通過不斷改變count值(count值的改變是在handler中實現的。count–;),首先判斷count是否能被2整除,交替繪制這兩條貝塞爾曲線。(這兩條貝塞爾曲線正好相反),從而實現水波蕩漾的效果。
(用for循環是實現水波的波數,一對path.rQuadTo();只能實現一次波紋。可以自己去驗證)
 if (!isSingleTap){
    float d=(1-(float)num/(100/2))*10;
      for (int i=0;i<3;i++){
      path.rQuadTo(10,-d,20,0);
      path.rQuadTo(10,d,20,0);
       }
    }else {
      float d=(float)count/50*10;
      if (count%2==0){
        for (int i=0;i<=3;i++){
          path.rQuadTo(10,-d,30,0);
          path.rQuadTo(10,d,30,0);
        }
      }else {
        for (int i=0;i<=3;i++){
          path.rQuadTo(10,d,30,0);
          path.rQuadTo(10,-d,30,0);
        }

      }
    }
最後是釋放內存的方法。記得要在Manifest文件中增加<uses-permission android:name="android.permission.KILL_BACKGROUND_PROCESSES"/>權限。
public void killprocess(){
    ActivityManager activityManger=(ActivityManager) getContext().getSystemService(Context.ACTIVITY_SERVICE);
    List<ActivityManager.RunningAppProcessInfo> list=activityManger.getRunningAppProcesses();
    if(list!=null)
      for(int i=0;i<list.size();i++)
      {
        ActivityManager.RunningAppProcessInfo apinfo=list.get(i);
        String[] pkgList=apinfo.pkgList;
 if(apinfo.importance>ActivityManager.RunningAppProcessInfo.IMPORTANCE_SERVICE)
        {
          // Process.killProcess(apinfo.pid);
          for(int j=0;j<pkgList.length;j++) {
            boolean flag=pkgList[j].contains("com.example.yyh.animation360");//這裡要判斷是否為當前應用,要不然也可能會結束當前應用。
            if(!flag){
            activityManger.killBackgroundProcesses(pkgList[j]);
          }
          }
        }
      }
4.FloatMenuView的實現。
1.創建一個float_menuview.xml;其中包括一個ImageView+TextView+自定義的MyProgreeView。
底部窗體要被設置能被點擊。android:clickable="true";
<?xml version="1.0" encoding="utf-8"?>
<RelativeLayout xmlns:android="http://schemas.android.com/apk/res/android"
  android:orientation="vertical"
  android:layout_width="match_parent"
  android:layout_height="match_parent"
  android:background="#33000000"
  >
  <LinearLayout
    android:layout_width="match_parent"
    android:layout_height="wrap_content"
    android:orientation="vertical"
    android:background="#F02F3942"
    android:layout_alignParentBottom="true"
    android:id="@+id/ll"
    android:clickable="true"
    >
    <LinearLayout
      android:layout_width="match_parent"
      android:layout_height="wrap_content"
      android:orientation="horizontal"
      >
      <ImageView
        android:layout_width="50dp"
        android:layout_height="50dp"
        android:src="@mipmap/ic_launcher"
        android:layout_gravity="center_vertical"
        />
      <TextView
        android:layout_width="wrap_content"
        android:layout_height="wrap_content"
        android:textSize="15sp"
        android:textColor="#c93944"
        android:text="360加速球"
        android:layout_gravity="center_vertical"
        />
    </LinearLayout>
    <com.example.yyh.animation360.view.MyProgreeView
      android:layout_width="wrap_content"
      android:layout_height="wrap_content"
      android:layout_gravity="center_horizontal"
      android:layout_marginTop="10dp"
      />
  </LinearLayout>
</RelativeLayout>
2.將FloatMenuView 根據條件,利用(wm.addView(view, params);將view增加到窗體中。
利用wm.remove(view,params);將view從窗體中移除。)方法,進行底部窗體view的顯示和隱藏
TranslateAnimation類用來設置底部窗體進入時的動畫效果。TranslateAnimation(int fromXType,float fromXValue,int toXType,float toXValue,int fromYType,float fromYValue,int toYType,float toYValue)
int fromXType:x軸方向起始的參照值有3個選項。(1.Animation.ABSOLUTE:具體的坐標值,指絕對的屏幕像素單位。
2.Animation.RELATIVE_TO_SELF:相對自己的坐標值。3.Animation.RELATIVE_TO_PARENT:相對父容器的坐標值。)
float fromXValue 第二個參數是第一個參數類型的起始值(例如若第一個參數設置為Animation.RELATIVE_TO_SELF,第二個參數為0.1f,就表示為自己的坐標值乘以0.1);
int toXType:x軸方向終點的參照值有3個選項同第一個參數。
float toValue:第四個參數是第三個參數類型的起始值。
Y軸方向的參數同理。起點+終點;(每個參數後一個參數為前一個參數的起始值。)
並對此view設置OnTouchListener,OnTouch事件最後必須返回false,表示此事件仍然需要向下傳遞。從而實現點擊手機其他區域時,手機底部窗體隱藏,懸浮小球顯示,點擊底部窗體時無變化,點擊底部窗體中的小球時,觸發其單擊和雙擊事件。
 View view =View.inflate(getContext(), R.layout.float_menuview,null);
    LinearLayout linearLayout= (LinearLayout) view.findViewById(R.id.ll);
    translateAnimation = new TranslateAnimation(Animation.RELATIVE_TO_SELF,0,Animation.RELATIVE_TO_SELF,0,Animation.RELATIVE_TO_SELF,1.0f,Animation.RELATIVE_TO_SELF,0);
    translateAnimation.setDuration(500);
    translateAnimation.setFillAfter(true);
    linearLayout.setAnimation(translateAnimation);
    view.setOnTouchListener(new OnTouchListener() {
      @Override
      public boolean onTouch(View v, MotionEvent event) {
        FloatViewManager manager=FloatViewManager.getInstance(getContext());
        manager.hideFloatMenuView();
        manager.showFloatCircleView();
        return false;
      }
    });
    addView(view);
5.MyFloatService
用來創建FloatVIewManager單例,管理懸浮小球+手機底部窗體的創建和移除。
public class MyFloatService extends Service {
  @Nullable
  @Override
  public IBinder onBind(Intent intent) {
    return null;
  }
  @Override
  public void onCreate() {
    //用來開啟FloatViewManager
    FloatViewManager manager=FloatViewManager.getInstance(this);
    manager.showFloatCircleView();
    super.onCreate();
  }

}
6.MainActivity的實現
定義一個intent,開啟服務(在服務中創建WindowManager單例對象,進行懸浮小球和手機底部窗體的管理。),關閉當前的activity。
public class MainActivity extends AppCompatActivity {
  @Override
  protected void onCreate(Bundle savedInstanceState) {
    super.onCreate(savedInstanceState);
    setContentView(R.layout.activity_main);
  }
  public void startService(View view){
    Intent intent=new Intent(this, MyFloatService.class);
    startService(intent);
    finish();
  }
}
以上就是本文的全部內容,希望對大家的學習有所幫助,也希望大家多多支持本站。
 android自定義組件(手機加速球+水面波動效果)
先看效果本項目實現起來大體上我們分三步講解【1】水面波動效果實現代碼首先畫出波浪線,通過通過貝塞爾曲線 for (int i = 0; i < 20; i++) {
 安卓手機怎麼加速?安卓手機加速教程
目前,安卓系統的手機是最受歡迎的手機,也是目前使用人數最多的手機。只是,安卓系統的智能手機都有一個共同的特點,那就
 Android安卓手機省電技巧
筆者個人的省電方式主要有兩種:1.不獲取手機最高權限的“屌絲”省電法。2.獲取ROOT最高權限,給手機做大手術最到極致省電方法。要記得一點,手機廠
 OPPO Find7省電模式設置方法
OPPO Find7手機省電模式如何開啟?這省電模式對於用戶來說幫助還是很大的,那麼這開啟方式又是什麼呢?一起來看